RapidCompact CLI Setup Guide
RapidPipeline 3D processor (CLI) is the successor of RapidCompact (CLI) - Phase out of active feature support for the RapidCompact CLI is scheduled for v6.20.0, ETA Q2 2025 (going forward after that bug fix patch releases will still occure on a regular basis).
Installation & Set-Up
Download
In order to obtain the RapidCompact CLI package for the OS of your choice, navigate to https://app.rapidcompact.com/cli.
In order to run RapidCompact, you will need an rpd_account.json file on your computer as well as an account with an Enterprise Plan on https://app.rapidcompact.com and a valid API token. Start with the account file first:
Account File Setup
Please download the file here. It then can be put in a place of your choosing, we would recommend creating a “rapidcompact” folder in your root directory. For example on windows this would be:
C:\rapidcompact\rpd_account.json
Windows
Here are the steps to set it up on Windows:
- Navigate to control panel / System&Security / System / Advanced System Settings / Environment Variables
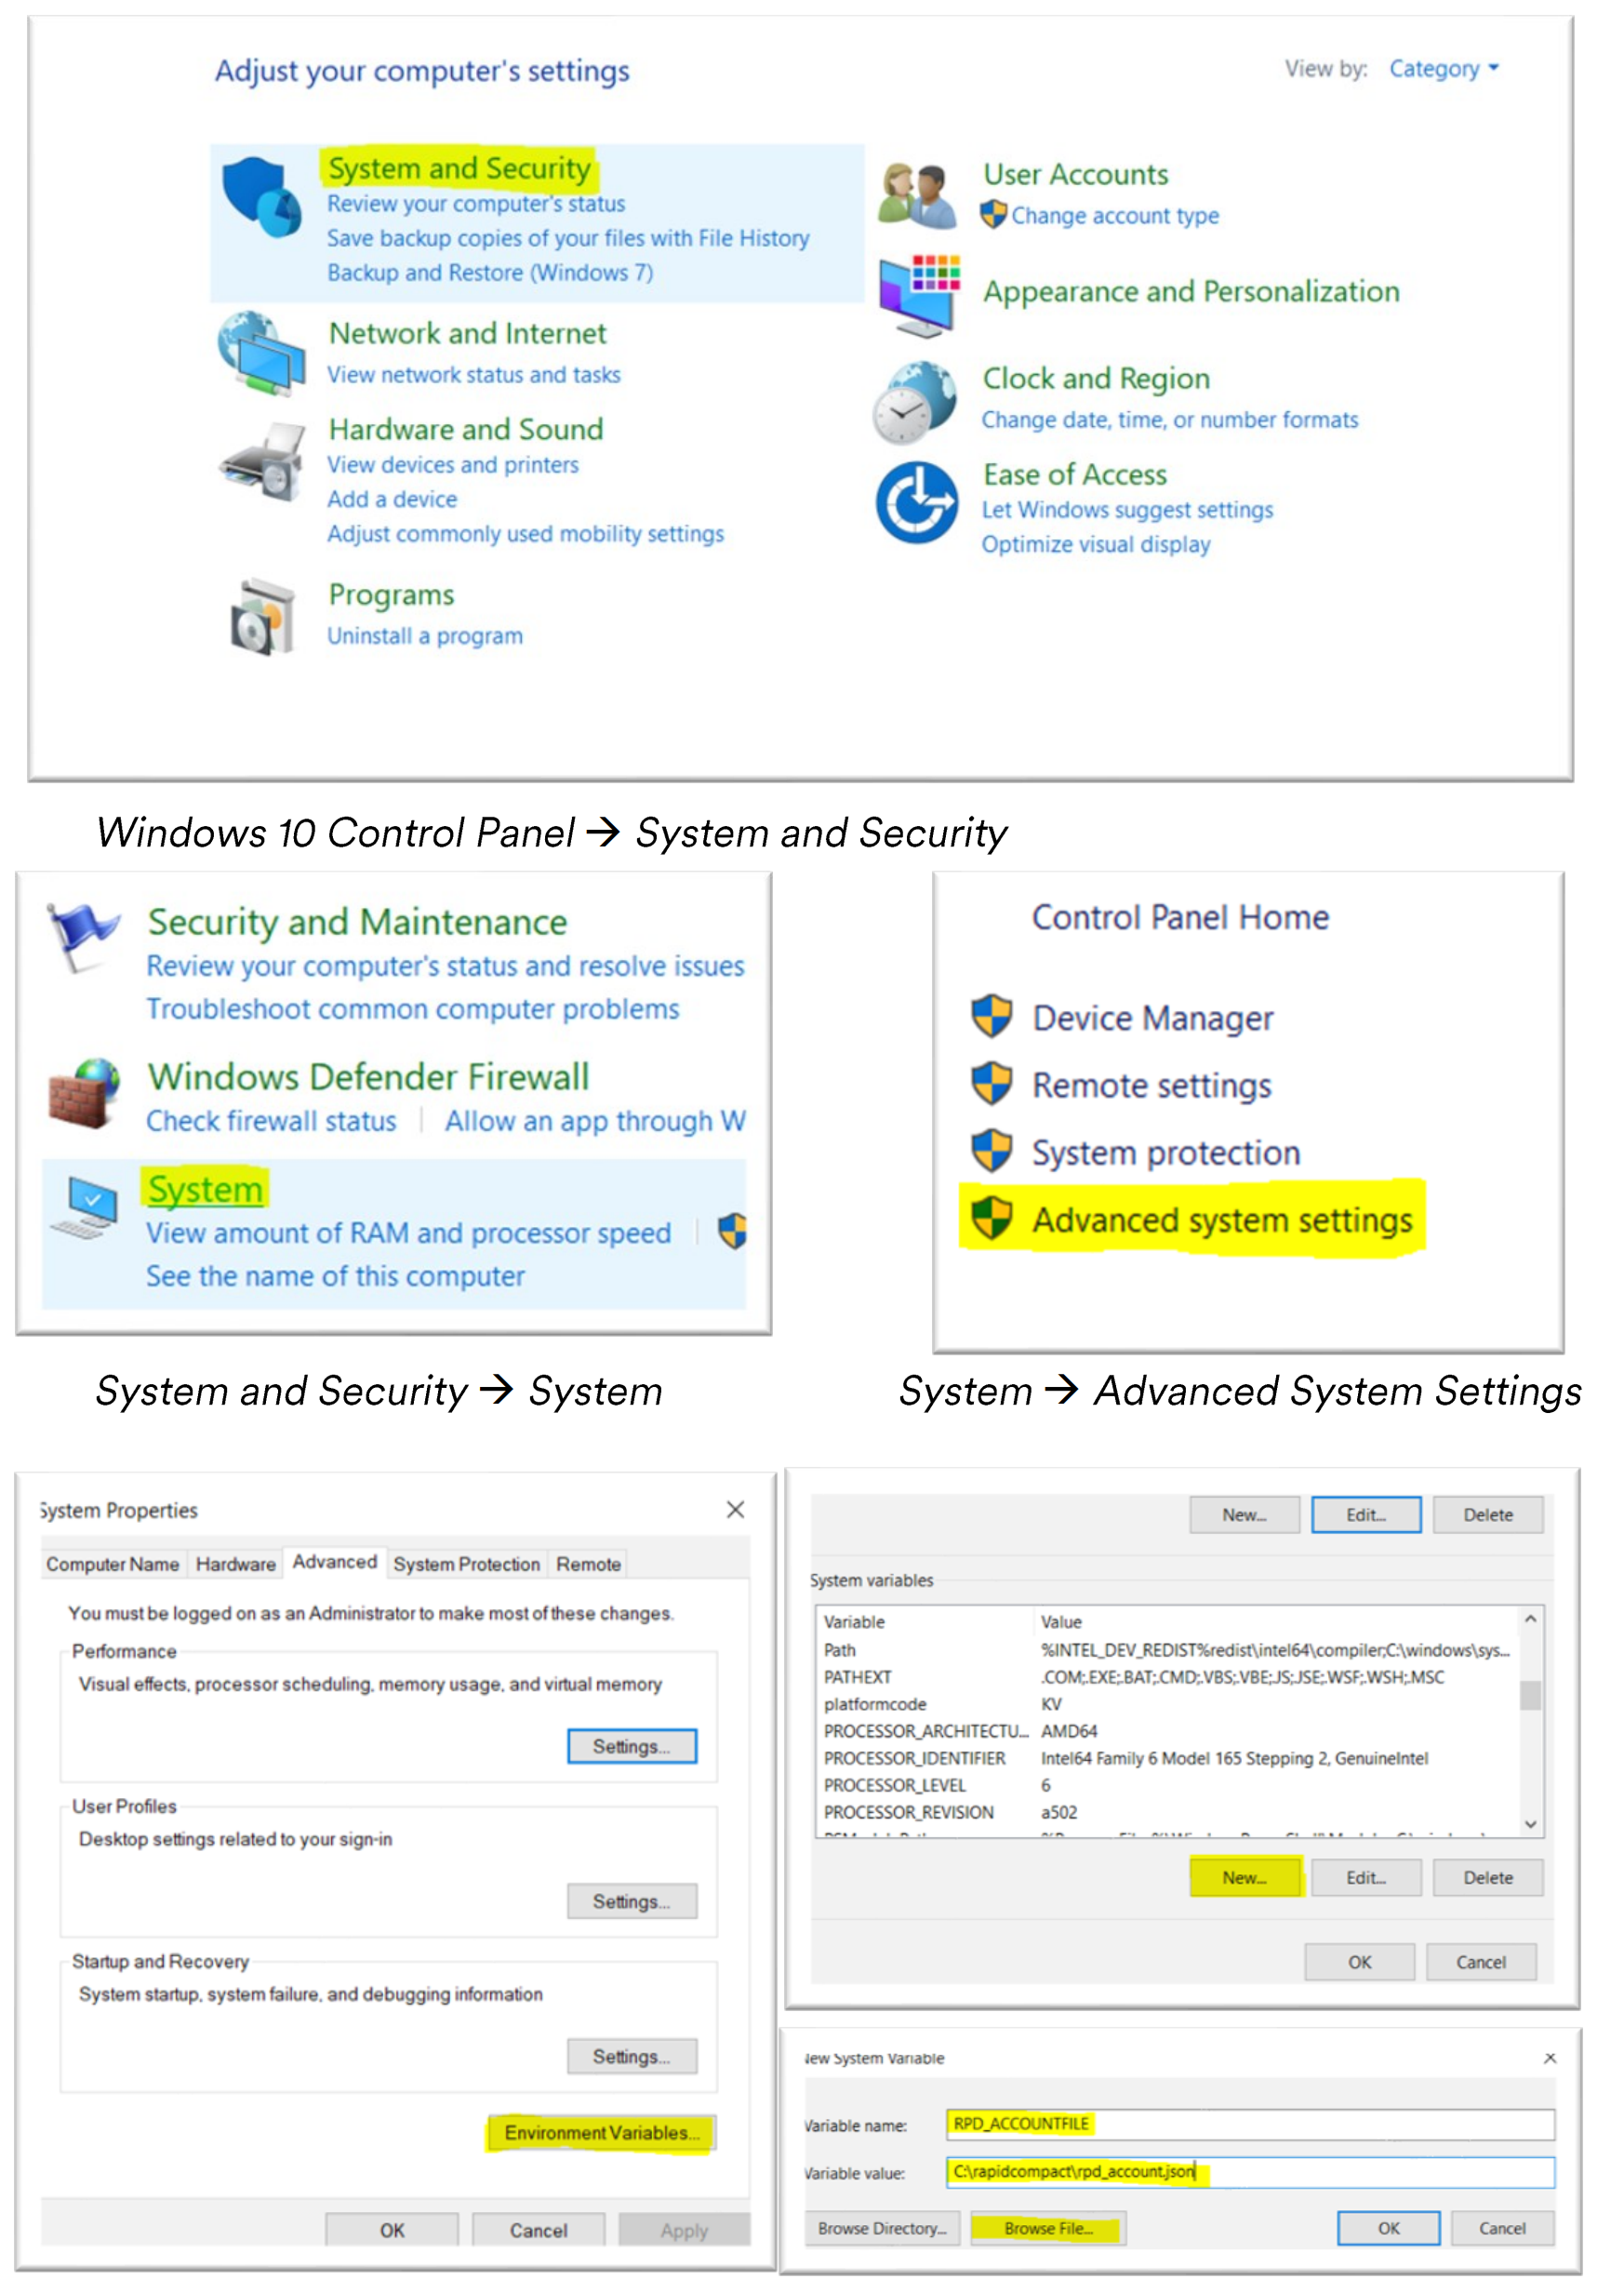
- Click on “New…” and name the environment variable “RPD_ACCOUNTFILE”, then you can either simply browse the rpd_account.json file or type in the exact path; In this example that is: “C:\rapidcompact\rpd_account.json”. This is it. You are almost all set!
MacOS
First of all the MacOS 10.15 Catalina Update introduced a change from the Commandline Tool "bash" to "zsh@.
To know which shell is being used, type this command in the terminal:
echo "$SHELL"
To switch to “zsh” type in the following command:
chsh -s /bin/zsh
To switch to “bash” type in the following command:
chsh -s /bin/bash
Similar to the windows setup you will need to save the rpd_account.json file somewhere on your system.
Let's assume your file is under /Users/YOUR_USER_NAME/Documents/ rpd_account.json
(replace the username, you can check what is your username in the terminal using the command "whoami").
To configure the environment variable, you can use the terminal:
For Catalina, if using "zsh" enter this command in the terminal (make sure the command is in one single line):
echo 'export RPD_ACCOUNTFILE=/Users/YOUR_USER_NAME/Documents/rpd_account.json' >> ~/.zshenv
When using the "bash" shell, use this instead:
echo 'export RPD_ACCOUNTFILE=/Users/YOUR_USER_NAME/Documents/rpd_account.json' >> ~/.bash_profile
After this, when you open a new terminal, rpdx should find the file. You can confirm the variable is set using this command:
echo $RPD_ACCOUNTFILE
Linux
Again, similar to the windows setup you will need to save the rpd_account.json file somewhere on your system.
Let's assume your file is under /home/YOUR_USER_NAME/rpd_account.json
To configure the environment variable, use the following command:
export RPD_ACCOUNTFILE=/home/YOUR_USER_NAME/rpd_account.json
You can confirm the variable is set using this command:
echo $RPD_ACCOUNTFILE
API Token Generation
Log in on https://app.rapidcompact.com and navigate to your account settings on the top right corner -> API Tokens. Now name your token to your liking and hit “Create API Token”:
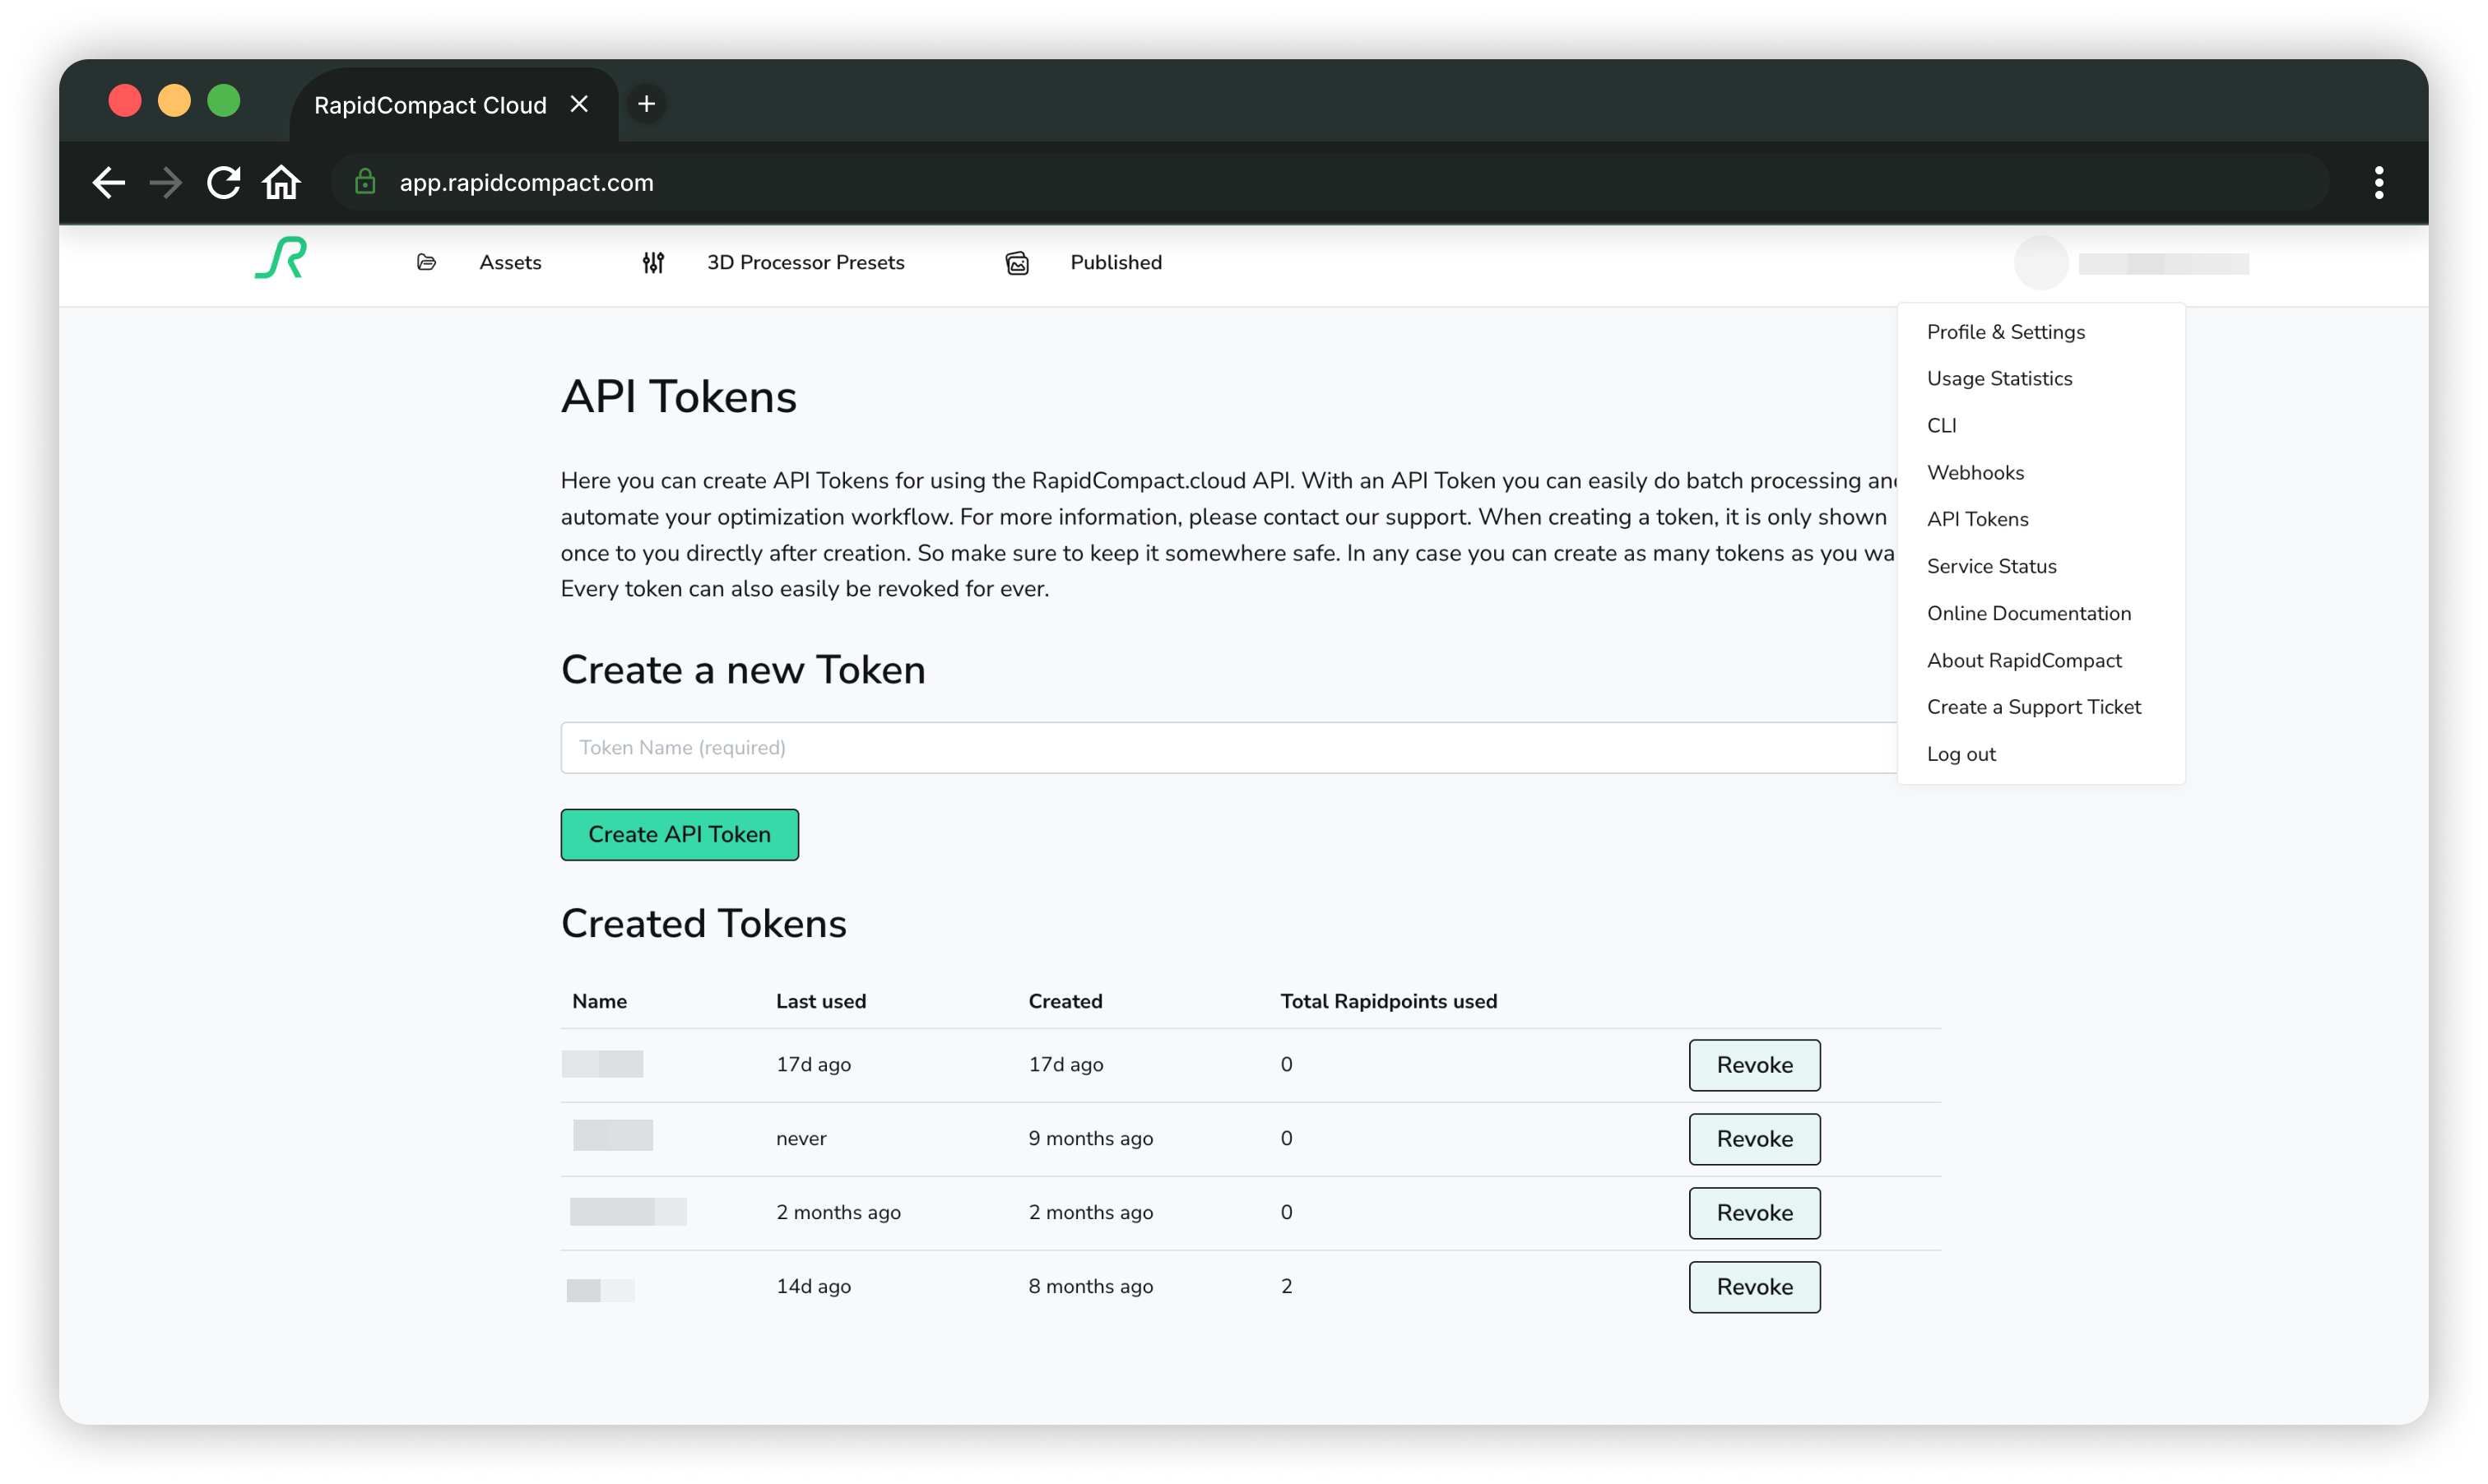
You can then copy the token string once (it won’t be accessible through the Web interface later, for security reasons) and then insert it into your account file, which you did set up before:
{
    "host" : "api.rapidcompact.com",
    "token" : "YOUR API TOKEN HERE"
}
In order to track usage and receive data for technical support the CLI will share some information with DGG. HTTPS license authentication request uses end-to-end encryption.
Shared Data to the DGG License Server
- Your command line (commands and parameters)
- Your optimization settings
Data which is not shared with the DGG License Server
- Any 3D model data
- Any texture data
- Any statistics about your 3D model
- File names (obfuscated)
You should now be able to use the RapidCompact CLI by opening your systems’ command line and type “rpdx”.
If you are looking for commands and what configurable parameter settings RapidCompact CLI has to offer, please visit our getting started guide here
Hardware Requirements
| Hardware | Recommendation | Description |
|---|---|---|
| Processor | x86-64 CPU, 8vCPUs recommended | rpdx makes use of multiple cores/threads for the following operations: UV unwrapping, texture baking, rendering |
| RAM | 1GB minimum, 16GB recommended | The amount of RAM required is highly dependent on the input models and operations performed. |
| Hard disk space | Ubuntu: 100MB, macOS: 85MB, Windows: 85MB | Executable and libraries only. |
| Graphics Card | Not used | rpdx can run headless, it has no dependencies on OS graphics APIs. rpdx does not support GPU acceleration. |
Memory Usage Estimation
Basic estimation
The following provides a conservative estimation on the amount of memory necessary to compact a 3D model using rpdx. In some cases, the estimate could be much higher than the actual number.
    inputMem = numInputTris * 36 + numInputVertices * 64 + numInputTexels * 3

    totalMem = 100MB + (inputMem + numOutputTexels * 3) *4
Note, that all of the values used in the calculation can be printed or written from any given input or output files using the following commands:
    rpdx -i foo.bar -p

    rpdx -i foo.bar --write_info
Precise estimation
This estimation should be more accurate but may in some cases be under the target. The number of vertices can be approximated as 0.75* numTriangles for many models.
    inputEstimationGeo = inTris * 3 * 3 * 4 + inVerts * (3 + 3 + 2) * 8

    # assuming tangents are needed (baking normalmaps)

    outputEstimationGeo = outTris * 3 * 4 * 4 + outVerts * (3 + 3 + 6 + 2) * 8

    estimation = (100 * 1024 * 1024) + (inputEstimationGeo + inTexels * 3) * 2 + (outputEstimationGeo + outTexels * 3) * 2
CLI Release Provider
Web Service
releases.rapidcompact.link
This service allows RapidCompact users to download rpdx (the RapidCompact CLI) releases with their api token.
All API tokens are issued via the Web Platform. You can visit the following guide to create your token.
Overview of existing releases
Fetch releases.rapidcompact.link/releases and set the header Authorization to just your api token.
Example in curl:
curl https://releases.rapidcompact.link/releases -H "Authorization: 15327|jxsPwchkwWd9ejfhqoskdlElfFI9e2430z92bLty"
Result:
{"message":"List of available releases. Use `/releases/{fileName}` to get a signed url of the given file name.",
"releases":["rapidcompact_5.4.3_ubuntu20.zip"]}%
Note, that all of the values used in the calculation can be printed or written from any given input or output files using the following commands:
Getting a signed url for a single release
Fetch releases.rapidcompact.link/releases/[file-name] and set the header Authorization to just your api token.
Example in curl:
curl https://releases.rapidcompact.link/releases/rapidcompact_5.4.3_ubuntu20.zip -H "Authorization:
15327|jxsPwchkwWd9ejfhqoskdlElfFI9e2430z92bLty"
Result:
{"signedUrl":"signed-url-of-release"}%