RapidPipeline Platform [Enterprise Only]
Introduction
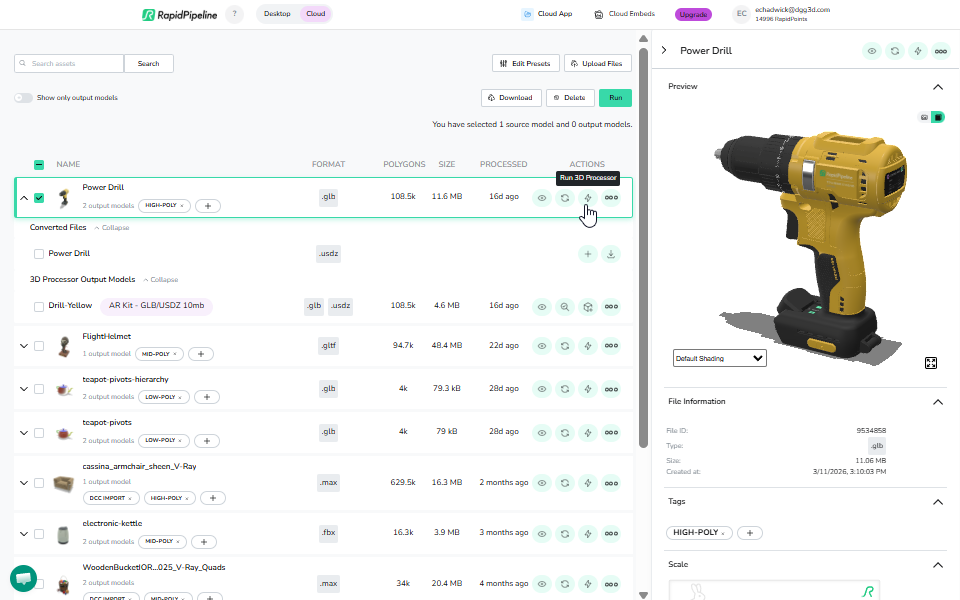
The RapidPipeline Web Platform (https://app.rapidpipeline.com/login) provides a self-service solution for automating complex 3D tasks.
The RapidPipeline Web Platform helps you manage your 3D assets and assists you complete your assets faster. Under the hood, it is powered by RapidPipeline 3D Processor and DCC Importer products that are built on years of R&D by Darmstadt Graphics Group.
What can it do?
3D Processor
- Mesh decimation
- Draw call reduction by scene graph optimization,
- Remeshing
- Texture baking
- UV unwrapping
- Texture compression (KTX, Webp, JPG)
- Mesh compression (Draco, Draco lossy)
DCC Importer
- Translating V-Ray materials to PBR - See More
- QC Report for translated materials
3D Asset Management
- Upload and preview 3D files
- CAD import/export
- Large number of 3D file type support
- Searchable custom metadata
Is there an API?
There is a REST API documentation you can find here.
Getting Started
Uploading your models
When you sign up to RapidPipeline Web Platform, upload your assets to begin your journey. You will be greeted with a drag&drop area where your assets can be uploaded.
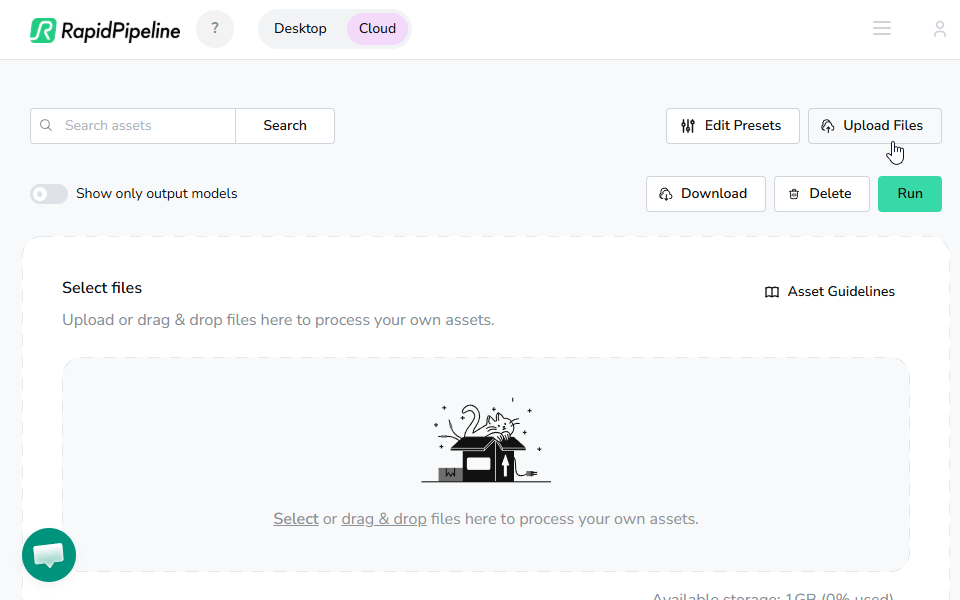
Here are the supported import formats for RapidPipeline:
- OBJ
- PLY
- GLTF
- GLB
- FBX
- STL
- USD
- USDC
- USDA
- USDZ
- ZIP (great for including external textures!)
- VRM
- MAX
- Plus 60 CAD formats!
Auto Converted Files
RapidPipeline will automatically convert:
- CAD files are auto-converted into .glb and .usdz files.
- 3ds Max files with V-Ray materials are auto-converted into .gltf, .glb, .max, and .fbx with PBR materials... read more here!
Best Practices
These issues represent about 90% of file import failures:
- For 3D models that are not self contained, ideally you should always collect your 3D and 2D files inside a .ZIP
- Note: .RAR and other archive formats are not supported.
- When uploading .ASM files make sure to use a .ZIP to include the connected .PRT files.
- If you are uploading a .MAX scene for DCC Importer,
- Do not upload files that have long names; it's best to limit file names to 16 characters or less.
- Upload only 3dsMax 2025 or 2024 or 2023 formatted files. Newer versions are not supported at this time.
- No absolute paths
- Make sure your model does not contain absolute paths for bitmaps and other references in material descriptions.
- With absolute paths, your model will still upload but you may not see the materials or textures properly and you will see a warning related to that.
- Do not upload more than one 3D model inside a single archive.
- Even if it is the same model with different export formats (i.e. .obj and .fbx), you will get an error message while uploading it.
- Trial Plan new users have a limit of 500mb per upload.
- File size limits increase for paid plans, see your Settings page for details.
Supported formats has a detailed list of all our supported 2D and 3D formats.
3ds Max Guidelines explains how to create well-formed .MAX file imports.
Uploading a model with Custom Metadata
To upload a model with custom metadata, you need to store this metadata in a valid JSON file, and the name of this file needs to be custom_metadata.json or any_prefix_you_prefer_custom_metadata.json, and the file needs to be in a .ZIP alongside the 3D asset.
    model.zip
    --- | model.glb
    --- | custom_metadata.json
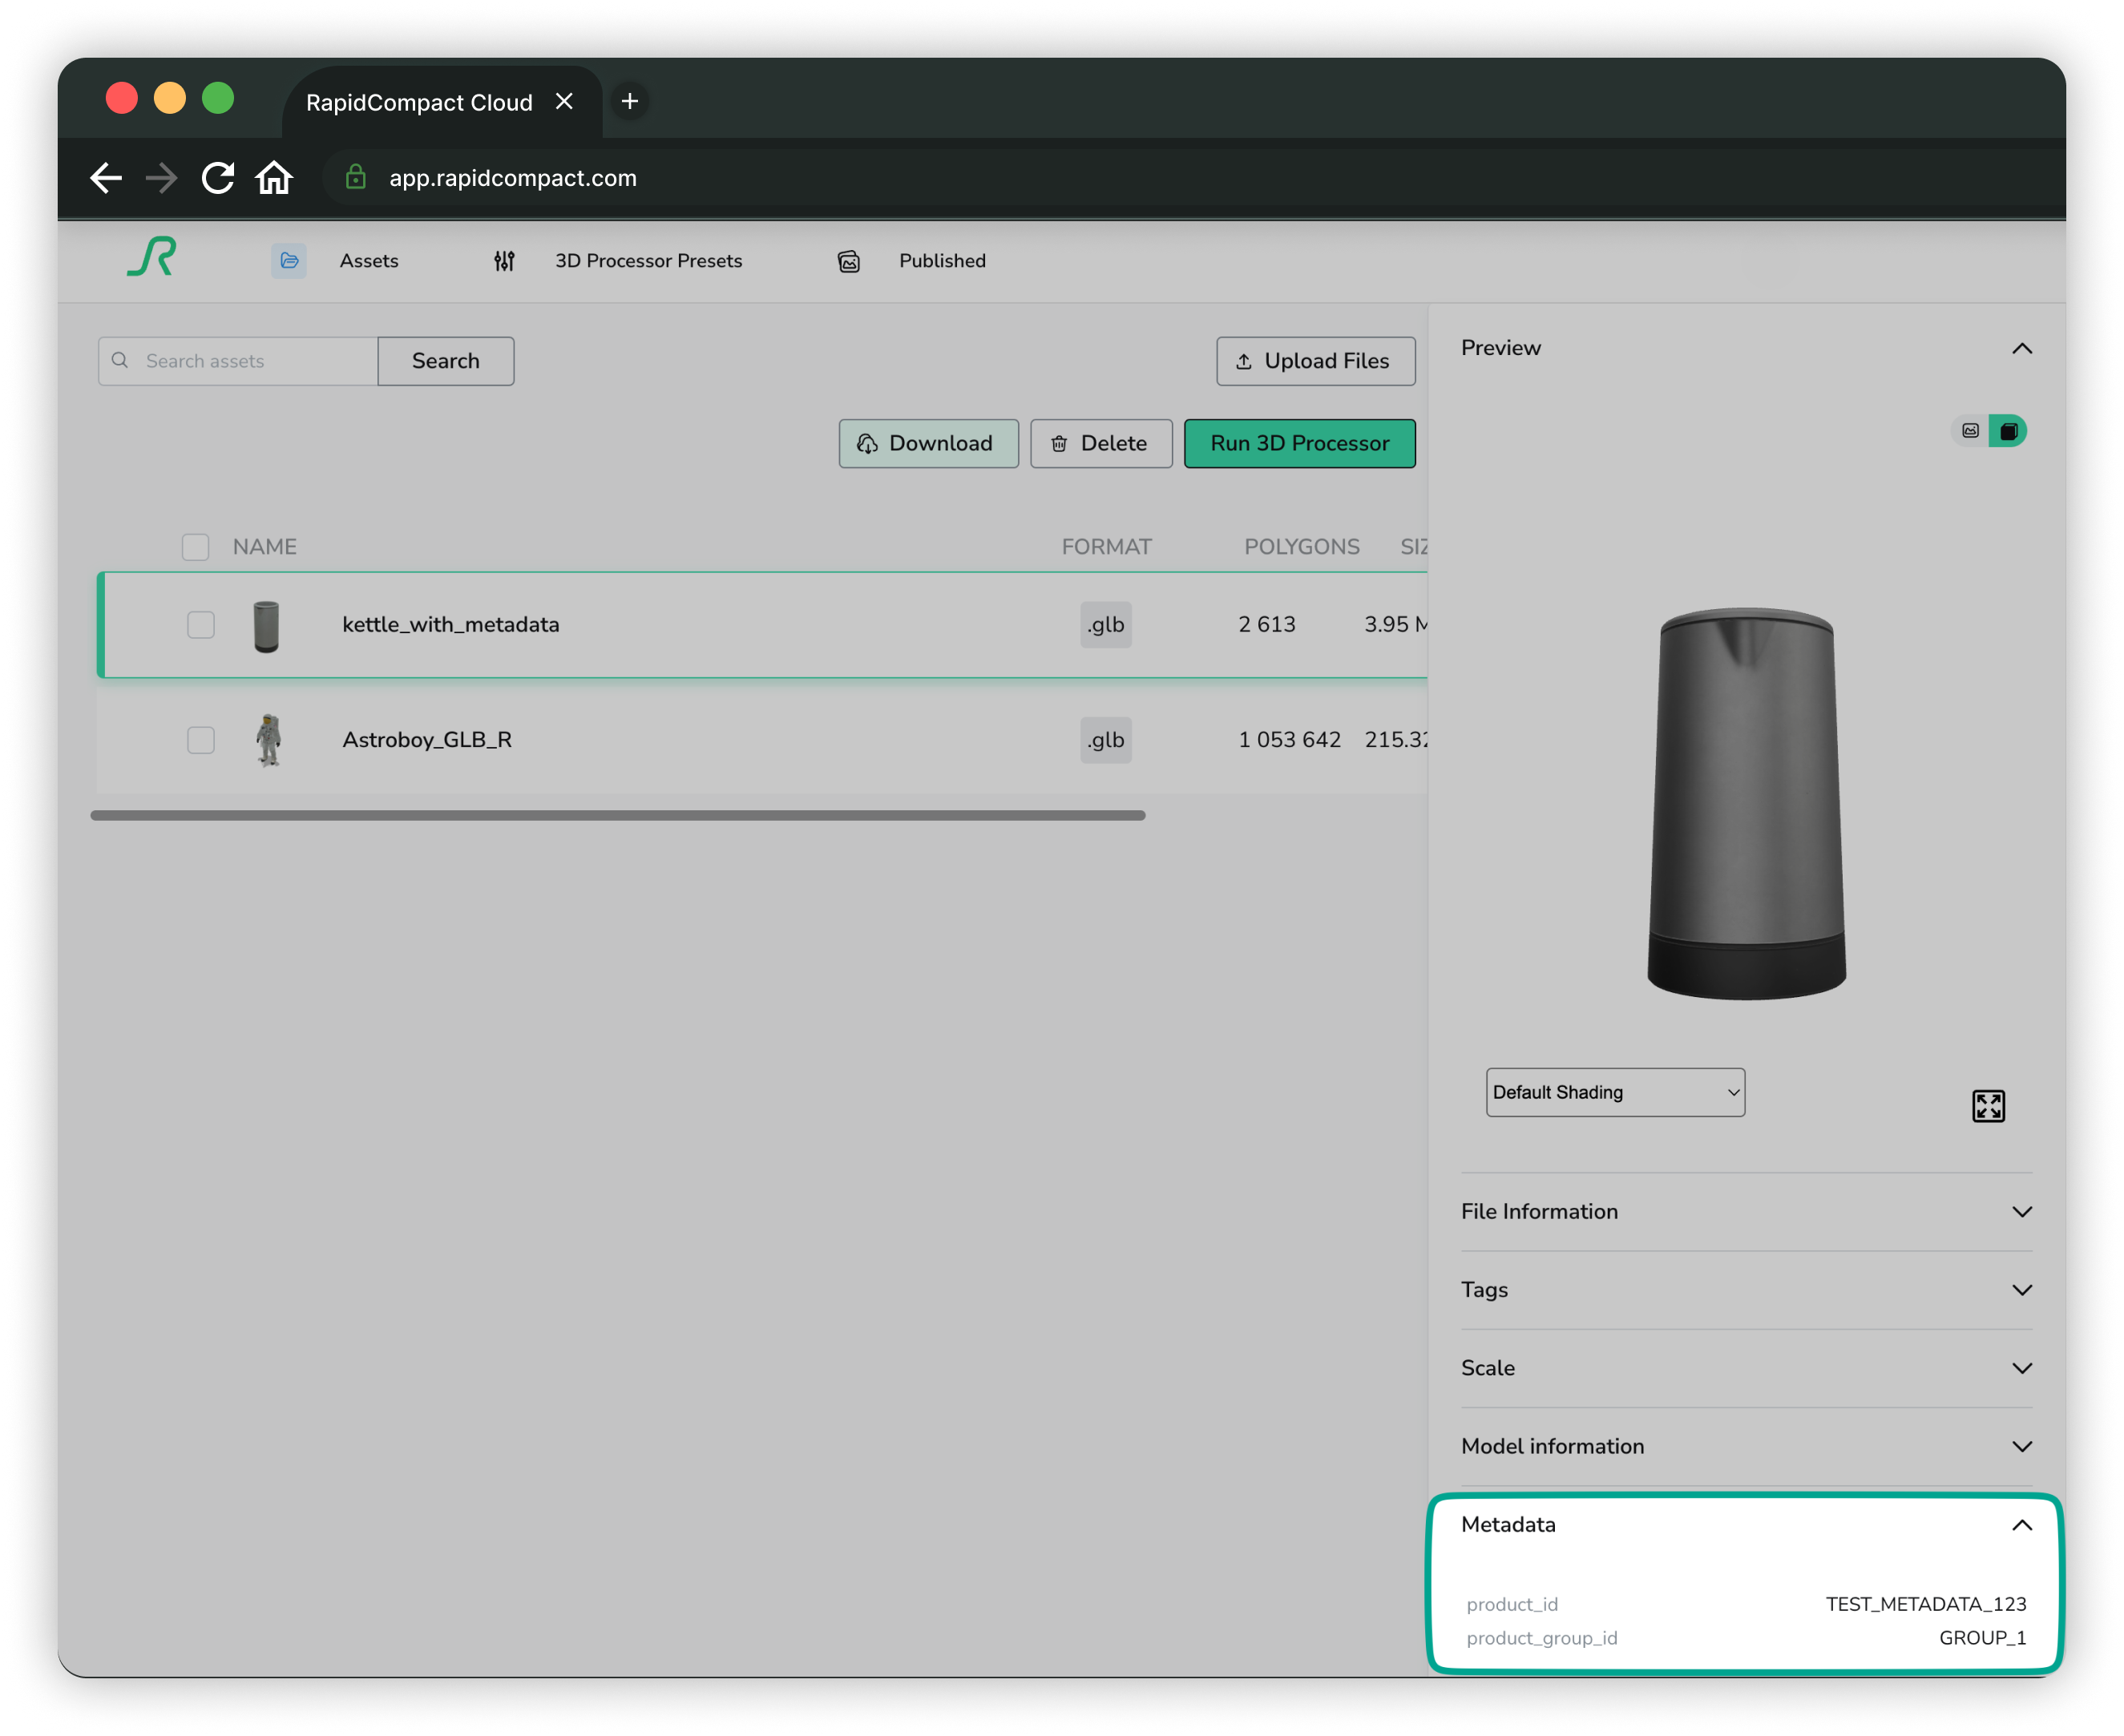
Upload Tutorial
Once you have uploaded an asset and the system has ingested it, you will be presented with a short interactive walkthrough of the web interface.
Click on an asset to open a detailed view.
The Sidebar is where you will find your model related information. You can also resize it!
To process your models, select the models you want to process.
Click the "Lightning" or "Run" button to process them.
Presets are organized in tabs. Your custom presets will be stored in "My Presets" and they will appear at the top of "All Presets".
Feel free to click "Run 3D Processor" for any preset you want to test. You can close the popup window while the 3D Processor is running.
Congratulations! Your output model is ready. You can download individual formats by clicking on them, or click the "..." button to download them all.
After uploading your assets, the next step is to learn about 3D Processor Presets!
Customizing your Presets
3D Processor Presets
After uploading an asset, usually the next step is to improve the asset by altering it with a Preset.
A Preset is a collection of settings that control how the RapidPipeline 3D Processor will optimize and convert 3D assets, and create whatever outputs you need.
Click on the "Edit 3D Processor" button to expose all the Presets.

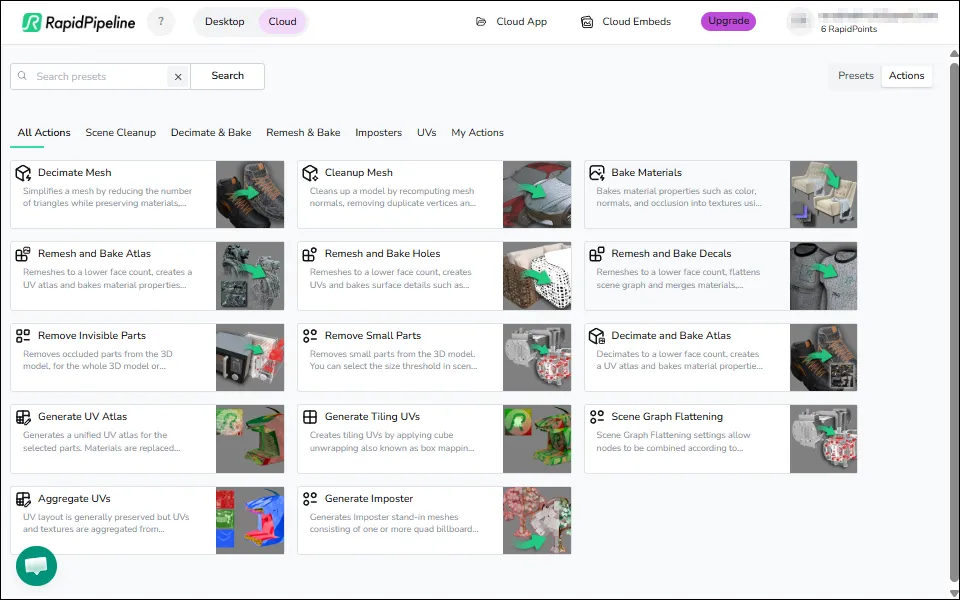
Actions vs. Presets
Actions and Presets give you two ways to access the same great 3D Processor settings.
Use the Presets / Actions buttons to switch between the two modes.

Actions are curated tools that speed up the process of performing common tasks on your 3D data.
Presets are great if you need custom results and you want to fine-tune all available settings. You can also reuse Presets in various RapidPipeline tools, and share them with other users.
Action Tabs
Actions are organized into tabs for related tasks, and pre-configured to expose commonly-used settings:

- All Actions: Contains all Actions and makes searching by keyword easier.
- Scene Cleanup: Tasks for cleaning up scenes, like for massaging incoming CAD data.
- Decimate & Bake: Optimizing 3D meshes by reducing triangle counts, and condensing textures and materials.
- Remesh & Bake: Complex 3D surfaces can be shrinkwrapped with new geometry, and all the details can be baked into new textures.
- Imposters: Convert detailed 3D meshes like foliage into highly-optimized flat planes, and bake all the details into new textures.
- UVs: Create new UV texture coordinates for your 3D models.
- My Actions: These will be your own custom Actions. (coming soon!)
Presets Tabs
Presets are similarly pre-configured, but each Preset allows you to branch out from the defaults and dig deeper by fine-tuning your own custom processing configurations.
Presets are organized into tabs for related tasks:

- All Presets: Contains all Presets and makes searching by keyword easier. Your custom Presets are always shown first.
- General: Curated presets to demonstrate specific features of the 3D Processor (Remeshing, Decimation, Baking, Preserving UVs, etc.).
- Application: Process your models to meet the limitations and requirements of specific 3D platforms.
- Device: Optimize models to work with high performance on specific devices.
- My Presets: This is a list of all your own custom Presets.
Creating Your Own Custom Presets
When the factory presets are not cutting it for you, you can dig into the settings of RapidPipeline 3D Processor yourself!
There are multiple ways to make a custom preset, depending on how you like to work:
Method 1: In the RapidPipeline Cloud App, open an existing Preset by clicking the down arrow on the left side, then change your desired settings, and click Save as new to create your own new Preset. You can rename your Preset by hovering over the name and clicking the pencil icon.


Method 2: In the RapidPipeline Cloud App, start a new empty Preset by clicking on Create Preset. This starts with nothing but the minimal Export setting. Open the new preset by clicking the down arrow on the left, then choose exactly which settings you wish to include. Make sure to click the green Save button when you're finished editing!

Method 3: Use the Blender Add-on in Expert Mode, then change your desired settings.

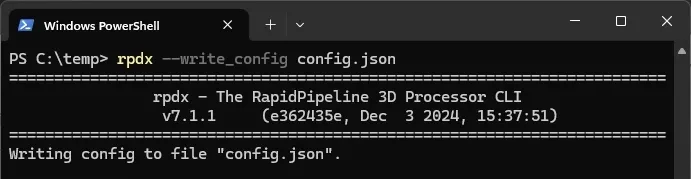
Method 4: Use the RapidPipeline CLI to generate a .JSON Preset file, then use a text editor to change your desired settings. Just make sure your edited preset is compatible with the RapidPipeline API.
Learn About Each Setting
To learn about Action settings, see the Actions Documentation.
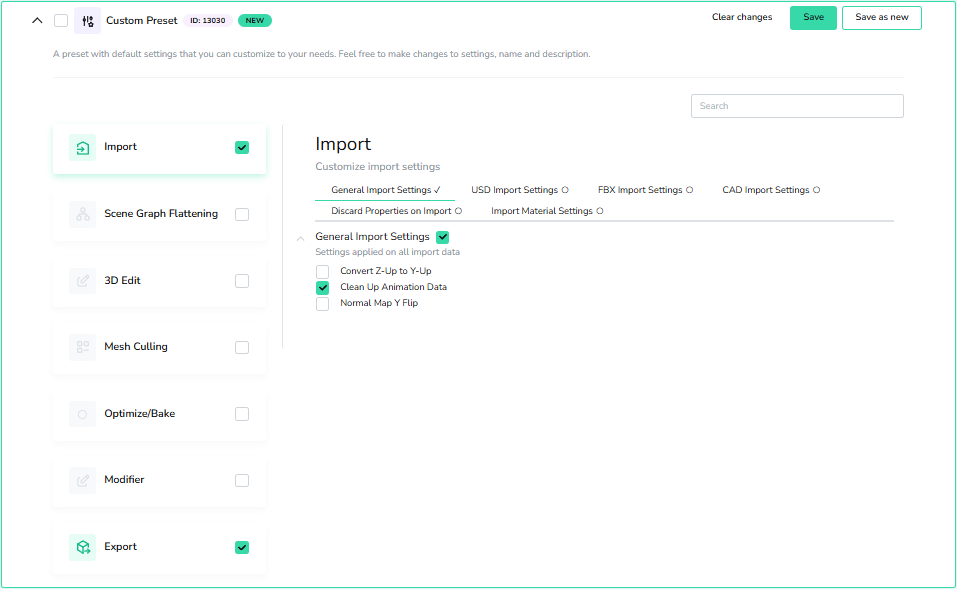
To learn about Presets, see the 3D Processor Settings Guides. These are organized by function, as shown in the Cloud interface when you edit a Preset:
Import customizes the way a 3D asset is imported into the RapidPipeline 3D Processor. Asset fixing, CAD tessellation, discarding unwanted items, importing materials, etc.
Scene Graph Flattening gives you full control over the scene graph, specifying how nodes are merged or kept. These settings can help improve rendering performance by reducing draw calls and scene complexity.
3D Edit modifies the asset, including centering and scaling the model, generating new UV texture coordinates, cleaning up surface shading, assigning default materials, and more.
Mesh Culling allows for automated removal of small features or hidden interior geometry.
Optimize/Bake controls optimization of mesh and material data, including options for decimation, remeshing, texture atlas baking, uv aggregation, and more.
Modifier allows high-level modifications of the whole 3D model, such as limiting the output to a specific file size, or adaptive optimization based on screen size.
Export controls how files are saved, by exposing compression options for each format's textures, materials and geometry.
After learning about Presets, the next step is to process your models!
Processing your Models
The RapidPipeline Web Platform provides you with multiple methods to perform alterations on your assets, from quick and simple, to deep and complex, depending on what you need.
Convert an Asset into Additional Formats
Uploaded assets are automatically converted into a couple formats, and the Convert button can be used to output additional formats. Note that these conversions apply no optimizations, this is a direct conversion only. To optimize an asset, it's best to use an Action or a Preset.
Click the Convert button on the right side of any imported asset, to perform a direct conversion into another format:

The Convert button opens a popup window with several choices:
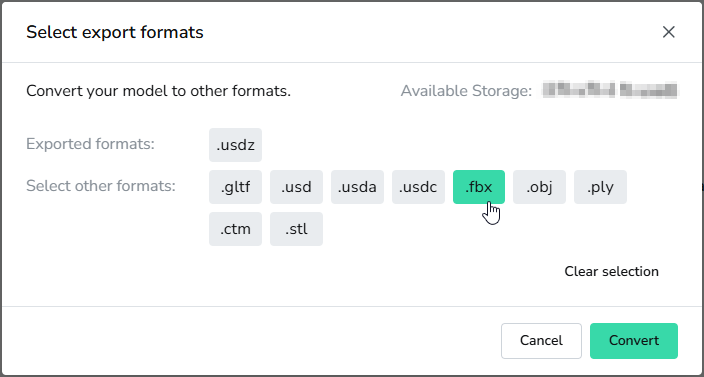
- Exported formats = These are already created, click any button to download the file immediately.
- Select other formats = These are available for conversion, select as many as you wish then press the Convert button.
Download single conversions by expanding an asset, then clicking any button in the Converted Files section:

Download all conversions by opening the three-dot menu, and choosing Download:

Use an Action or Preset on a Single Asset
Uploaded assets can be processed one at a time by an Action or a Preset.
On the right end of any asset, click Run 3D Processor, it looks like a lightning bolt:

Use the switch to choose between Actions or Presets, as desired:

Open any Action or Preset, and adjust settings as needed.
Click the Run 3D Processor button to initiate processing.

The popup window can be closed, and the current progress will show under each asset.
Use an Action or Preset on Multiple Assets
Uploaded assets can be batch-processed with an Action or a Preset.
Select as many assets as you wish.

Click the Run button.

Use the switch to choose between Actions or Presets, as desired:
Open any Action or Preset, and adjust settings as needed.
Click the Run 3D Processor button to initiate processing.
The popup window can be closed, and the current progress will show under each asset.
After processing an asset, you can verify the quality using our built-in quality assurance tools.
QC on Optimization
The RapidPipeline cloud interface will perform automated quality assurance whenever an asset is processed with an Action or a Preset. These tools provide quantitative evaluation of your output models, with evaluation scores and rendered image comparisons.
Open the Quality Report for Processed Outputs
To see the quality control information:
Process an uploaded 3D model with an Action or a Preset.
Expand the asset listing by clicking on the arrow to the left of the asset name.
Look for the rows under 3D Processor Output Models then click on the Quality Control magnifier icon button.
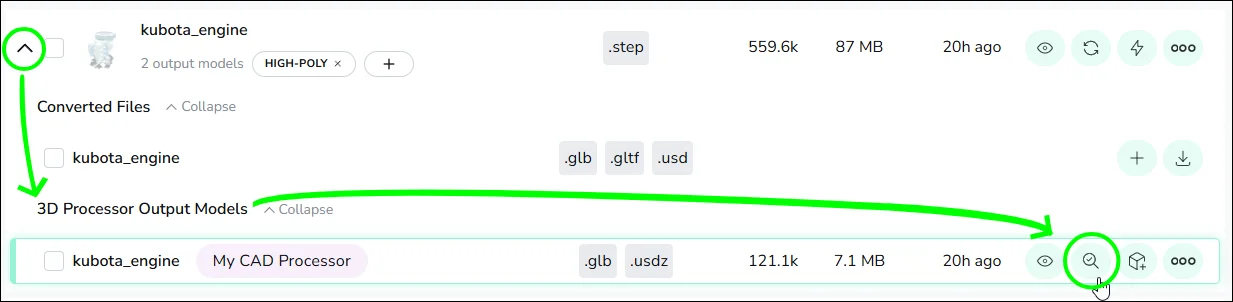
- The magnifier button is also available inside the Preview display, in the top right corner.

The Quality Report
The Quality Report provides quantitative evaluation of your output models, with evaluation scores and rendered image comparisons.
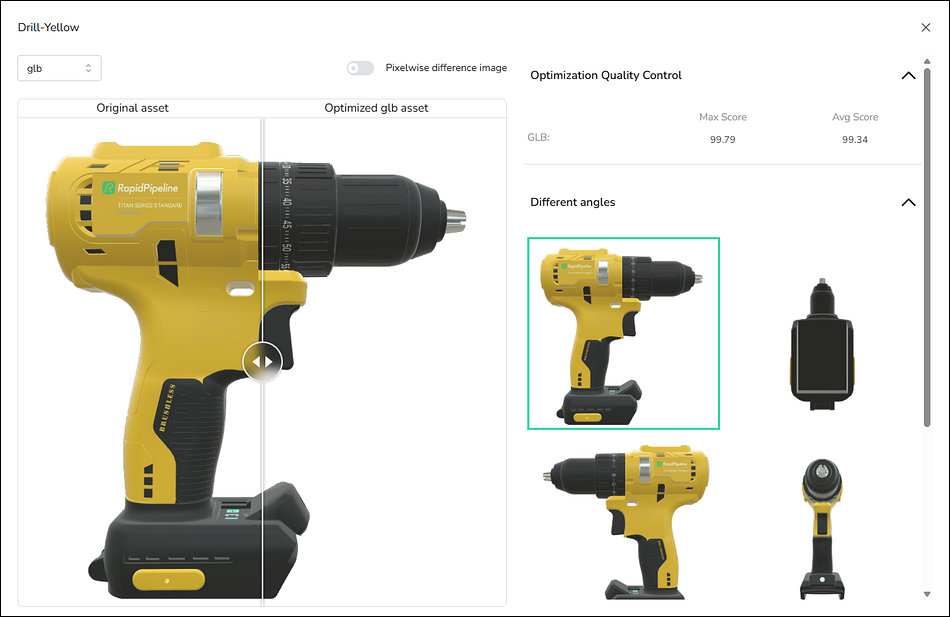
Use the A/B Slider to compare the input asset with the output model.
Use the Model Dropdown at top left to switch between output models, replacing the model on the right side of the A/B slider.
Enable the Pixelwise difference image to highlight in red any differences between the two models.
Evaluation scores are shown at upper right. These provide a quantitative measure of the output model's quality, based on its visual similarity to the input model.
- Maximum Score is the highest similarity percentage for any of the 6 renders for that particular format.
- Average Score is the weighted average score of all 6 renders of that particular format.
Choose any of the six Different angles to compare various views of the two models.
All versions of the asset are rendered with RapidPipeline's own PBR renderer. When the Original Asset is a CAD model, renders use the tessellated version of the CAD file.
Currently a Quality Report is not available for assets uploaded using the cloud version of the RapidPipeline DCC Importer.
A more comprehensive Quality Report can be generated by using the RapidPipeline QC Tools CLI.
If using the API, a Quality Report is automatically generated whenever the Optimize endpoint is called for a source asset, and can be readily accessed with a downloadQc call.
Preview - Comparison Mode
The Comparison Mode switch in the Preview display shows the input and output models side-by-side in a real-time 3D view.
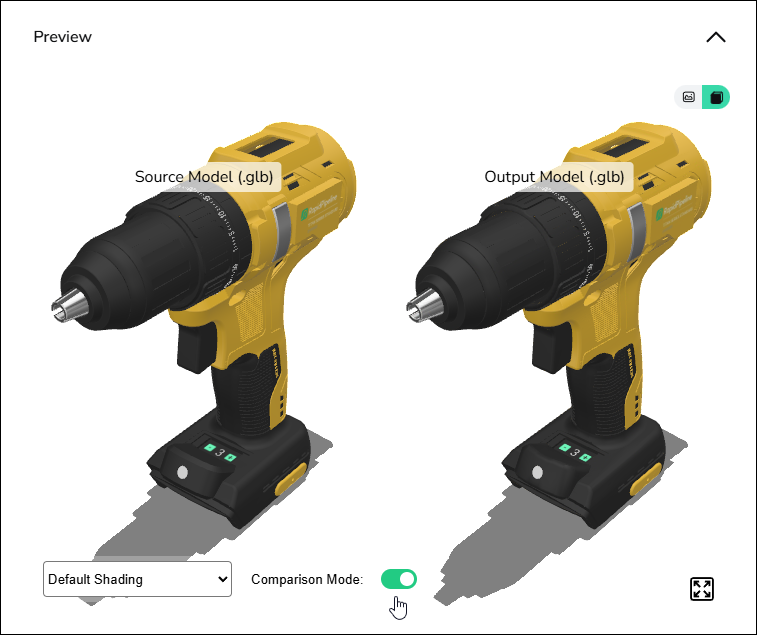
This allows a detailed real-time examination of the two models, from any angle.
- Left mouse drag = rotate
- Right mouse drag = pan
- Middle mouse wheel = zoom
Use the rendering options dropdown at bottom left (Default Shading) to compare different material channels, including Wireframe and UV Coordinates modes!
After examining the quality comparisons, it's time to learn about Importing a Preset!
Importing a Preset
How to Import a Preset into RapidPipeline Web
If you or someone else has created a RapidPipeline Preset, the downloaded JSON file can be shared with others and uploaded to the RapidPipeline Cloud App, or loaded into the RapidPipeline Blender Add-On.
Step 1: Create a RapidPipeline Preset
There are multiple ways to make a custom preset, depending on how you like to work:
Method 1: In the RapidPipeline Cloud App, open an existing Preset by clicking the down arrow on the left side, then change your desired settings, and click Save as new to create your own new Preset. You can rename your Preset by hovering over the name and clicking the pencil icon.
Method 2: In the RapidPipeline Cloud App, start a new empty Preset by clicking on Create Preset. This starts with nothing but the minimal Export setting. Open the new preset by clicking the down arrow on the left, then choose exactly which settings you wish to include. Make sure to click the green Save button when you're finished editing!
Method 3: Use the Blender Add-on in Expert Mode, then change your desired settings.
Method 4: Use the RapidPipeline CLI to generate a .JSON Preset file, then use a text editor to change your desired settings. Just make sure your edited preset is compatible with the RapidPipeline API.
Step 2: Download Your Preset
- RapidPipeline Web Platform:
- Open the RapidPipeline Cloud App.
- Click the Edit 3D Processor button.
- Change the Presets/Actions switch to Presets.
- Click the three-dots button on the right side of any Preset, and choose Download.

- After the ZIP download has finished, extract the preset.json file from the API folder.
- RapidPipeline Blender Add-On:
- Open the RapidPipeline Blender Add-On.
- Open the Settings menu, it is the button shaped like a gear.

- Enable Expert Mode and click the Back button.
- Click on Save Preset.

- Name the preset .JSON file however you prefer, and click Save JSON Preset.
Step 3: Upload Your Preset
- RapidPipeline Web Platform:
- Open the RapidPipeline Cloud App.
- Click the Edit 3D Processor button.
- Change the Presets/Actions switch to Presets.
- Click the Import Presets button, located at the top-right above the presets table.

- Click the Select button to choose your preset .JSON file, or simply drag and drop the file.

- Rename the preset if you like.
- Press the Import Presets button.
- The newly-imported preset will appear at the top of your presets list.
- Review the settings to ensure everything matches your expectations.
- RapidPipeline Blender Add-On:
- Open the RapidPipeline Blender Add-On.
- Open the Settings menu, it is the button shaped like a gear.
- Enable Expert Mode and click the Back button.
- Click on Load Preset.

- Choose your preset .JSON file, and click Load JSON Preset.
- The newly-loaded preset will simply replace all the existing settings.
- Review the settings to ensure everything matches your expectations.
Tips for Successful Preset Import
- Ensure your preset file is compatible with the RapidPipeline API. Check the documentation for specific format requirements. (https://docs.rapidpipeline.com/docs/componentDocs/3dProcessingSchemaSettings/processor-schema-overview)
- If the import fails, review the error message provided. Common issues include invalid JSON files or unsupported configurations.
- If the file you are trying to import was previously downloaded via another user's RapidPipeline Web account, make sure the file you are trying to import comes from the
/apisubfolder of the downloaded preset, instead of/cli.
With these steps, you can effortlessly import and use presets in RapidPipeline Cloud App and the RapidPipeline Blender Add-On, allowing you to share your presets with your colleagues or other people using RapidPipeline.
DCC Import
Upload your 3ds Max files with V-Ray materials to RapidPipeline Web Platform to convert them into PBR materials.
The process will output .glTF, .glb, .FBX, .MAX and .USDz files with properly-formatted PBR textures and materials. Additionally, a .USD with MaterialX shaders, using baked textures, will also be created.
The outputs can be readily imported into other content creation tools for better interoperability between editing applications, or they can be compressed directly for real-time AR/VR/web use.
How to Process 3ds Max files with the Web Platform
Use the Archive command inside 3ds Max to create a ZIP of your scene and all its textures and resources:
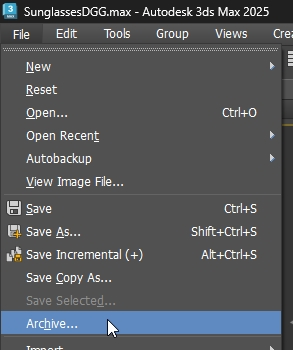
To package files that import cleanly, see DCC Importer Inputs.
To setup scenes for optimal conversion, see 3ds Max Guidelines.
Log into https://app.rapidpipeline.com/, go to the Assets tab, and choose Upload Files:

Choose the ZIP file (or drag-and-drop) into the file selector window, then press the Upload button:
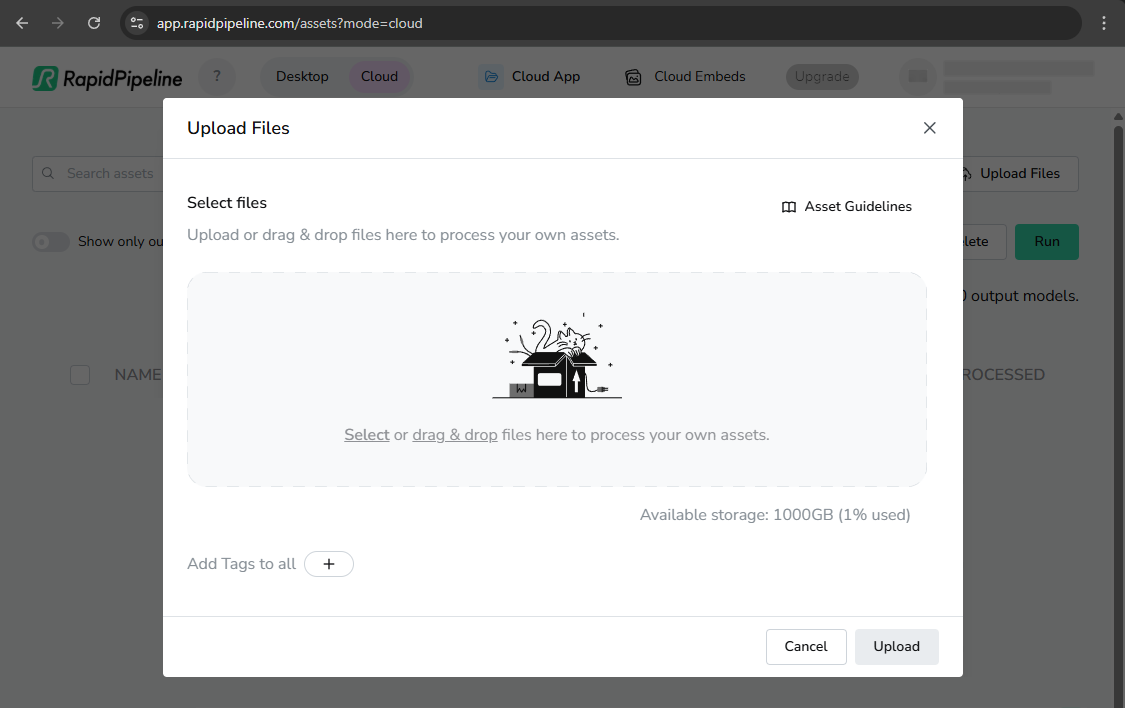
Once the ZIP is uploaded, an optional list of settings appears. When done choosing settings, press the Upload button to start converting:
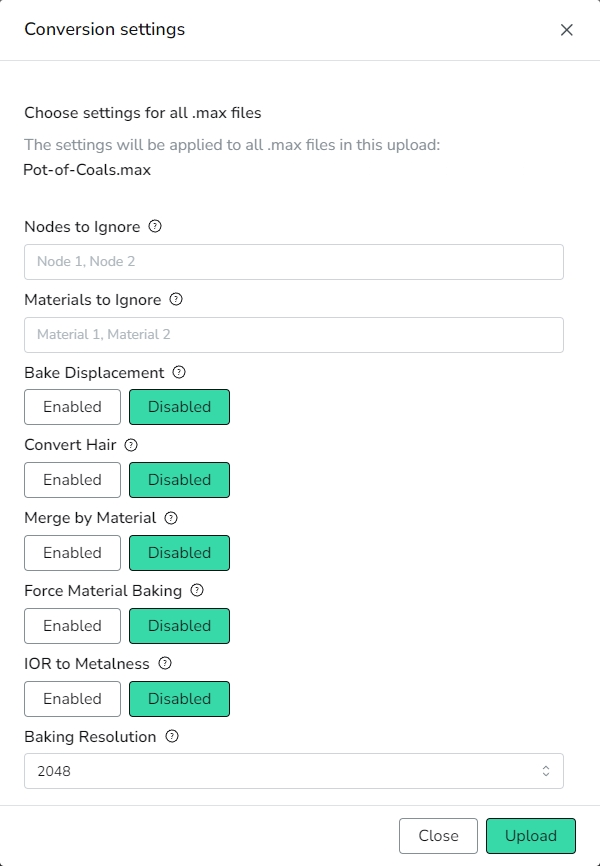
Settings Explained
| Setting | Description |
|---|---|
| Nodes to Ignore | Nodes with the exact names contained in "nodesToIgnore" can be ignored. This is useful, for example, if you have a recurring pattern of studio elements, such as a background, which you don't want to be included in your output files. Use commas between names. |
| Materials to ignore | Materials with the exact names contained in "materialsToIgnore" can be ignored. This is useful, for example, if you have a recurring pattern of studio elements, such as a background, which you don't want to be included in your output files. Use commas between names. |
| Bake Displacement | VRayDisplacementMod can be converted into geometry. When disabled, displacement will be converted into normal maps. |
| Convert Hair | Hair and Fur (WSM) modifier can be converted into geometry. When disabled, Hair and Fur (WSM) will be ignored. |
| Merge by Material | Geometry nodes sharing the same material can be merged together. |
| Force Material Baking | Recommended off by default - can improve baking fidelity for some cases, but increases conversion time. |
| IOR to Metalness | This is an experimental feature and it is useful if materials are created with high IOR values to emulate metals, as seen in legacy workflows. |
| Baking Resolution | Texture resolution can be overridden when baking materials. Possible values range from 256 up to 4096. |
Evaluating the Results
Once conversion is completed, outputs can be examined. Tap on the model in the Asset List, then in the preview window choose QC Tool Report.
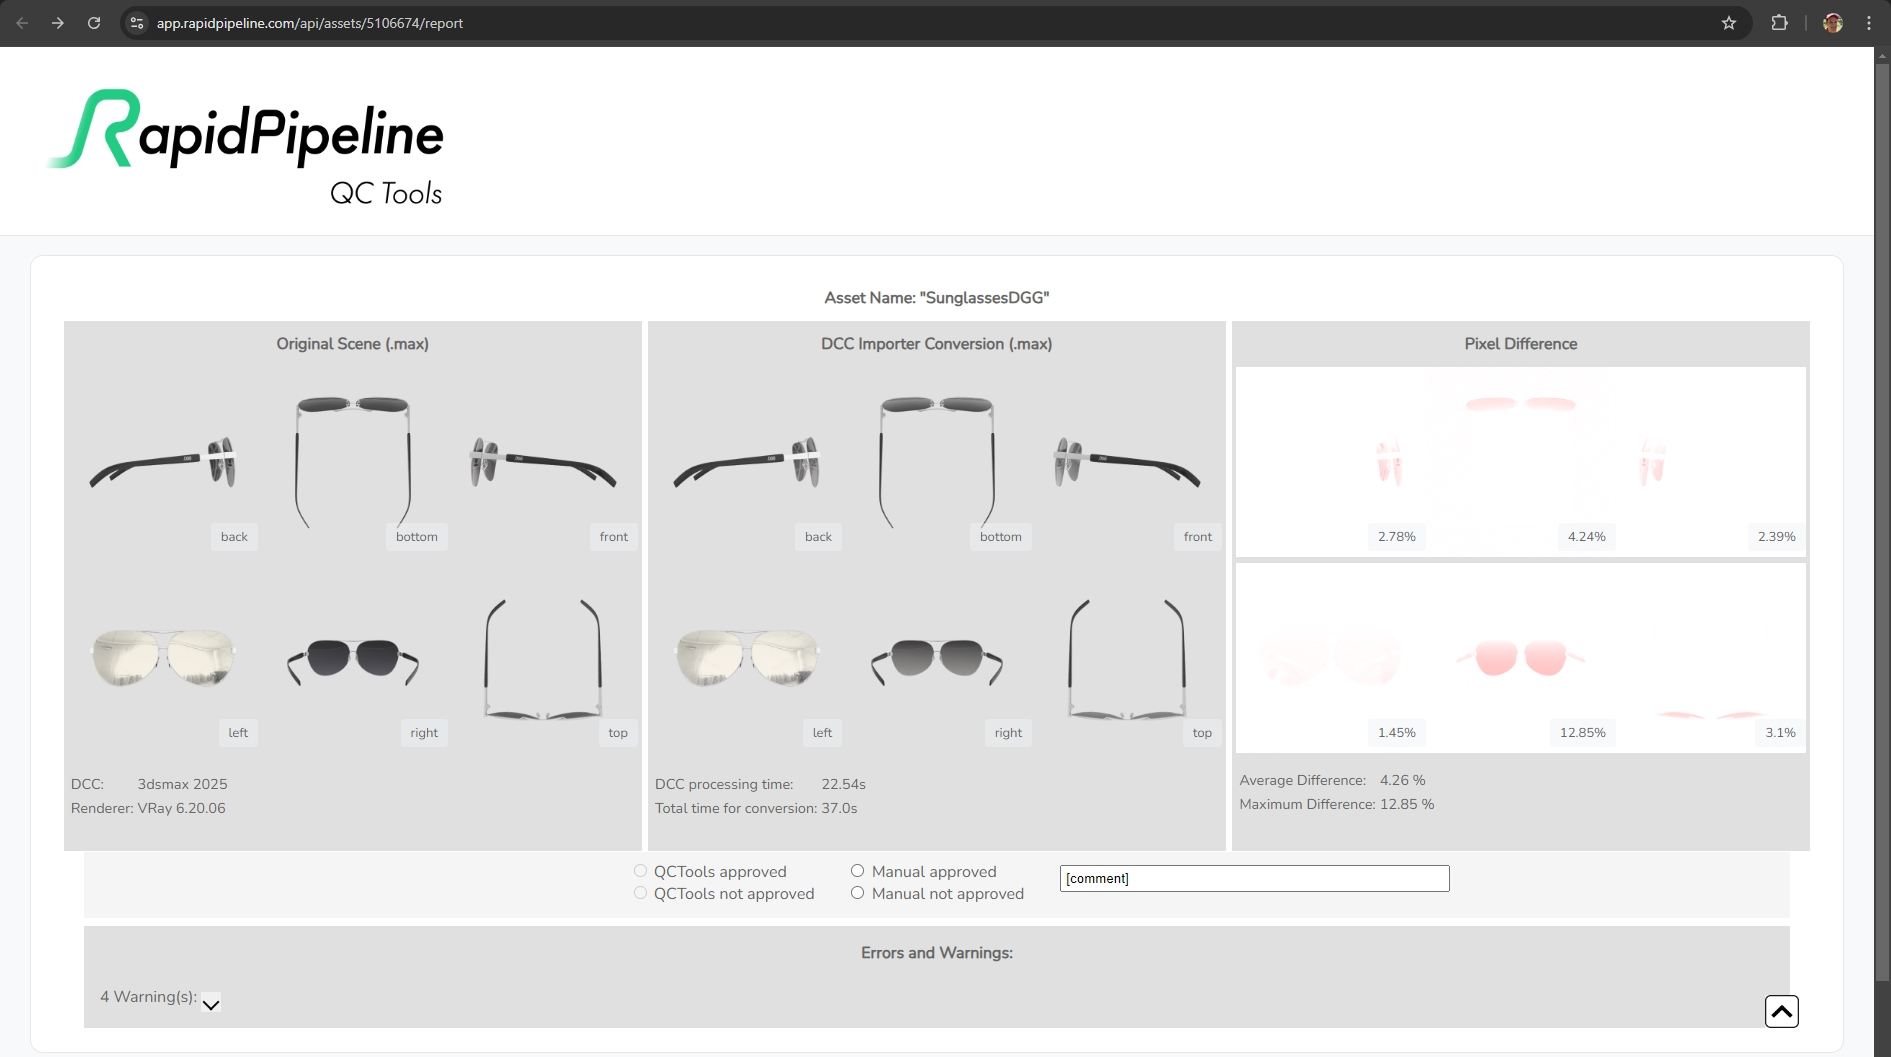
This report (currently in Beta) will provide you with two main deliverables:
- An evaluation score comparing the model rendered from different angles.
- Image comparison between the original V-Ray model and the output PBR model.
Optimizing the Output
Output files are uncompressed to allow for manual editing and lossless importing into digital content creation (DCC) or compression tools.
To create final optimized versions of files we recommend using RapidPipeline 3D Processor.
Common Issues
Here are some common reasons why your file might have failed processing successfully:
- Missing textures. Use the "Errors and Warnings" dropdown within the QC Tool Report to isolate which files are missing. These can be resolved within 3ds Max, before creating the Archive ZIP. Look in the File menu for Reference, then choose Asset Tracking Toggle to resolve the missing files.
- Long scene or texture names. There is not an exact hard limit to this, but try to keep the names for less than 40 characters.
- Unsupported materials. For further information please see the full list of supported materials.
To achieve the best possible results, we recommend checking the content guidelines for input files.
Convert Files
Using Automatic 3D File Conversion
Uploading and Automatic Conversion
- Log in to your account on our web platform
- Navigate to the assets page
- Upload any supported 3D file from your computer
- Automatic conversion begins immediately after upload completes
- Once processing is complete, find your original file with new .glb and .usdz versions in the "Converted Files" section
Converting to Additional Formats
Method 1: Using the Plus Button
- Locate the "Converted Files" section under your uploaded file
- Click the "+" (plus) button in the Converted Files row
- Select your desired output format from the dropdown menu
- Wait for conversion to complete
- Access your newly converted file in the Converted Files section
Method 2: Using the Overflow Menu
- Find your previously uploaded 3D file in the assets page
- Click the 3-dot overflow menu icon next to the file
- Select "Convert" from the menu options
- Choose your target format from the available options
- Confirm to start the conversion process
- View the new file in your Converted Files section when complete
Working with Converted Files
- Click on the tag of any converted file to download it
- Download all converted files by clicking the download button at the right-most side of the row
Creating an Embed
RapidPipeline Web Platform can create an embeddable 3D viewer and publish it for sharing publicly as a 3D viewer, or with AR/VR applications.
Creating a 3D embed is only possible for output models of 3D processor. Here is a quick step by step tutorial to walk through the process:
- Use the 3D Processor to make GLB and USDz outputs.
- Make sure the model is in the right real world scale. RapidPipeline Web Platform provides a tool for this in the preview area.
- Go to the 3-dot menu of the output model, and click
Create embed. - Adjust scene settings and lighting as desired.
- Click
Publish. - Give the embed a name, then click
Create Embed. - The embed is now accessible with these options:
- The URL for the web viewer is displayed, and can be copied.
- Click
Viewto see the web viewer. - Click
iframeto see the HTML code for embedding. - Click
QR Codeto see and/or download a QR image, which links to the web viewer. - Click the trash can icon to remove the embed.
For maximum compatibility with both Apple and Android devices, make sure you output both .USDz and .GLB formats. USDz is required for viewing AR on an Apple device, because we invoke the native Apple renderer for AR. Likewise, GLB is required when using AR mode with an Android device, as we use Android's native AR renderer which requires a GLB asset. If your conversion only includes a GLB output, then you will see a 3D model in the main embed window (because this uses a WebGL viewer) but as soon as you attempt to view it in AR using an Apple device, the AR will fail to load. Creating both output formats will avoid this problem.
How to integrate?
<iframe style={{maxWidth:"100%"}} width= "100%" height= "600px"
    src="https://api.rapidpipeline.com/viewer?id=oENGVtfbpy" frameborder="0"></iframe>
- Go to Published embeds page: https://app.rapidpipeline.com/published
- Click
iframeorQR codebutton- For iframe method, add any styling you need into the iframe code like width or height
- For QR code method, simply use the QR code image wherever you want your visitors to scan the code to initiate the 3D viewer