QC Tools Overview
What is QC Tools?
RapidPipeline QC Tools offer a quality assurance system to automate the comparisons of 3D assets after they've been modified by RapidPipeline.
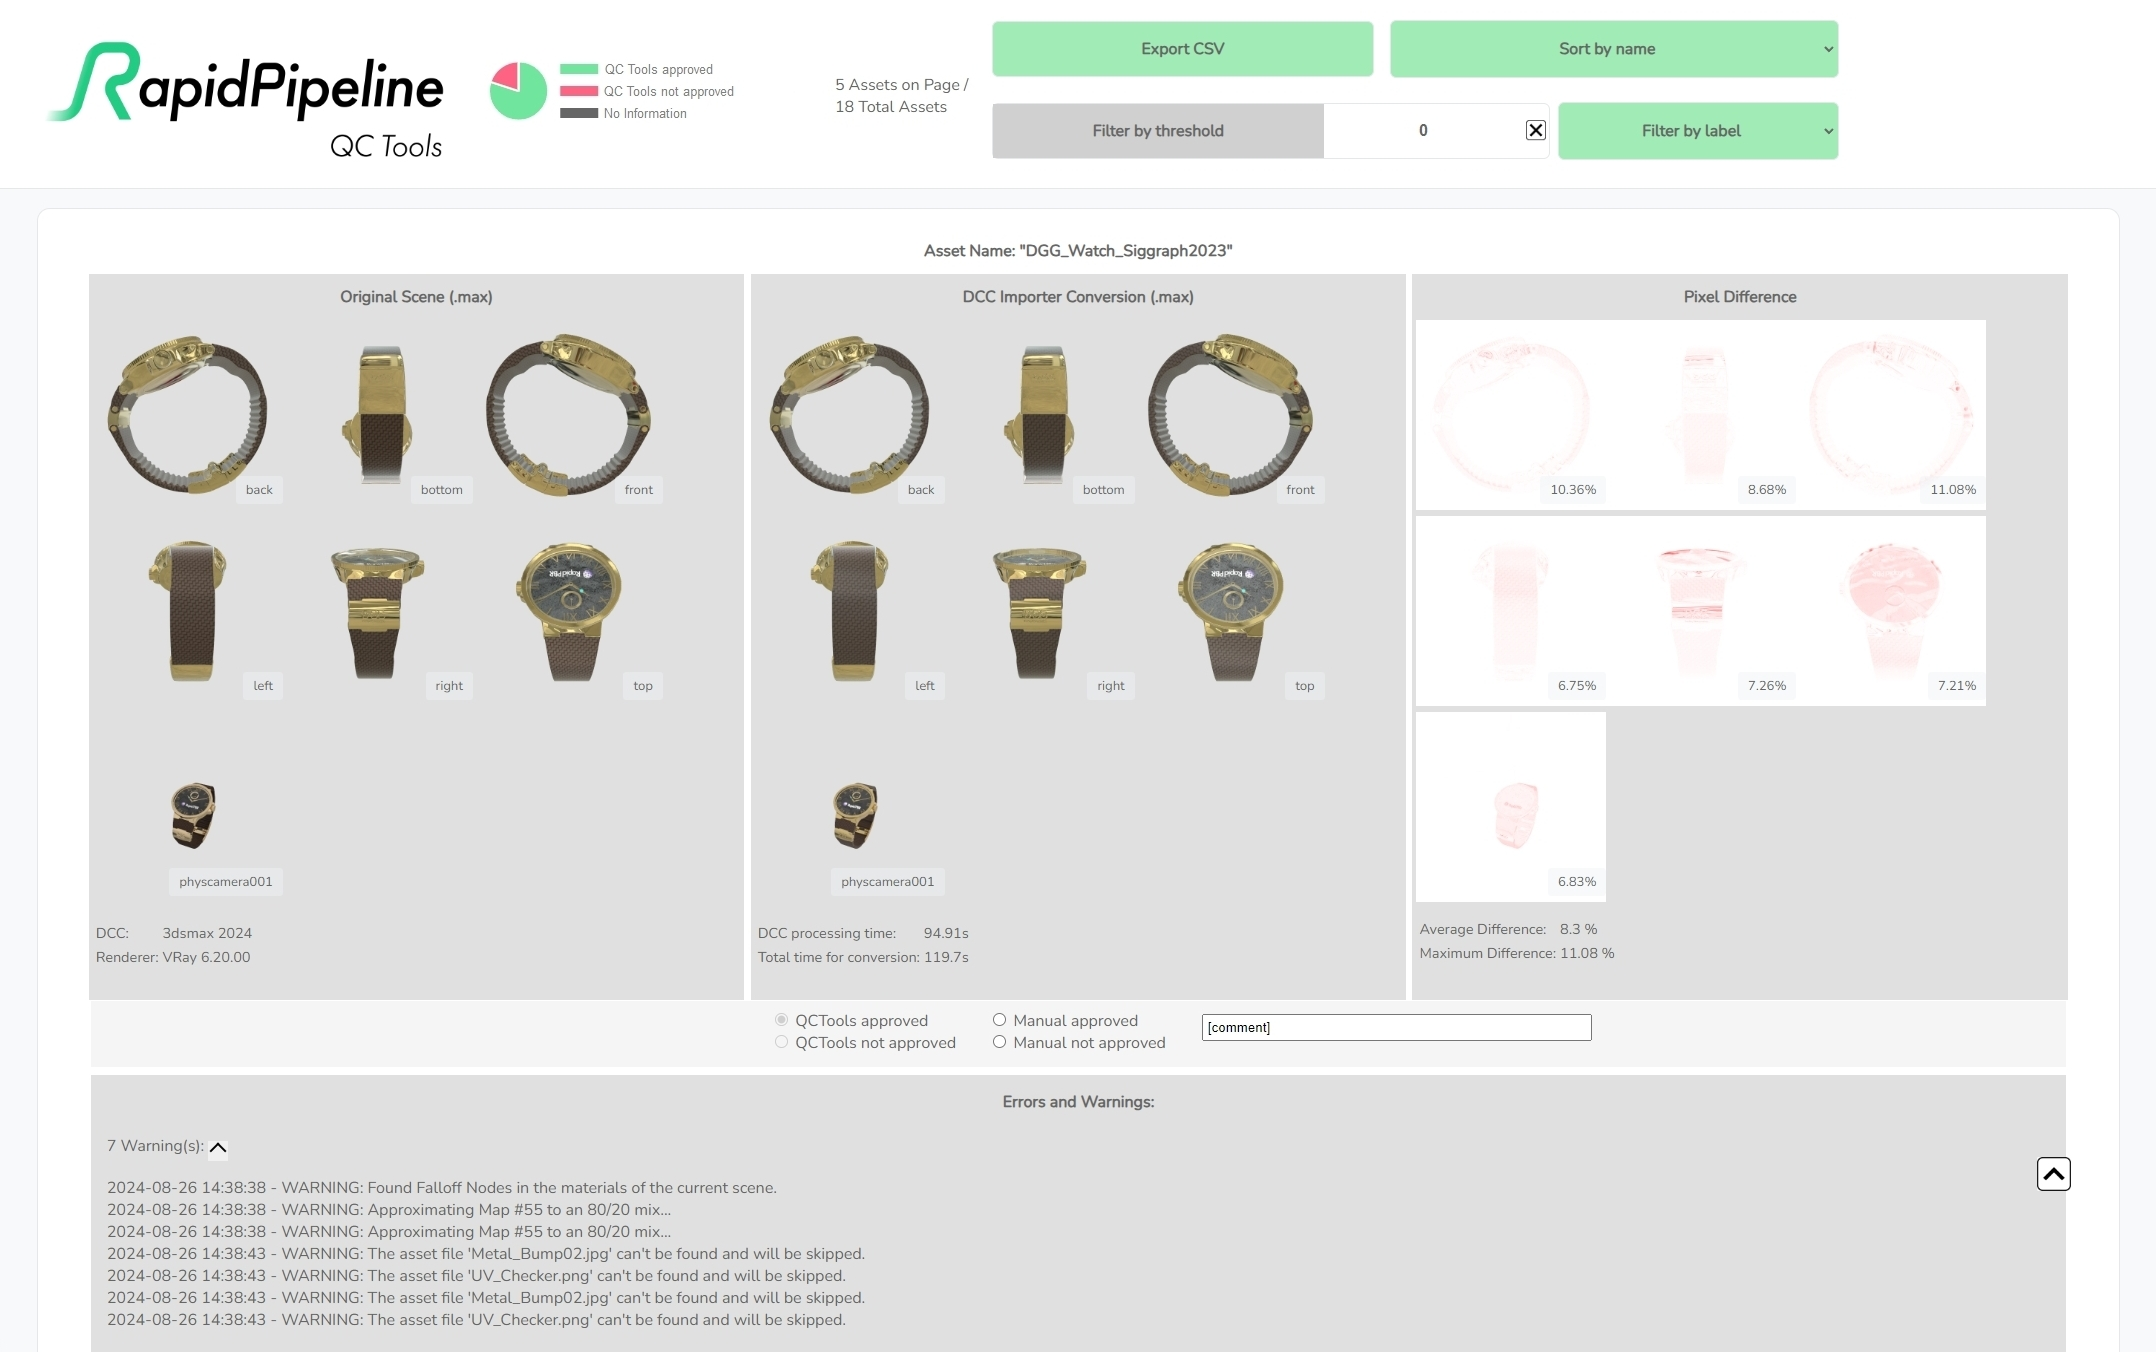
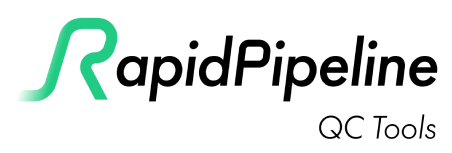
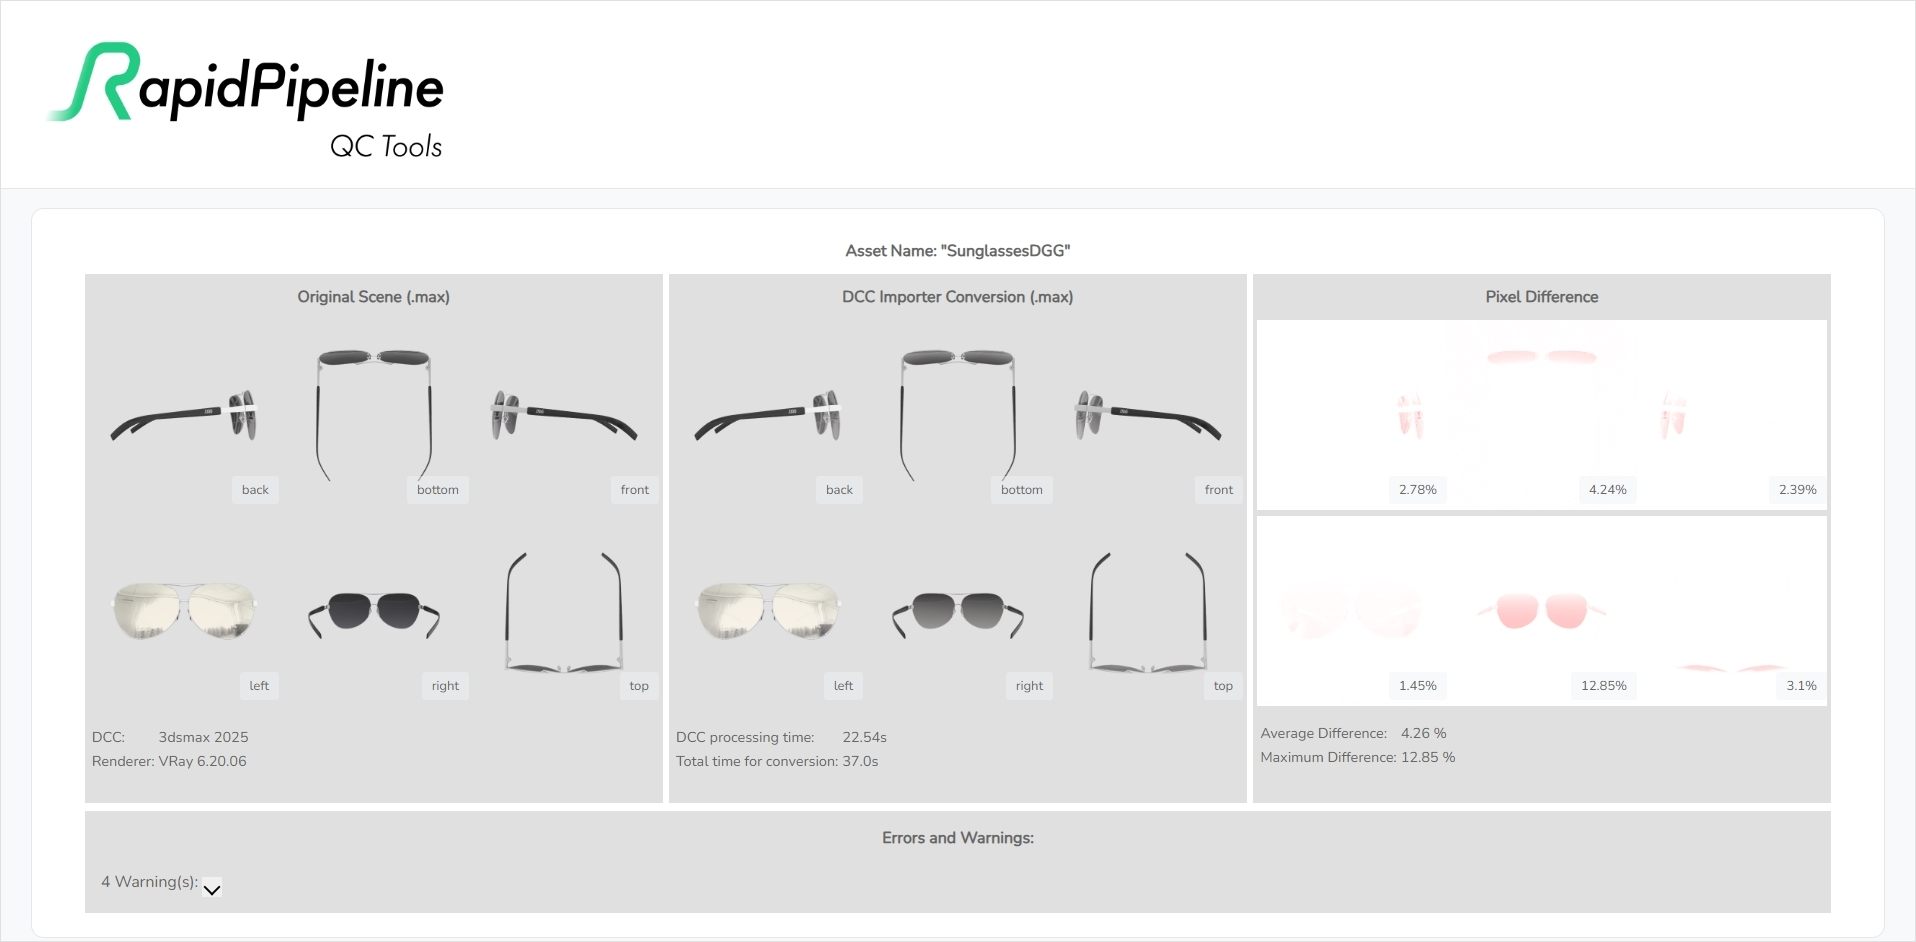
RapidPipeline QC Tools compares input files with processed outputs, rendering multiple angles plus any cameras already present in the scene file. Image pairs are compared, and html pages are generated with an overall score, individual similarity scores, and any errors generated by malformed input data (such as missing textures).
RapidPipeline QC Tools can be accessed from our Web Platform in single-asset mode, or it can be run on-premise on large batches of assets via the QC Tools CLI (command line interface).
These tools have been battle-tested on hundreds of thousands of assets by leading enterprise businesses, to authenticate massive asset production runs.
Major Functionalities:
Automated Rendering
RapidPipeline QC Tools can generate renders automatically, given two input files with 3D data. It will render six cardinal angles of the asset, plus views from any cameras included in the scene file.

Assets are rendered from six cardinal directions, plus any included cameras.
Currently, supported files for automated renderings are 3ds Max files with V-Ray shaders, plus any types of 3D files supported by the RapidPipeline 3D Processor.
The conversion output from RapidPipeline DCC Importer is imported back into 3ds Max and V-Ray materials are assigned to mimic PBR material behavior. Renders of the conversion are then compared with renders of the original 3ds Max input data. This way, the lighting and the renderer are the same, reducing variables which could interfere with comparison accuracy.
Another common use is to compare glTF and USDz outputs, since it is often useful to contrast their differing PBR material implementations. These files are both rendered with Rapidpipeline 3D Processor to demonstrate typical webGL/rasterizer rendering behavior.
Comparison Criteria
Comparisons are performed on a pixel-by-pixel basis to spotlight areas where differences may be more prevalent. A red-pixel difference image is prepared for each image pair. Automated success/fail scores are then calculated based on the amount of differing pixels plus whether any asset errors were detected.

The summary graph gives an overview of pass/fail status for the whole batch.
Each image pair is assigned a difference percentage value, an Average Difference is calculated, and the Maximum Difference is also displayed. When created QC Reports a maximum threshold value can be set (default 13%); if the asset's Maximum Difference is below this value the asset will be labeled as "QCTools approved".
Render pairs are compared and differences are exposed as red pixels.
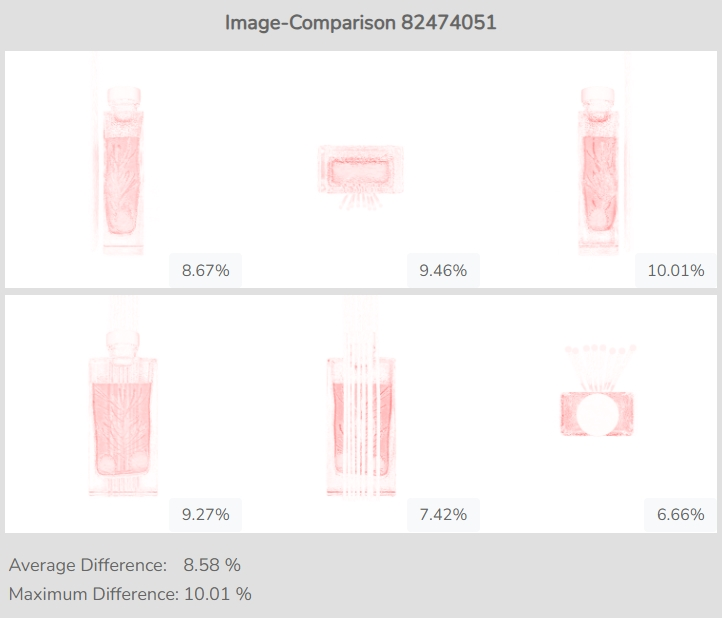
Errors and Warnings
If an asset causes conversion errors it is marked as "QCTools not approved" and the errors are listed in the "Errors and Warnings" section of the report.
This section contains a list of issues encountered during conversion.
Errors cause the asset to be marked as "QCTools not approved" but may also prevent the asset from converting at all.
Warnings are informational only and do not contribute to the approval score, however they may affect conversion quality so it is advisable to fix the source asset if possible and re-convert.
Sorting and Filtering
Results can be sorted and filtered. One common sorting method is to sort by Difference which displays the worst conversions first, since it is helpful to know which assets may need to be fixed.
Sorting can be performed by: Name, Difference, Runtime, AssetID, or Label.
- Name sorts the asset names alphabetically.
- Difference sorts by Average Difference score, highest first.
- Runtime sorts by the DCC name.
- AssetID and Label both sort the list according to metadata, if this has been provided.
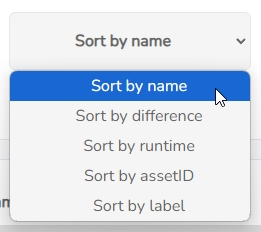
Asset results can be easily sorted.
Filtering can be calculated via a threshold value, displaying only those whose Average Difference is above the specified value. For example to display only assets which have failed QC Tools approval, set this to the Approve Threshold (default value of 13).
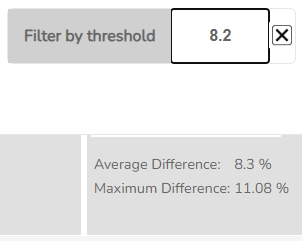
Filtering can be set by Average Difference, only displaying scores above this value.
Assets can also be sorted by specific Labels, if metadata has been imported. It can be provided as .json files, given with each input scene as part of the input directory. Default keys for metadata are AssetID and AssetLabel, but custom fields can be provided as well.
Render Agnosticism
Renderings can either be generated by the application itself, or provided by the user as pairs of images regardless of their source render engine or DCC tool. By default, renders are square at 500 pixels resolution but this can be customized.
For best results, image pairs should be generated using the same renderer, camera angles, and lighting.
For lighting, we recommend using a HDR lighting panorama; our default lighting is based on the Studio Small 09 from Polyhaven, with a checker added for better viewing of surfaces with opacity or refraction. Lighting can be customized using the QC Tools CLI.
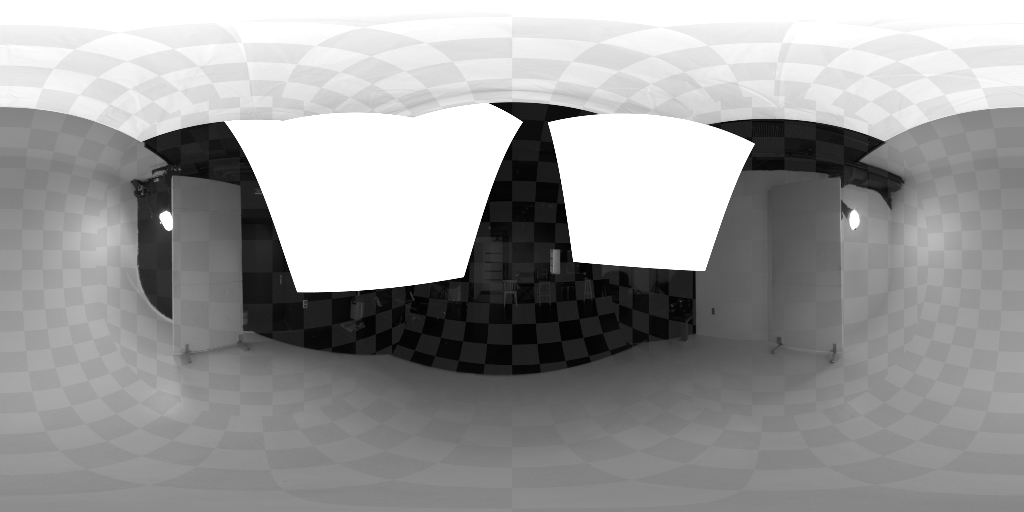
The HDR environment used by default.
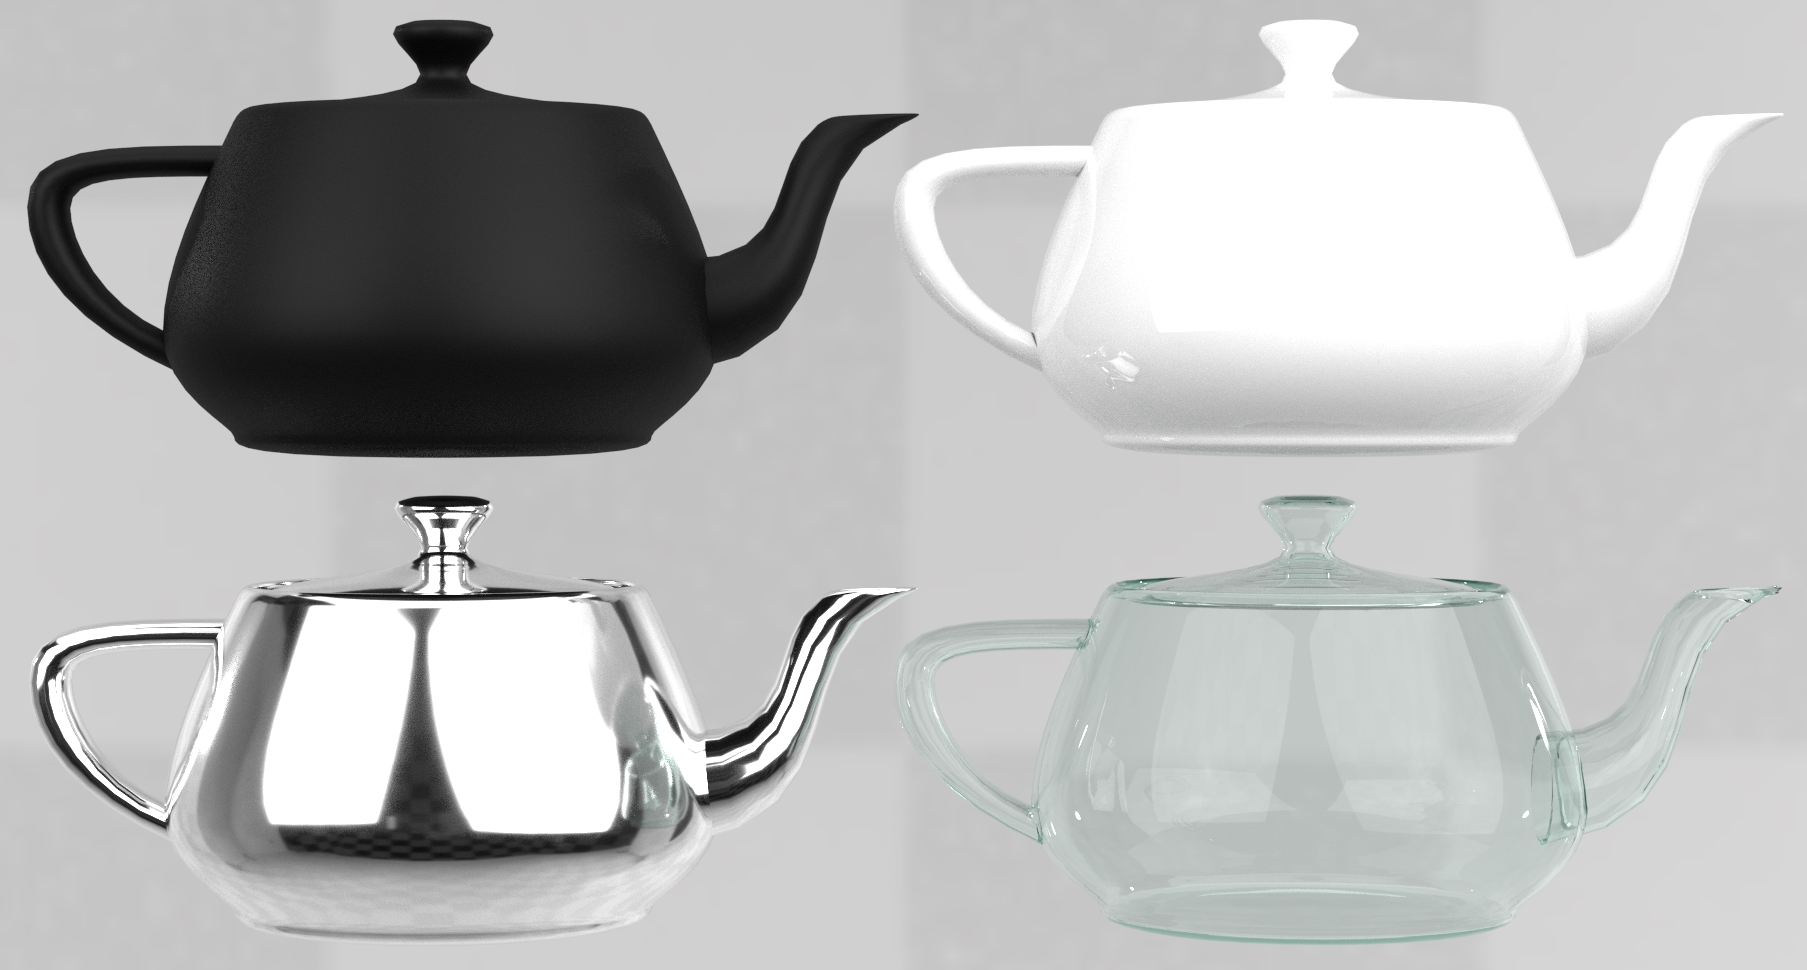
A set of common materials rendered with the default lighting.
Single Asset or Batch Mode
RapidPipeline QC Tools can be accessed from our Web Platform in single-asset mode, or it can be run on-premise on large batches of assets via the QC Tools CLI.
Single-asset mode has been simplified to expose only those features relevant to reviewing a single conversion. When a 3ds Max file is uploaded and converted with RapidPipeline DCC Importer, a QC Tools Report is automatically generated and can be viewed via the Web Platform.
Single-asset mode is simplified for Web Platform conversion.
Batch mode exposes additional tools for sorting, filtering, scoring, commenting, CSV export, and navigating large reports with thousands of asset results. This mode is only available when using the QC Tools CLI.
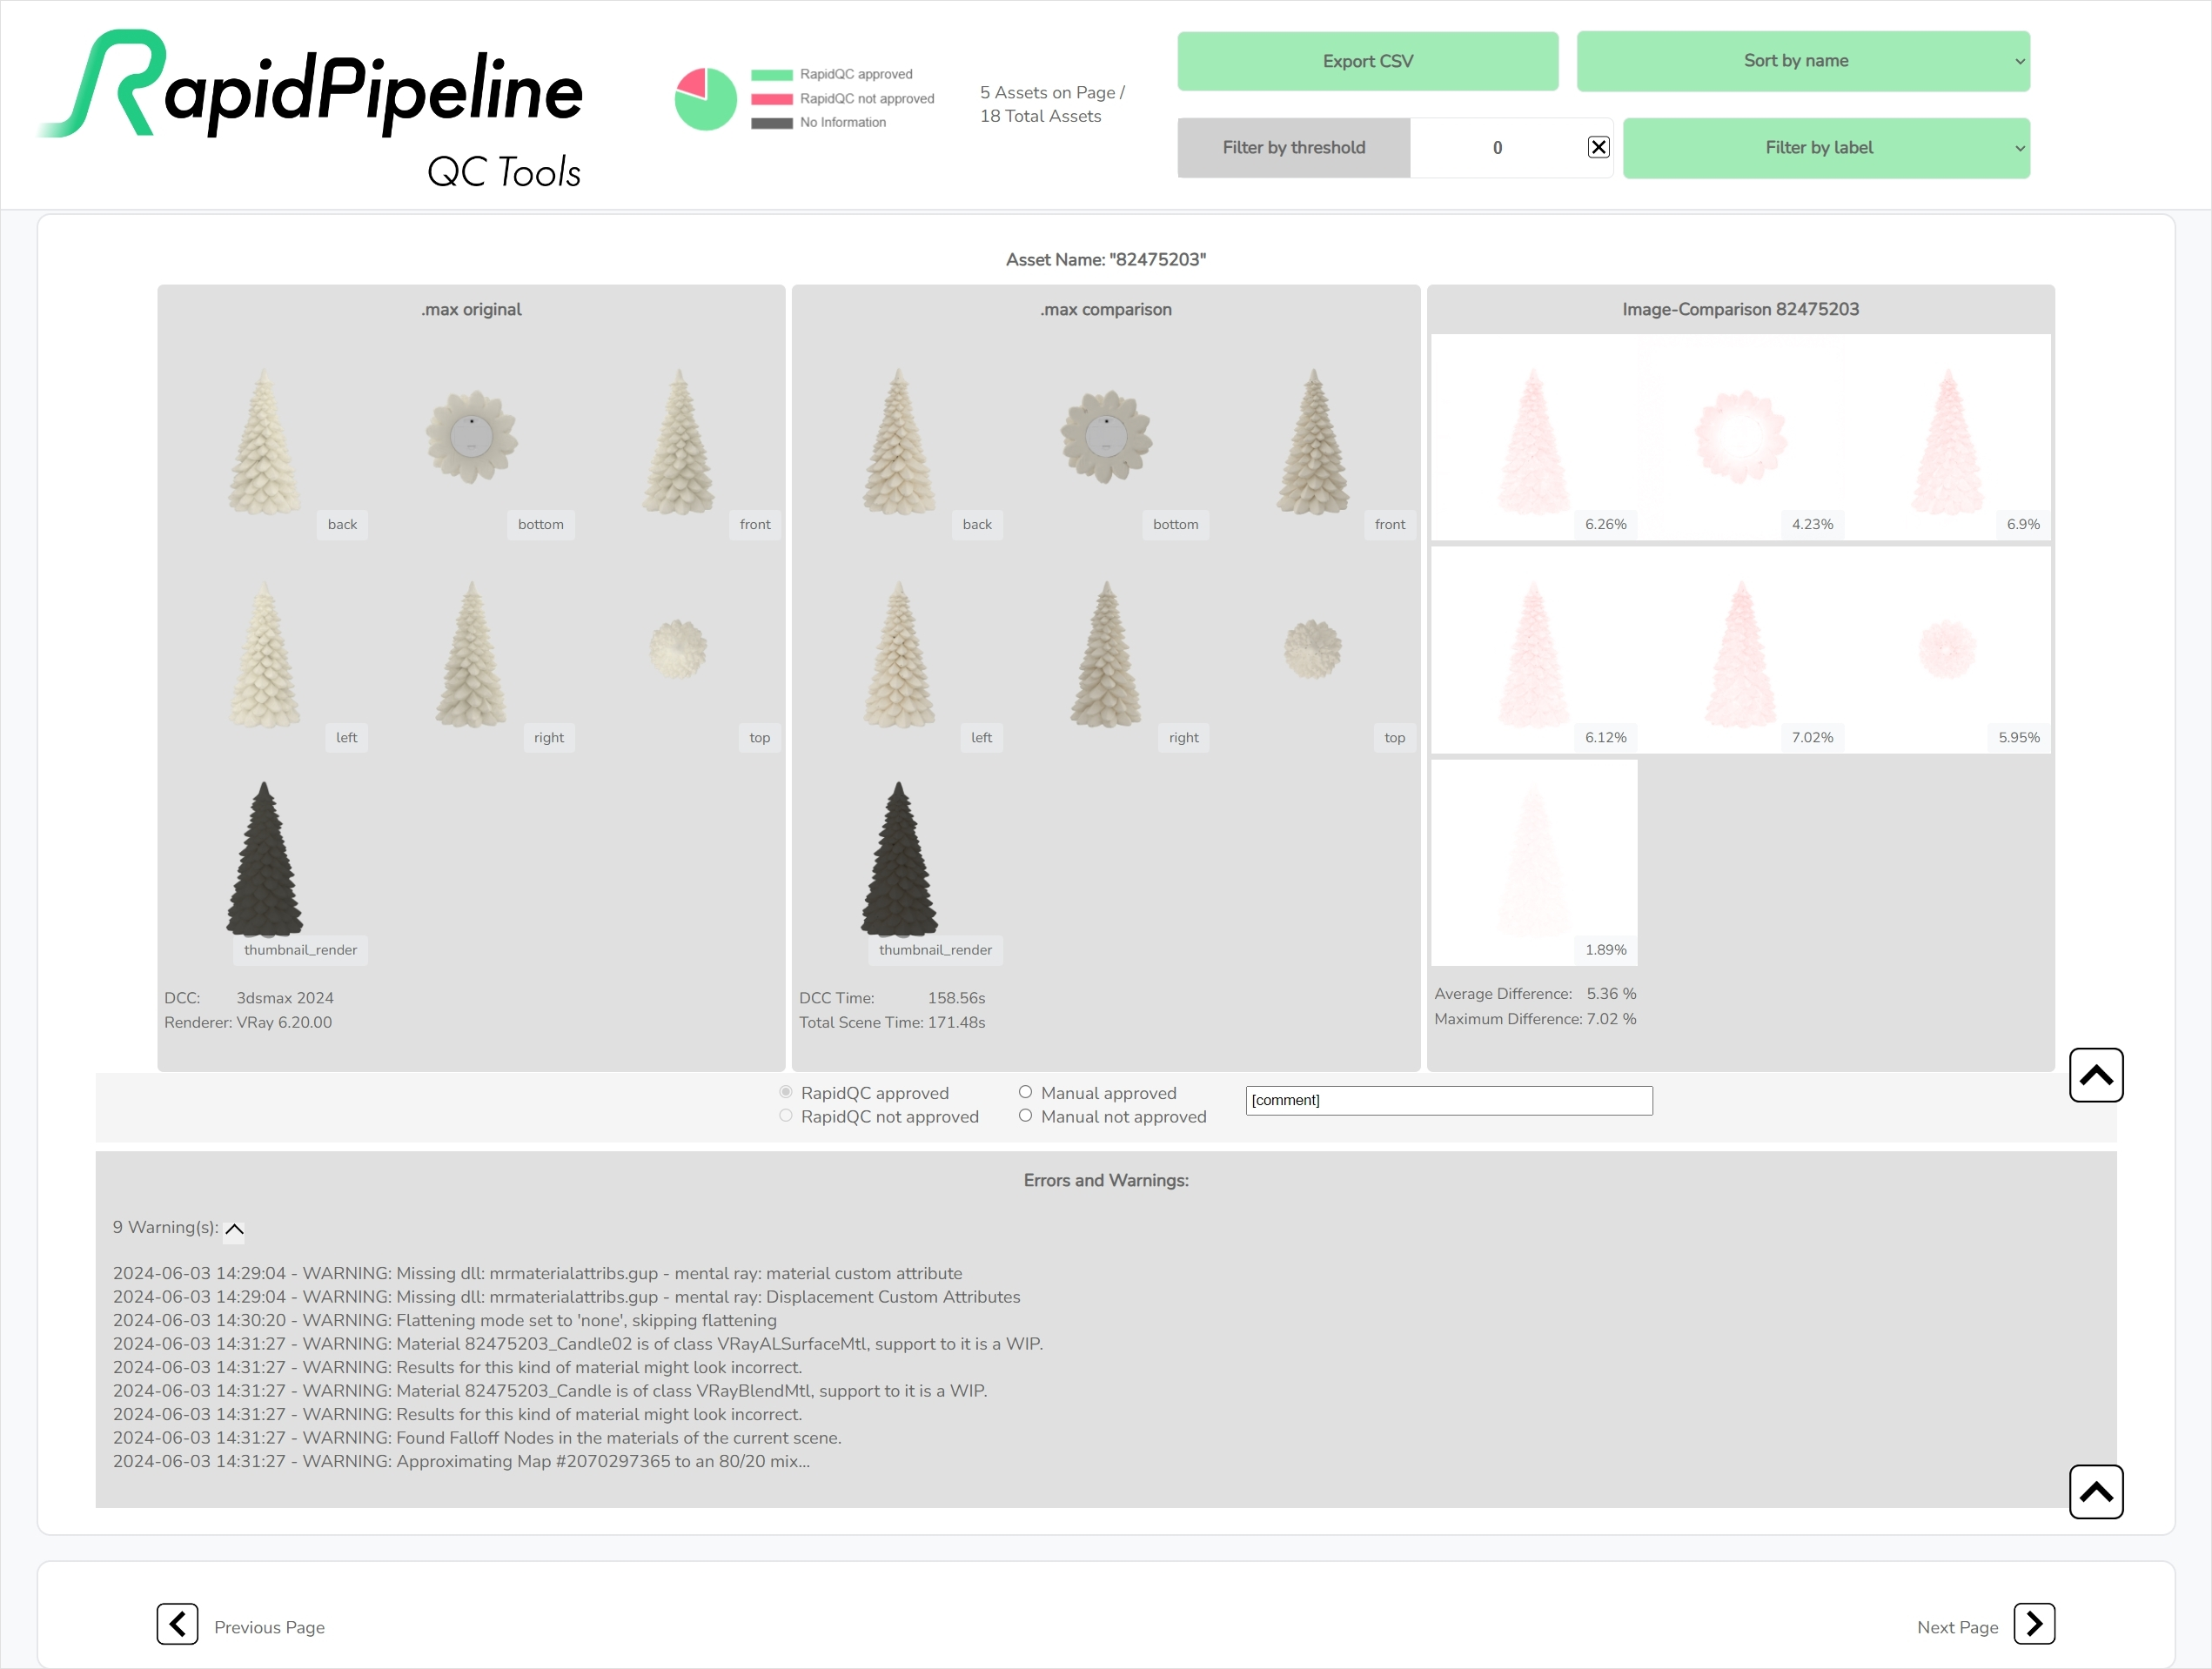
CLI batch mode exposes additional controls for evaluating and managing large runs.
Manual Quality Control
Manual approval/rejection can be performed as needed, to override the automated scoring. Comments can be added for clarity. Use the CSV Export button to save comments and manual scores.

The automated scoring can be overriden, and comments can be added.
CSV Export
CSV reports can be exported to integrate into a custom pipeline, for example to load into Excel or Sheets for further sorting and filtering.

Details can be exported as CSV (comma separated values) for use in Excel or Sheets.