Interface Guide
Interface guide for the RapidPipeline Blender Add-On.
Invoking the Add-On
The Add-On window is accessed via a Sidebar on the right side of the 3D Viewport.
The hotkey
ntoggles the visibility of the Sidebar.The width of the Add-On window can be resized by dragging on the left edge.
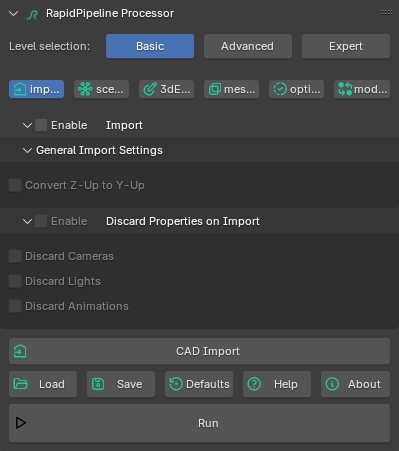
Settings Level

The amount of settings shown in the tabs can be quickly simplified.
Basic: Basic settings are shown.
Advanced: More settings are shown.
Expert: All settings are shown.
Settings Tabs
![]()
The RapidPipeline Blender Add-On is powered by the RapidPipeline 3D Processor. Each of the settings are explained in the 3D Processor Settings Documentation. Look for the "In the Blender Add-On" tabs in each setting category.
Import: Customize the file import process.
Scene Graph Flattening: Control the scene graph, specifying how nodes are merged or kept.
3D Edit: Edit normals, scale, generate UVs, assign textures, center the model, and more.
Mesh Culling: Removal of invisible interior geometry and/or small features.
Optimize: Mesh and material optimization, including options for decimation, remeshing, texture atlas baking, UV aggregation, and more.
Modifier: Optimize to a specific target, either file size or screen size.
Export: Customize file export, formatting, and compression.
Function Buttons
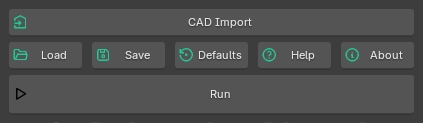
- CAD Import: Import a CAD format asset into Blender using RapidPipeline 3D Processor.
- This is available if you have a RapidPipeline CAD Edition plan, which extends CAD file support in RapidPipeline.
- It prompts for a supported CAD format, then uses RapidPipeline 3D Processor to tesselate the model and import it into Blender.
Load: Load a RapidPipeline Processor settings .json file.
- All current settings are overridden by the loaded settings.
- Settings must be in RapidPipeline 3D Processor 7.x format. Avoid legacy 6.x presets which may be present in your web platform account, these are indicated with the tag "Legacy".
Save: Save the current settings as a RapidPipeline Processor settings .json file.
- Saved settings can be shared with other team members.
- Saved settings can be used in other interfaces for RapidPipeline 3D Processor: Web Platform, REST API, CLI, or the Blender Plugin.
Defaults: Resets all settings in the current window to their default values.
Help: A link to the tutorial documentation.
About: Information on the current version, licenses, and a button to reset the RapidPipeline API Token.
Run: Start processing selected objects using the current settings.
- Once processing is complete, the source mesh is hidden, a new Collection is created for the result, and the result is selected.
For step-by-step usage guides see Blender Add-On Tutorials and Remesher in Blender