Tutorial: 3D Processor CLI Preserve UVs
| This tutorial contains these key points: |
|---|
| ✔️ Import a 3D model |
| ✔️ Create a Settings Preset Config |
| ✔️ Optimize geometry |
| ✔️ Preserve tiling UVs |
| ✔️ Bake ambient occlusion to 2nd UV |
| ✔️ Compare the results |
This tutorial shows how use RapidPipeline 3D Processor CLI to optimize a 3D model, preserving existing tiled UV coordinates, generating a second shared UV, and baking a single ambient occlusion texture for the whole model.
RapidPipeline 3D Processor is a powerful 3D data optimization and automation toolset; for more information please see the product overview.
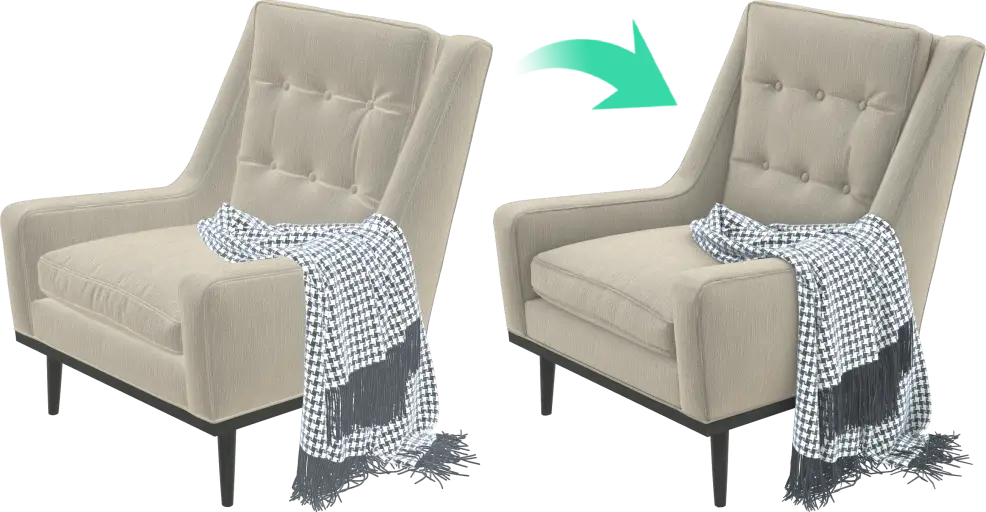
Input model (left) at 61.6mb with 906,426 triangles. Output model (right) is 6.5mb with 50,000 triangles.
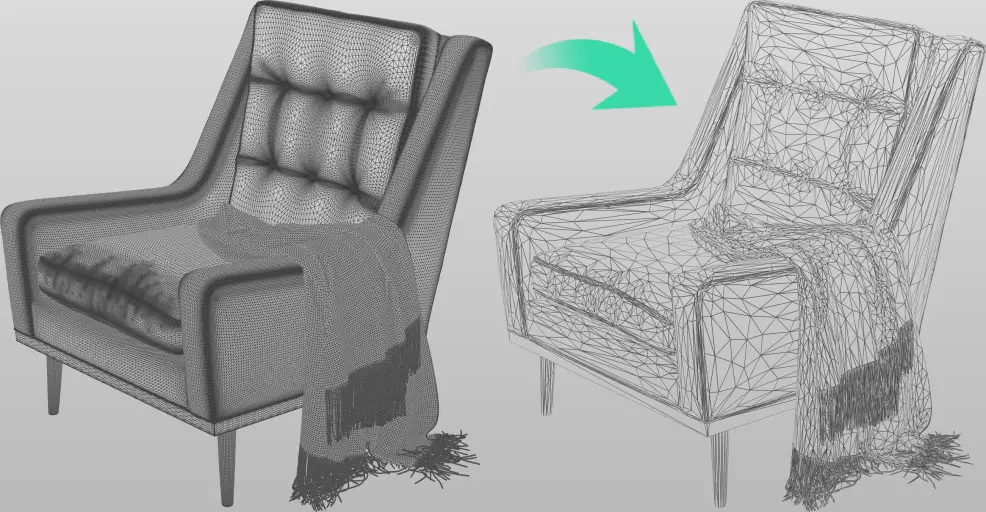
Wireframes of the input and output models.
Files Used in this Tutorial
- The input 3D asset: chairwiththrow.glb (61.6 mb)
- The Settings Preset Config file: preset-preserve.json.
- The output 3D asset: chairwiththrow-output.glb (6.5mb)
Examine the Input Model
Before deciding on which settings to use, it is important to examine statistics for the input 3D model. Download the 3D asset chairwiththrow.glb (61.6 mb) and save it into a folder on the hard drive. In this tutorial C:\temp\ is used.
RapidPipeline 3D Processor CLI can be used to extract salient info by typing rpdx -i chairwiththrow.glb --write_info info-input.json
This process will generate a JSON-formatted text file with more than 70 lines of information about the 3D model. The info file can alternatively be downloaded here.
This asset has 26 meshes: "numMeshes": 26, so Scene Graph Flattening will be useful. This will attach all pieces together that share the same material, which helps prevent gaps from appearing during optimization.
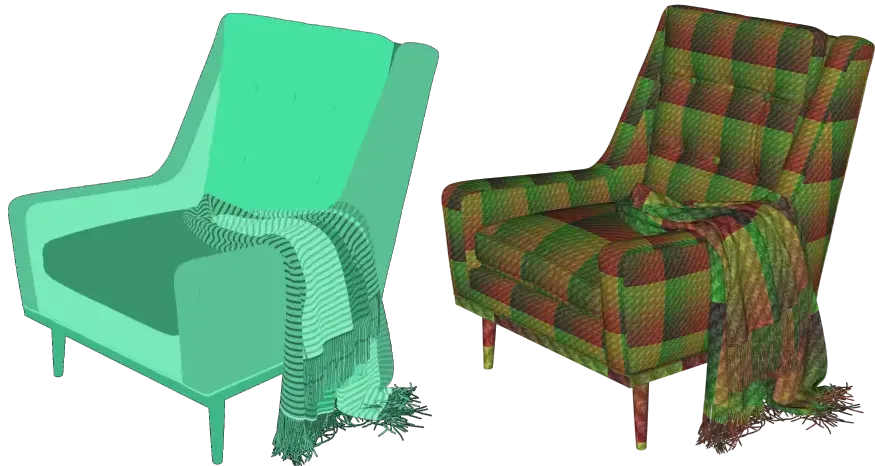
The chair has multiple meshes, and tiled UVs.
Settings Presets
To control the optimization process, a JSON-formatted Settings Preset Config is required. This is a text file with a specific layout, containing settings that can be edited as needed.
Config files can be created in multiple ways: by using the CLI, or using the Blender Plugin, or using the Web Platform, or using the REST API.
In this tutorial, a Config will be created using the Web Platform, then exported to use with the CLI. The Config file can alternatively be downloaded here.
Presets are great for automatically processing large batches of 3D assets, to create well-formed output files. Presets help to effectively convert, optimize, render and prepare 3D content for any use-case, platform or device.
Create a Settings Preset Config
Open the RapidPipeline web platform and go to 3D Processor Presets.
Click on Create Preset which will start the preset with a blank template.
Click the down arrow next to Custom Preset to open the available settings.
Change the mode to Expert to expose all settings.
Settings for Scene Graph Flattening
Enable the Scene Graph Flattening section, which opens the available settings.
Set the Flattening Method to use byMaterial.
This will merge all the meshes together that share the same material. Merging meshes together will help prevent gaps from appearing between them when they are optimized.
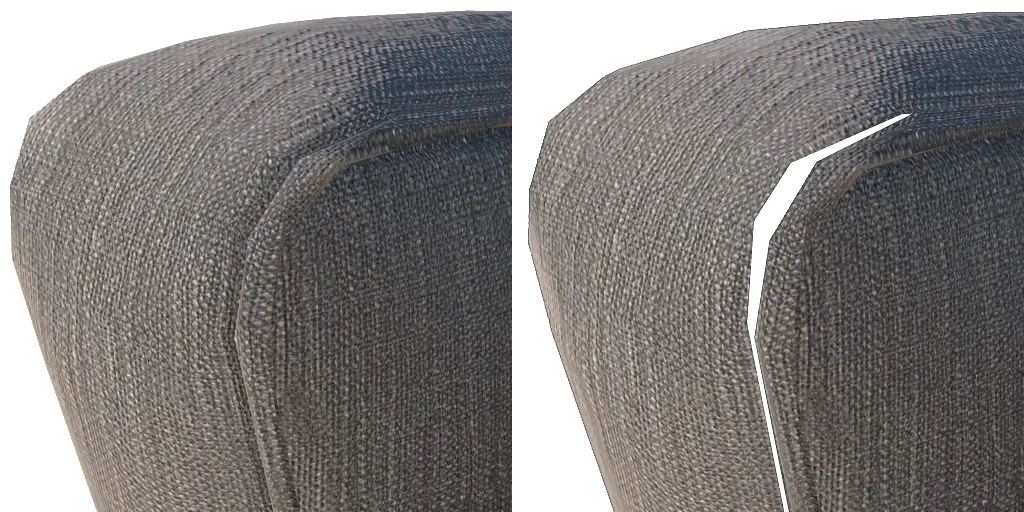
Scene Graph Flattening byMaterial (left), versus None (right)Use the Save button at the top of the preset to save the settings created so far.
For more information, see the reference documentation on Scene Graph Flattening.
Settings for Optimize
Enable the Optimize section, which opens the available settings.
Enable the 3D Model Optimization Method, and use Mesh and Material Optimization.

The mesh for this model will be simplified, and an ambient occlusion texture will be baked for the materials.Enable Target, choose Faces, choose Faces Value, and enter a triangle count of 50000.
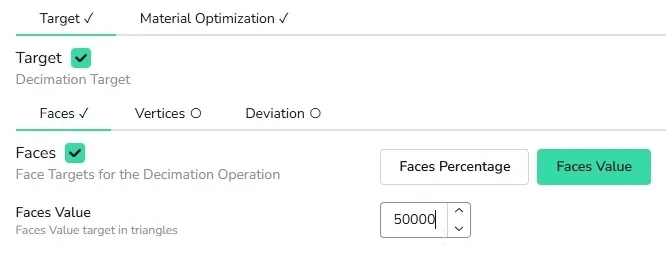
This is a good amount for a complex mesh; this asset has a throw blanket with fine tassles, which requires a bit more detail in the optimized model.tipFor more information on triangle decimation, see the reference documentation for the Decimator.
Next to the Target heading, choose Material Optimization.
This will expose the controls for ambient occlusion baking.The first dropdown should be set to Keep Materials and UVs.
Click on the heading Generate 2nd UV Atlas, then enable the checkbox next to Generate 2nd UV Atlas.
UV Atlas Mode should be changed to single.
This will create a 2nd UV which is shared by all the asset materials, which means they will all use a single shared ambient occlusion texture.Enable the checkbox next to 2nd UV Atlas Texture Baker and enable Bake Combined Scene.
This will cause all meshes to cast occlusion onto each other, so for example the throw blanket will cast shadowing onto the chair. When this setting is disabled, each material will only create occlusions using its own meshes, ignoring all other meshes in the scene.Click on the heading 2nd UV Ambient Occlusion Map Baker, and enable the checkbox next to 2nd UV Ambient Occlusion Map Baker.

This will bake the ambient occlusion texture using the 2nd UV.tipFor more information on ambient occlusion baking, see the reference documentation for the Ambient Occlusion Baker.
Use the Save button at the top of the preset to save the settings created so far.
Settings for Export
Click on the Export section to expose the Export controls.
Set the first output to GLB Format, and click the down arrow to open the export settings.
This will be a single self-contained glTF asset in binary form, which makes it easier to share the finished asset.Enable the checkbox for Exclude Tangents.
Tangents are not needed for this model because it uses tiled normal maps. Excluding the tangents will help reduce the file size.tipWhen is it good to include tangents? If normal maps are baked with mesh data in them (not tiled) then tangents will help a renderer understand how to correctly light the model, and to avoid causing seams on UV borders.
Enable the checkbox next to glTF PBR Material, enable Maximum Texture Map Resolution, and set it to 1024.
The default resolution is 2048x2048, which is set by the texture baker in the Optimize tab, but this asset doesn't need that much resolution, so it helps to reduce the Export file size by setting the ambient occlusion texture to 1024.Use the Save button at the top of the preset to save the finished settings.
Export the Preset
Rename the preset if desired, by hovering over the default title Custom Preset and clicking on the edit button.
This name is only used within the Web Platform; the exported preset will always be namedpreset.json.In the ACTIONS column, click the three dots menu button, and choose Download.
Open the downloaded ZIP file, extract the
preset.jsonfile into the same folder as the 3D model that will be optimized, then rename itpreset-preserve.json.tipIt is a good idea to rename preset files to keep them organized, and to prevent files from being overwritten by subsequent presets.
The finished Settings Preset Config file can alternatively be downloaded here.
The finished preset file looks like this:
{
    "export": [
        {
            "preserveTextureFilenames": false,
            "reencodeTextures": "auto",
            "format": {
                "glb": {
                    "pbrMaterial": {
                        "maxTextureResolution": {
                            "default": 1024
                        }
                    }
                }
            }
        }
    ],
    "sceneGraphFlattening": {
        "method": "byMaterial"
    },
    "optimize": {
        "3dModelOptimizationMethod": {
            "meshAndMaterialOptimization": {
                "decimator": {
                    "materialOptimization": {
                        "keepMaterialsUVs": {
                            "atlasGenerator2ndUV": {
                                "atlasMode": "single",
                                "textureBaker2ndUV": {
                                    "bakeCombinedScene": true,
                                    "aoBaker2ndUV": {}
                                }
                            }
                        }
                    },
                    "target": {
                        "faces": {
                            "value": 50000
                        }
                    }
                }
            }
        }
    }
}
Processing the Model
| Step by Step |
|---|
| 1. In the same folder containing the 3D model and the Settings Preset Config, open a Windows PowerShell. This can be done by holding the Shift key, right-clicking in the folder, and choosing Open PowerShell window here. |
| 2. Type (or copy-paste) the CLI command below, and press the Enter key. |
rpdx -i chairwiththrow.glb --read_config preset-preserve.json -r -o out
The results in the CLI:
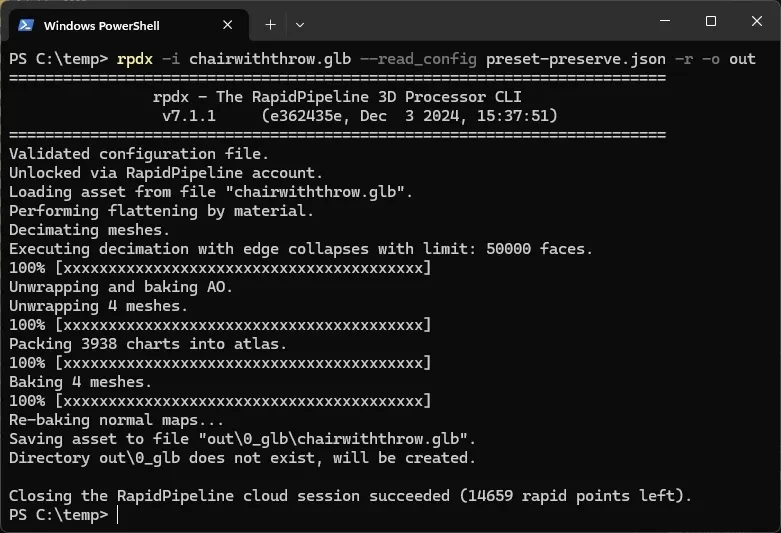
CLI output from the optimization and baking process
CLI Commands Explained
| Command | Result |
|---|---|
rpdx | Starts the CLI |
-i chairwiththrow.glb | Imports the 3d asset for processing |
--read_config preset-preserve.json | Loads the Settings Preset Config file (created above) |
-r | Runs the 3D Processor |
-o out | Outputs the processed 3D asset into a folder named \out |
Understanding the Outputs

Input model (left) at 61.6mb with 906,426 triangles. Output model (right) is 6.5mb with 50,000 triangles.
The output file is saved into a subfolder named \out\0_glb. A numbered subfolder is created because an Output command can save multiple file formats in the same command, so each is saved into its own folder, to avoid conflicts.
The output filename will use the same prefix as the input file chairwiththrow and use whatever file extension was specified in the Settings Preset Config, in this case .glb.
The input model had 26 meshes and 4 materials; the output has 4 meshes and 4 materials.
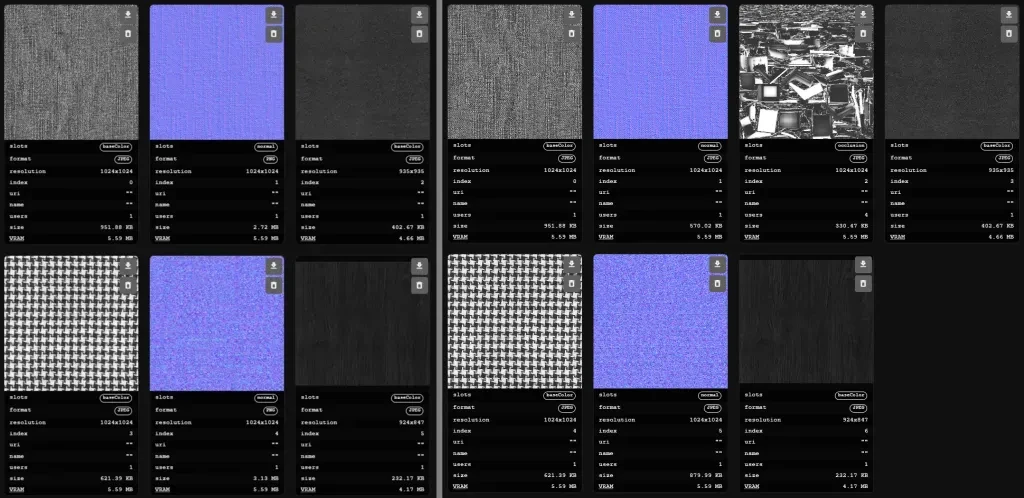
Input model has six textures (left), output (right) has the same six textures plus one additional 1024x1024 ambient occlusion texture.
Input / Output Statistics
| Input Asset | Output Asset |
|---|---|
| 906,426 triangles | 50,000 triangles |
| 26 meshes | 4 meshes |
| 4 materials | 4 materials |
| 4 BaseColor maps | 4 BaseColor maps |
| 2 Normal maps | 2 Normal maps |
| No Occlusion map | 1 Occlusion map |
| File size 61.6mb | File size 6.5mb |