RapidPipeline for Blender
An introduction on how to use the RapidPipeline Blender add-on.
The plugin runs on a powerful 3D data optimization and automation toolset, more about it here: 3D Processor Reference.
For setup instructions please refer to RapidPipeline for Blender Installation.
Basic Usage
In Blender, all RapidPipeline operations are powered by Actions which offer a curated set of common functions for quick and easy processing. Alternatively, users can leverage Expert Mode for fine-grained customizations.
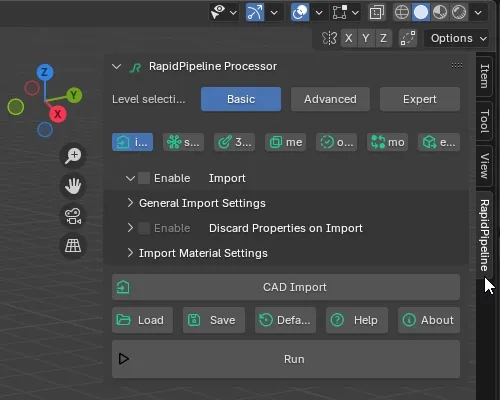
Invoking the Add-On
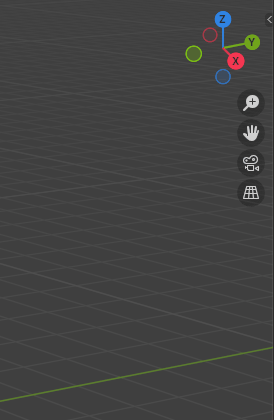
The add-on window is accessed via a sidebar on the right side of the 3D viewport.
The hotkey
ntoggles the visibility of the sidebar.The width of the add-on window can be resized by dragging on the left edge.
Import a 3D Model
In the 3D viewport open the sidebar (default hotkey
n) and chooseRapidPipeline.Click on the
Import 3D or CAD Filebutton.Browse for a 3D file to import. Adjust options as needed in the Settings region on the right. Then press
Import File.
The 3D asset is now imported into the scene. Imported assets can now be edited with Actions.
Process a 3D Model
Open a model in Blender, and select the mesh parts to be processed.
- If no parts are selected, all visible meshes will be affected.
In the 3D Viewport open the Sidebar (default hotkey
n) and chooseRapidPipeline.Click on an Action to expose the options, and adjust settings as desired.
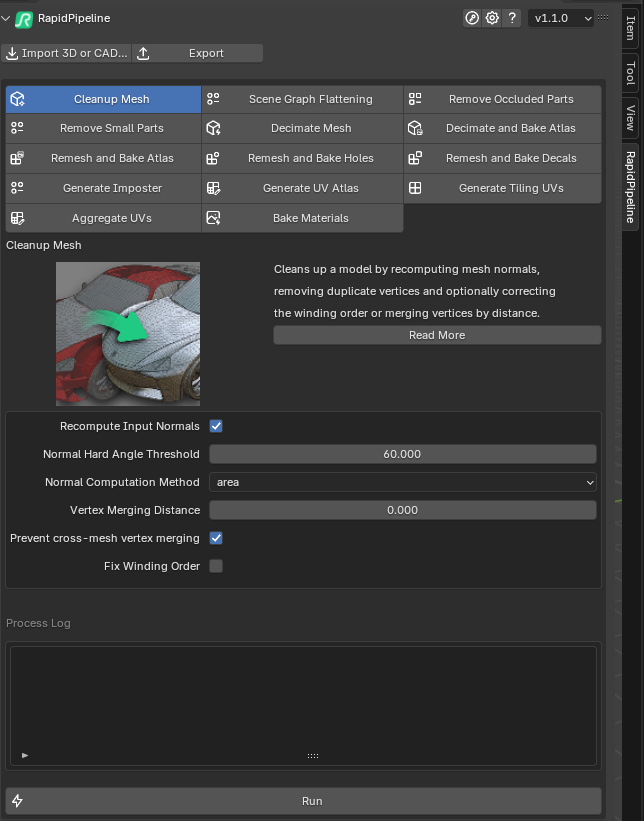
Click the Run button.
- The selected meshes are processed.
- Once processing is complete, the selected meshes are hidden, and the newly-processed meshes are placed into a new Collection.
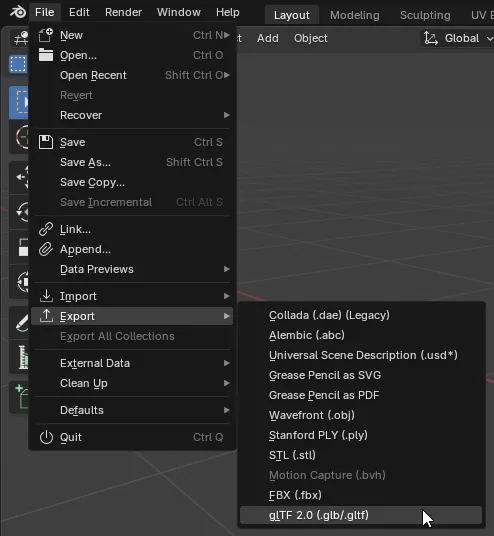
Export a 3D Model
In the 3D Viewport open the Sidebar (default hotkey
n) and chooseRapidPipeline.Click on the
Exportbutton.
In the Export Menu, choose a format to export to.

Browse for a location to export to, and choose a file name. Adjust options as needed in the Settings region on the right. Then press
Export File.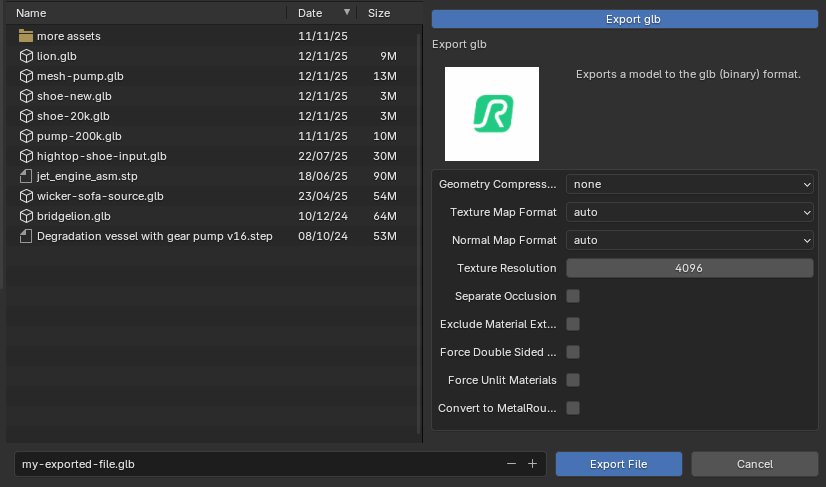
Blender Actions Tutorials
Here are guides that walk through each RapidPipeline Action within the Blender add-on.
For detailed documentation about the individual settings, please see the Actions Reference.
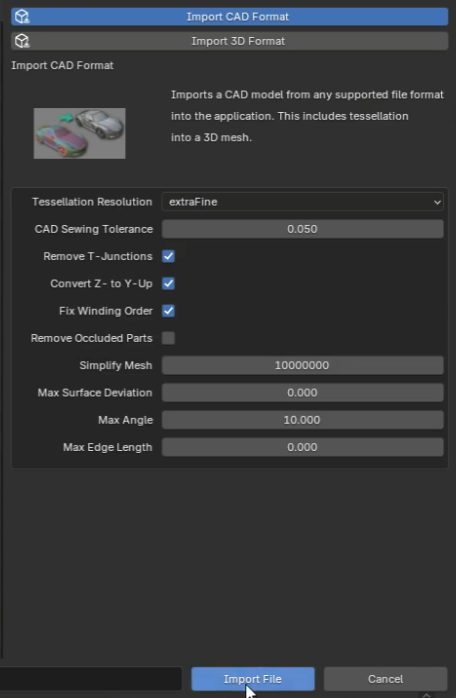
Import 3D or CAD File
| This tutorial contains these key points: |
|---|
| ✔️ Use the Blender add-on |
| ✔️ Run "Import CAD Format" Action |
| ✔️ Select a CAD file |
| ✔️ Adjust import settings |
| ✔️ Examine the results |
This tutorial shows how use the RapidPipeline Processor add-on in Blender to import a 3D or CAD model.
It walks you through the use of the Import 3D or CAD file Option, focusing on the Import CAD Format Action, and explains the available import options.
As an example model see below a coffee machine model, in SolidWorks Part format (.SLDPRT), can be easily imported into Blender with the RapidPipeline add-on. During this process, the model gets automatically tessellated.
The example asset in this tutorial is based on a Coffee Machine model by bob-640, sourced from GrabCAD.
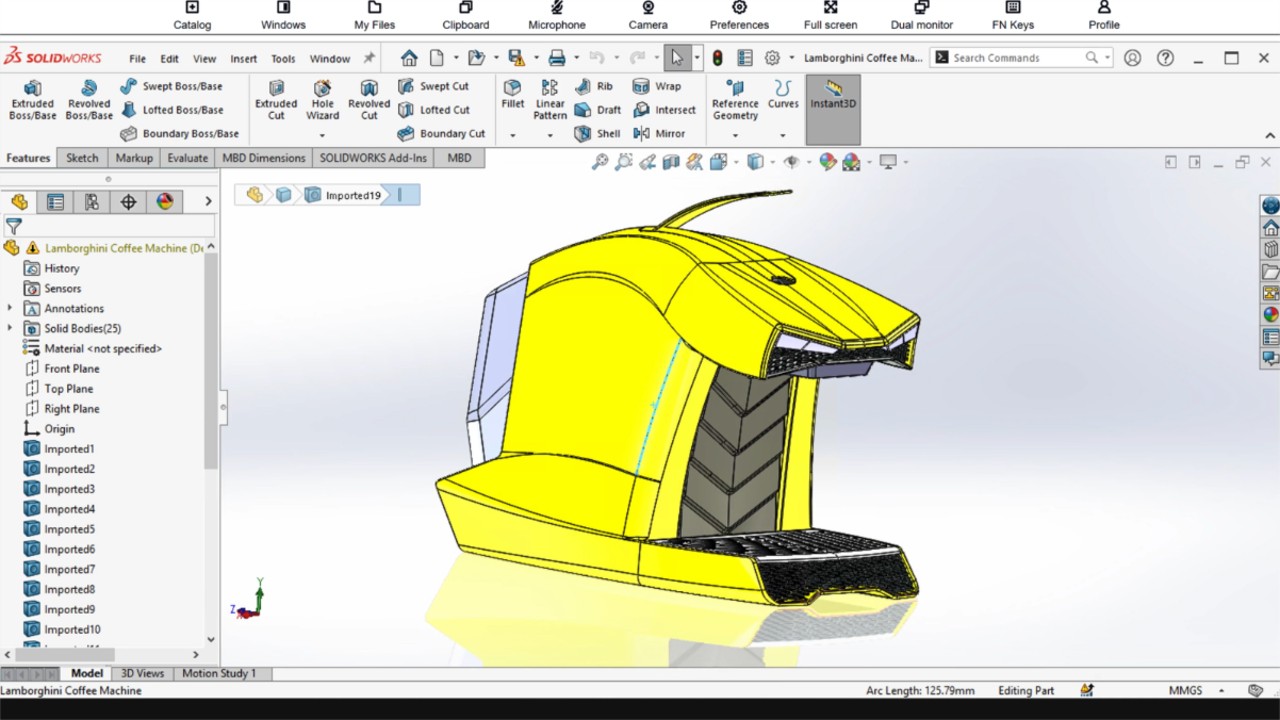
The coffee machine original model in SolidWorks
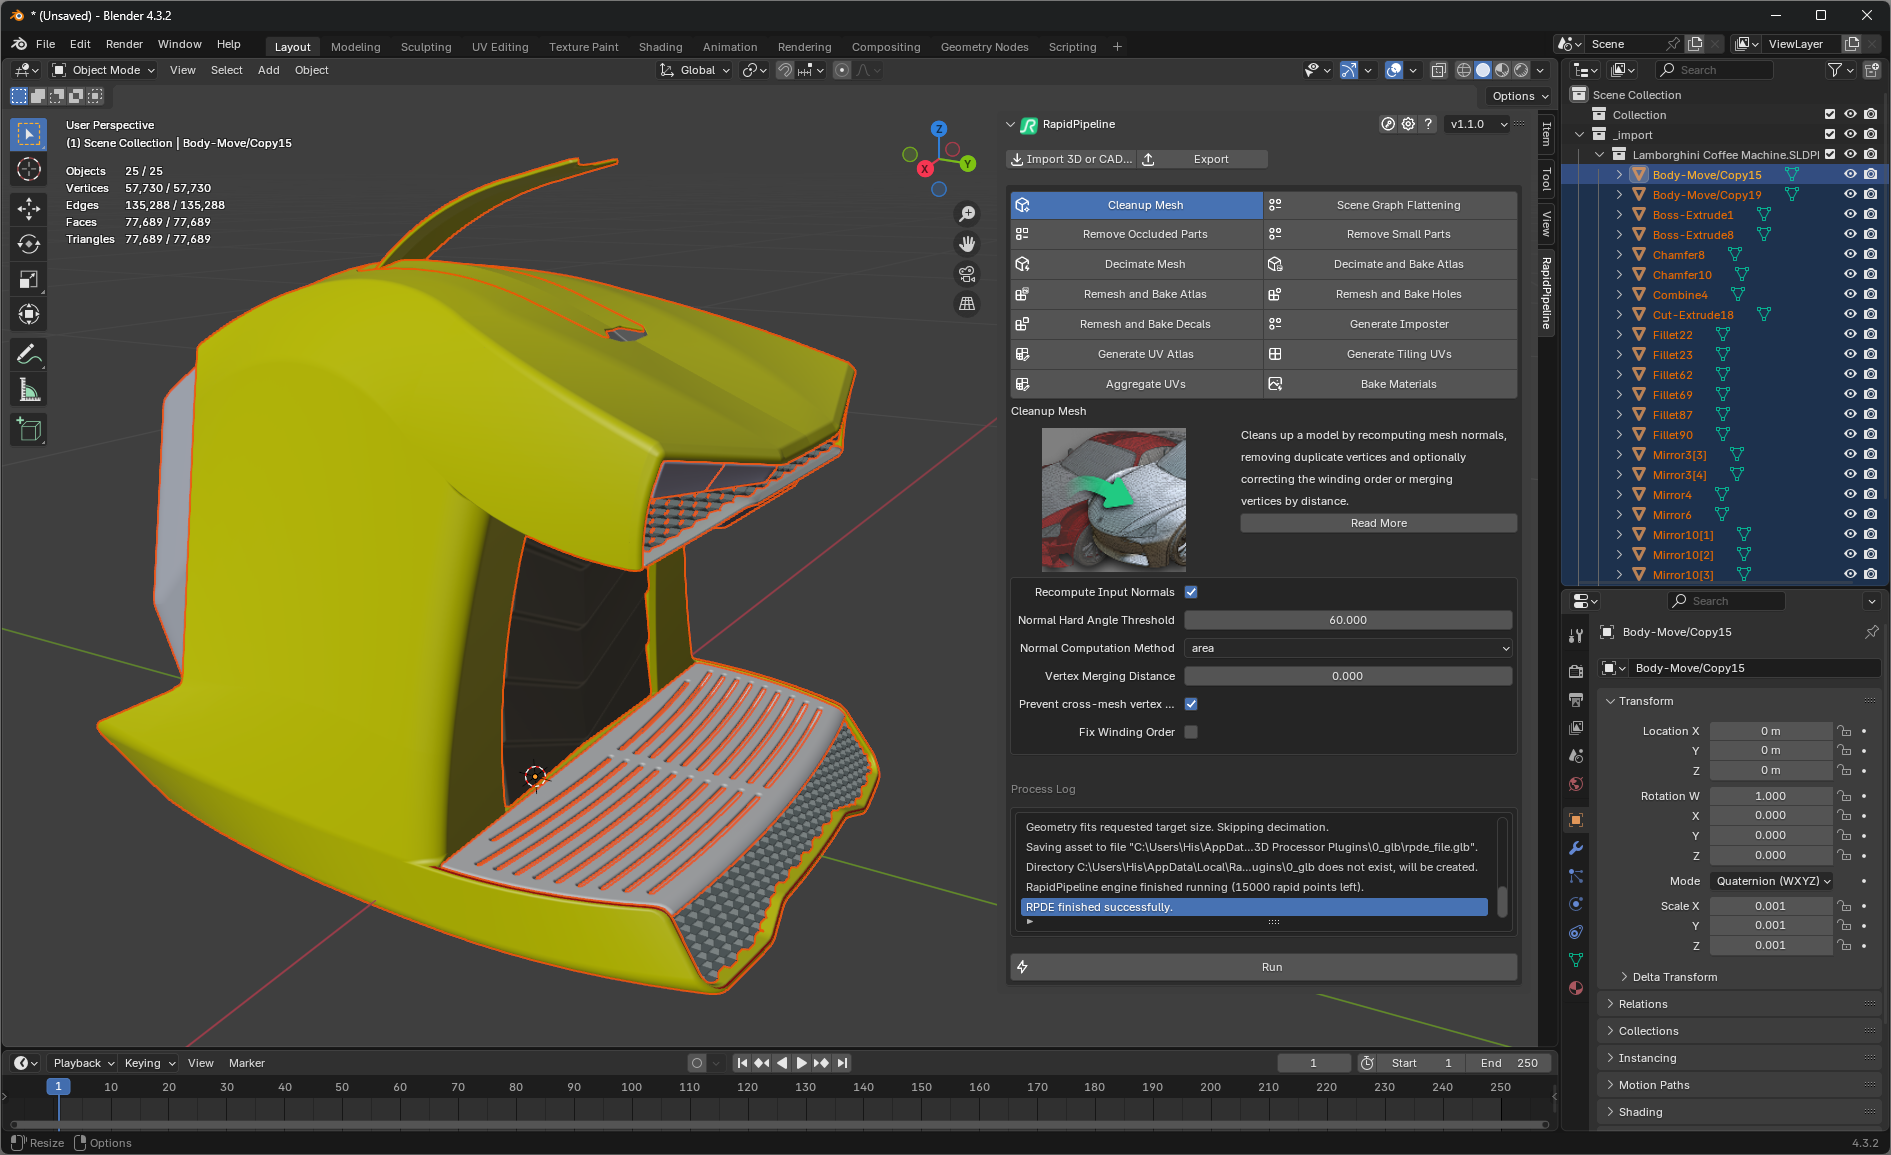
The coffee machine model inside Blender
Import CAD Format Action
Here are the steps to achieve the same result as seen in the preview above.
In the 3D viewport open the sidebar (default hotkey
n) and chooseRapidPipeline.Click on the
Import 3D or CAD Filebutton.Browse for a 3D file to import. Adjust options as needed in the Settings region on the right. Then press
Import File.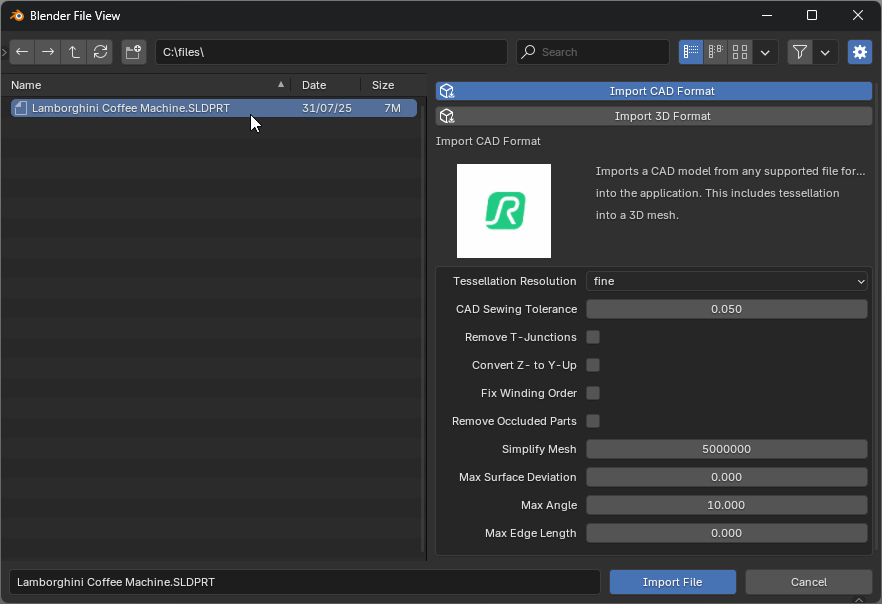
The 3D asset is now imported into the scene. Imported assets can now be edited with Actions.
If no settings are adjusted, RapidPipeline will import your CAD model with default values. However there are different settings you can tweak to fix common CAD-related issues during import, or even already perform optimization during the import step. For detailed information about each option, see the Actions Reference Documentation.
Examine the Results
To properly analyze the results, enable “Edged Faces” from the Viewport Shading drop-down menu. This will display the mesh topology in the viewport. The outputs when selecting Tessellation Resolution fine and coarse are displayed in the picture below, where the face count differences are shown.
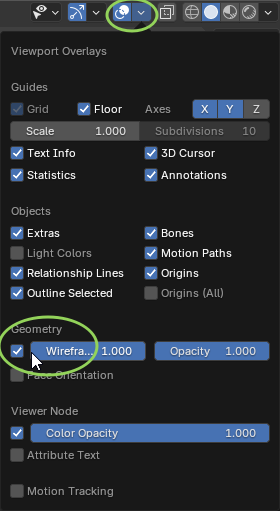
"Geometry” option in the Viewport Overlays menu
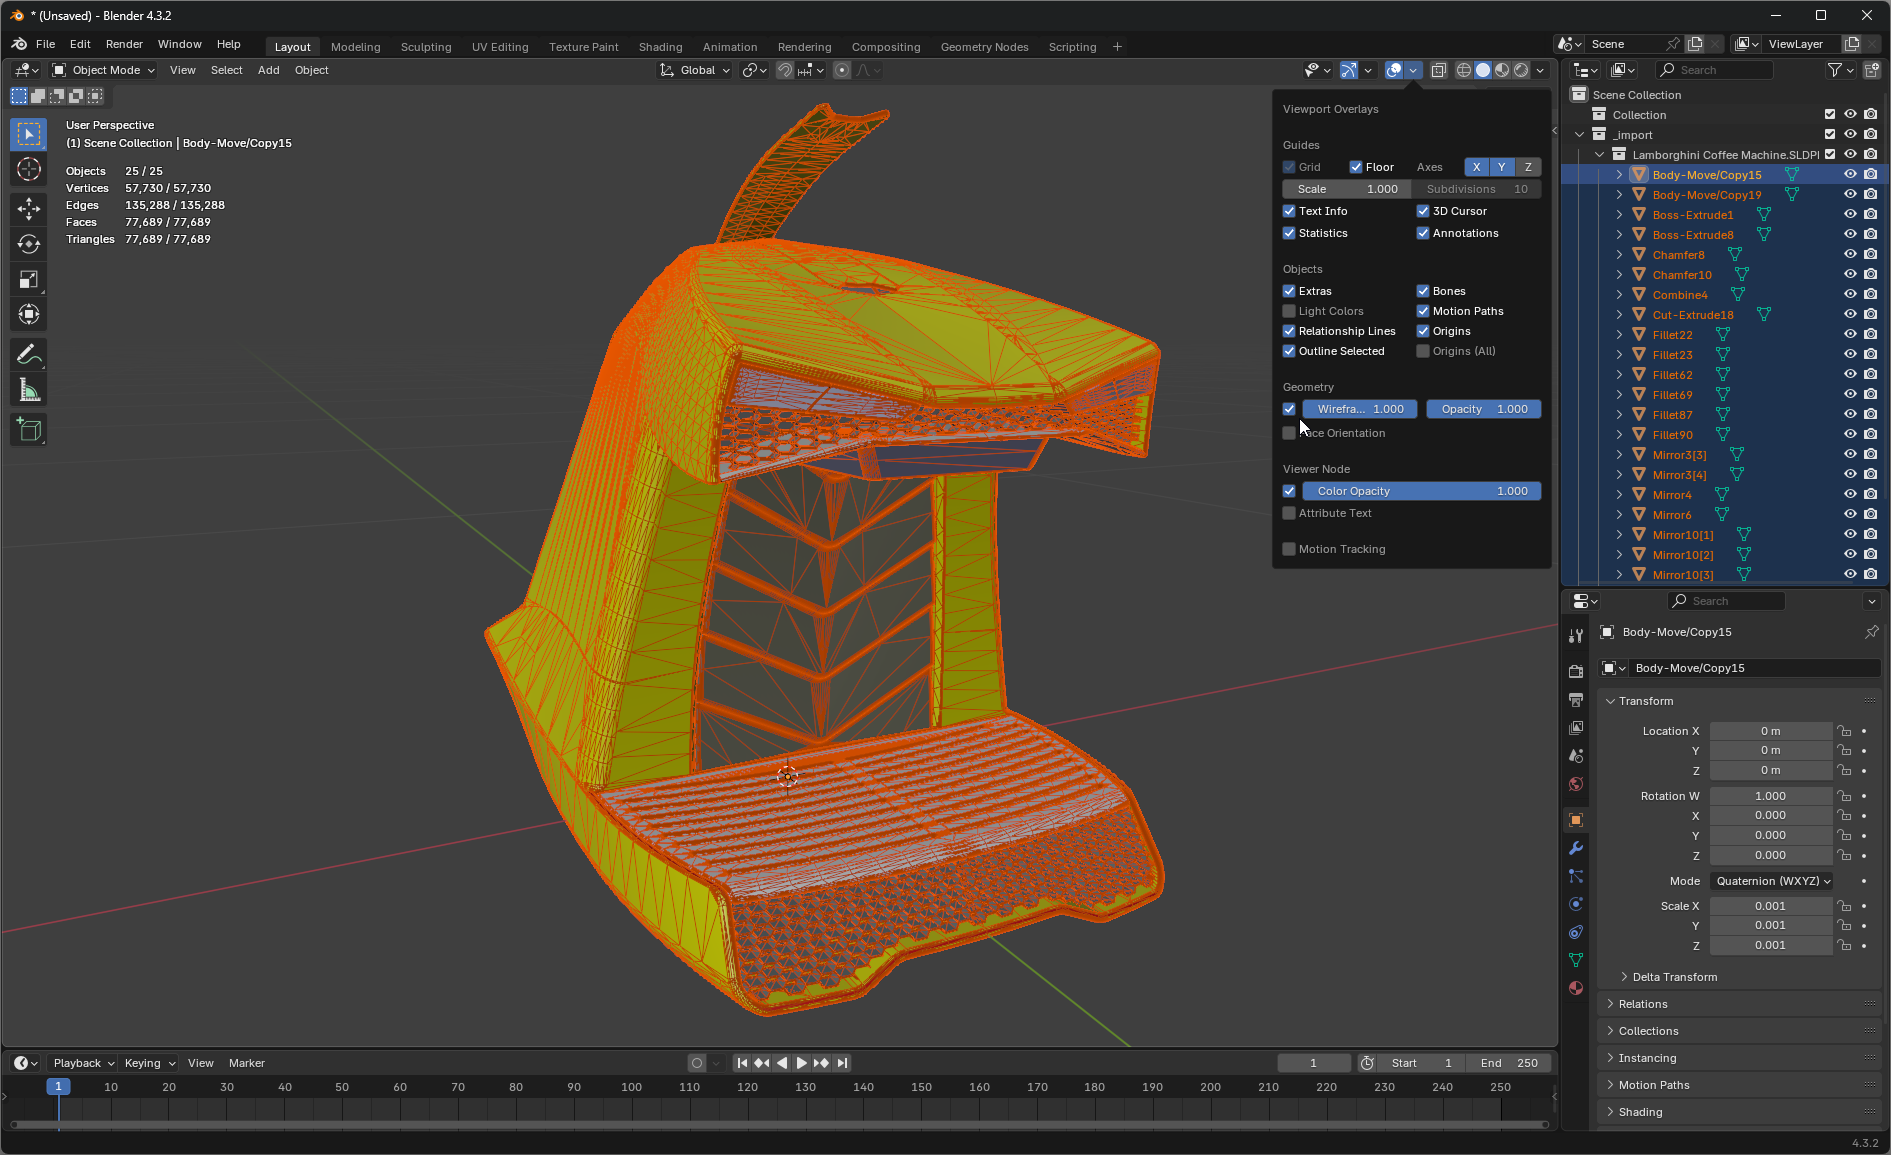
The imported model with tessellation resolution fine
Next Steps
To fix winding order, normal or topology issues in your model, try the Cleanup Mesh action!
Cleanup Mesh
| This tutorial contains these key points: |
|---|
| ✔️ Use the Blender add-on |
| ✔️ Check for inverted faces |
| ✔️ Use the Cleanup Mesh action to fix winding order |
| ✔️ Examine the results |
This tutorial shows how use the RapidPipeline Processor add-on in Blender to clean up model´s geometry and fix frequent mesh issues. This page will guide you through the use of the action Cleanup Mesh on a CAD model example with faulty normals/winding order.
See below an overview of the performed fixes during this tutorial: the normals and winding order of the mesh, wrong in the original file, have been fixed in the output.
The example asset in this tutorial is based on 'Gusto - electric sports car concept' by Mikko Hörkkö, sourced from GrabCAD.
Input with wrong Winding Order
Output with correct Winding Order
Clean Up Mesh Action
In the 3D viewport open the sidebar (default hotkey
n) and chooseRapidPipeline.Select the faulty meshes by clicking on them in the Viewport (only the selected meshes will be processed), or select all the model, or do not select anything (all the scene will be processed).
Inside the add-on window, choose the action
Cleanup Mesh.Enable
Fix Winding Orderin the action settings.Press the
Runbutton.
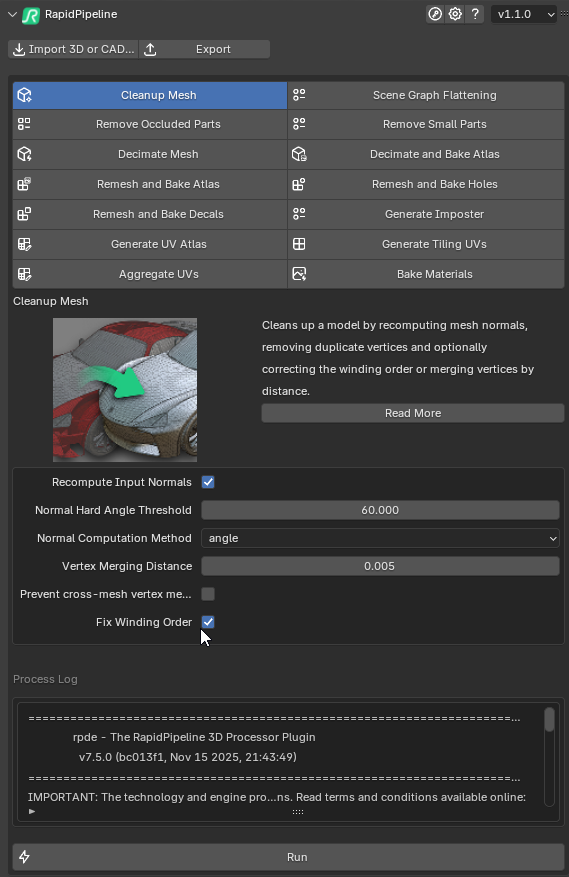
The Cleanup Mesh action opened in the add-on
These settings are optimal for this model, as some parts have incorrect winding order.
For other models with faulty mesh normals, the setting Fix Winding Order may not be needed. In that case, simple use Recompute Input Normals. The angle at which recomputed normals will be considered “hard” is controlled with the Normal Hard Angle Threshold setting.
Examine the Results
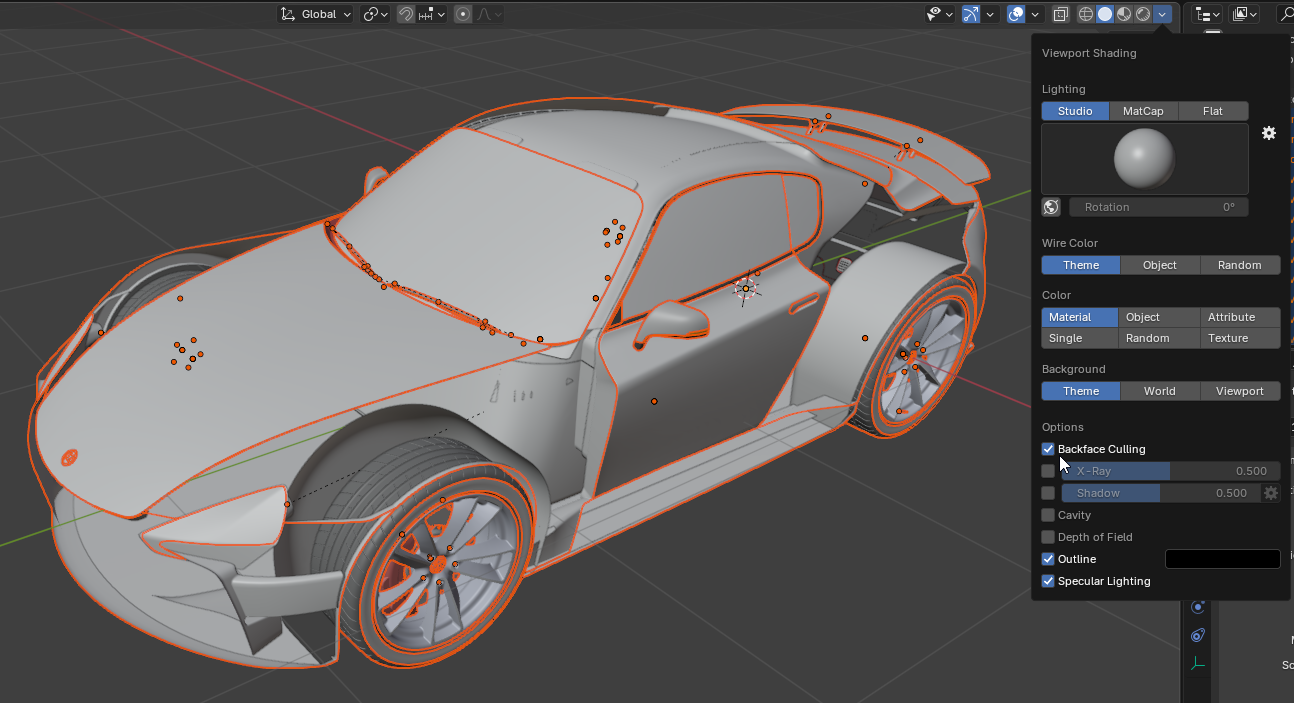
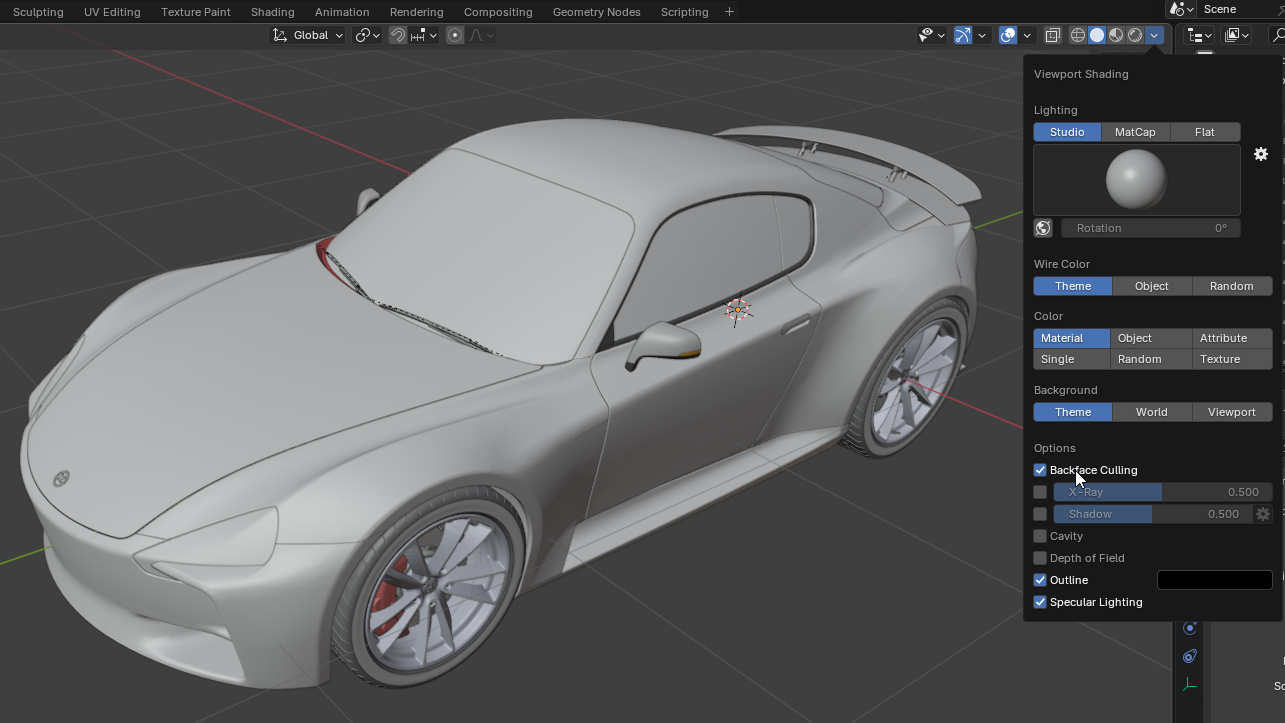
To analyze the model, enable Backface Culling from the Viewport Shading drop-down menu. This will display the mesh as single-sided in the viewport, showing where faces are flipped incorrectly.
Alternatively, enable Face Orientation in the Viewport Overlays drop-down menu. Note this only works properly if Backface Culling is disabled.
You can follow the same steps for the input and the output model to examine the winding order closely.
Backface Culling on the imported asset
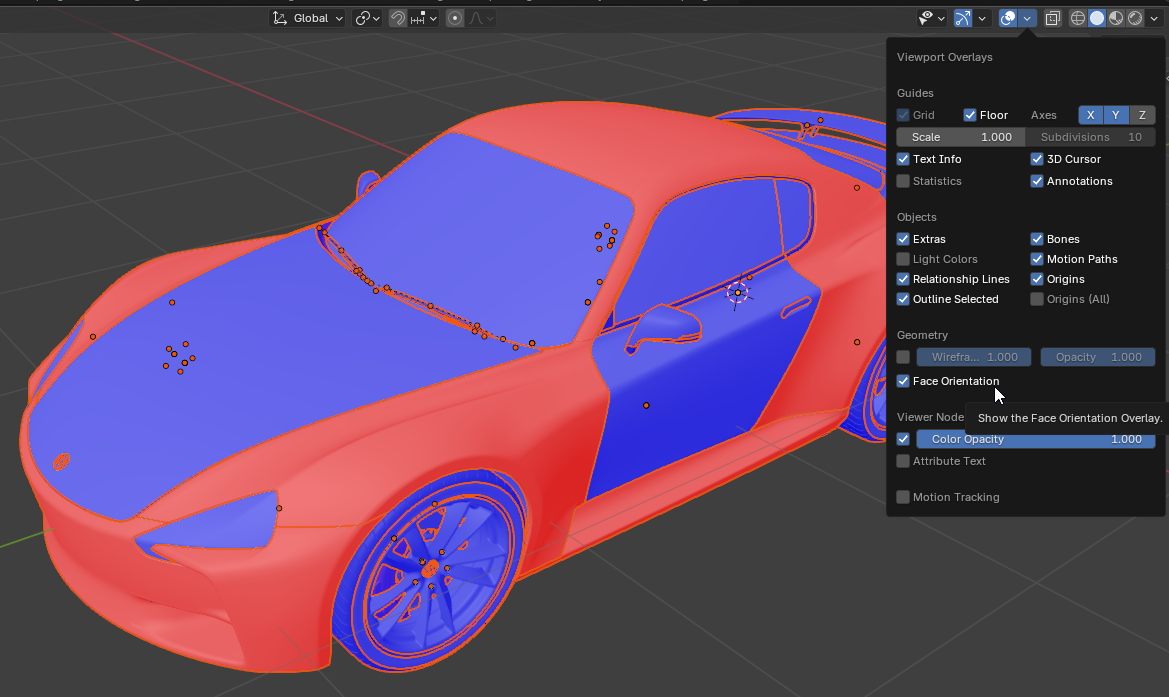
Face Orientation on the imported asset
The fixed winding order, using Backface Culling

The fixed winding order, using Face Orientation
Next Steps
To optimize your model further, try the Remove Occluded Parts action!
Remove Occluded Parts
| This tutorial contains these key points: |
|---|
| ✔️ Use the Blender add-on |
| ✔️ Run "Remove Occluded Parts" Action |
| ✔️ Examine the results |
This tutorial shows how to use the RapidPipeline Processor add-on in Blender to clean up occluded geometry to create lightweight assets with the “Remove Occluded Parts” action.
This microwave includes hidden interior geometry that represents the engine parts, inner cables, etc.
These parts may be important for technical renders with wireframe views. However, they can also reduce real-time rendering performance. Let’s take a look at how to eliminate this unnecessary geometry.
Remove Occluded Parts Action
In the 3D viewport open the sidebar (default hotkey
n) and chooseRapidPipeline.Select the faulty meshes by clicking on it in the Viewport, all the model, or do not select anything (all the scene will be processed).
Inside the add-on window, choose the action
Remove Occluded Parts.Press the
Runbutton.
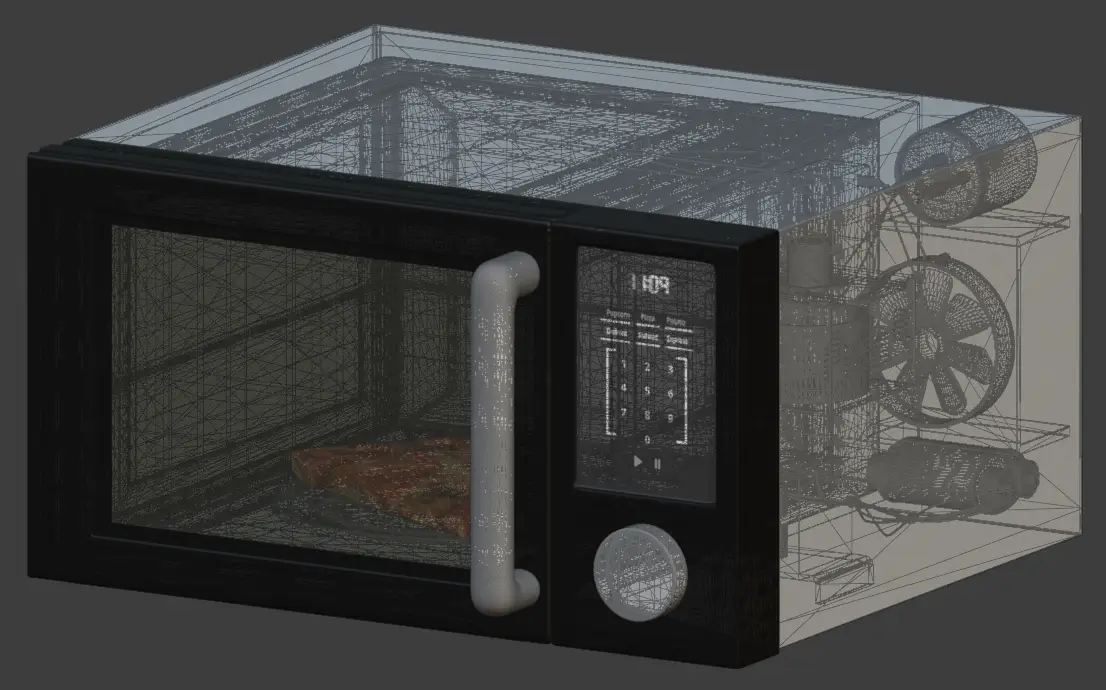
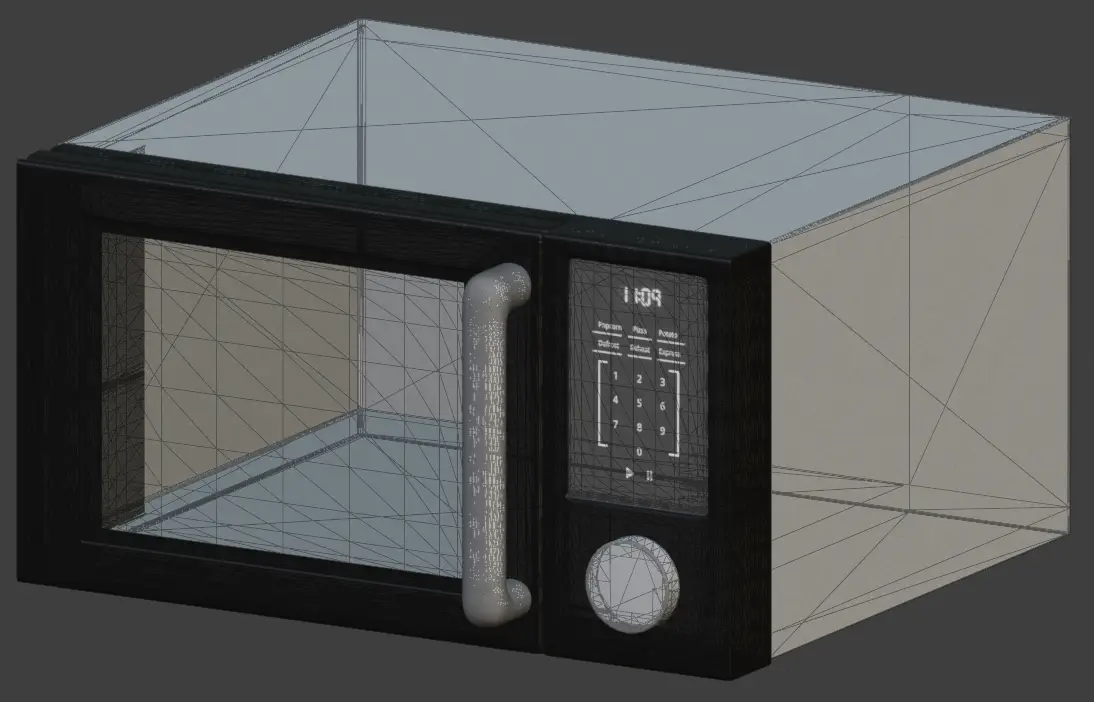
Input with occluded unseen geometry
Output without occluded unseen geometry
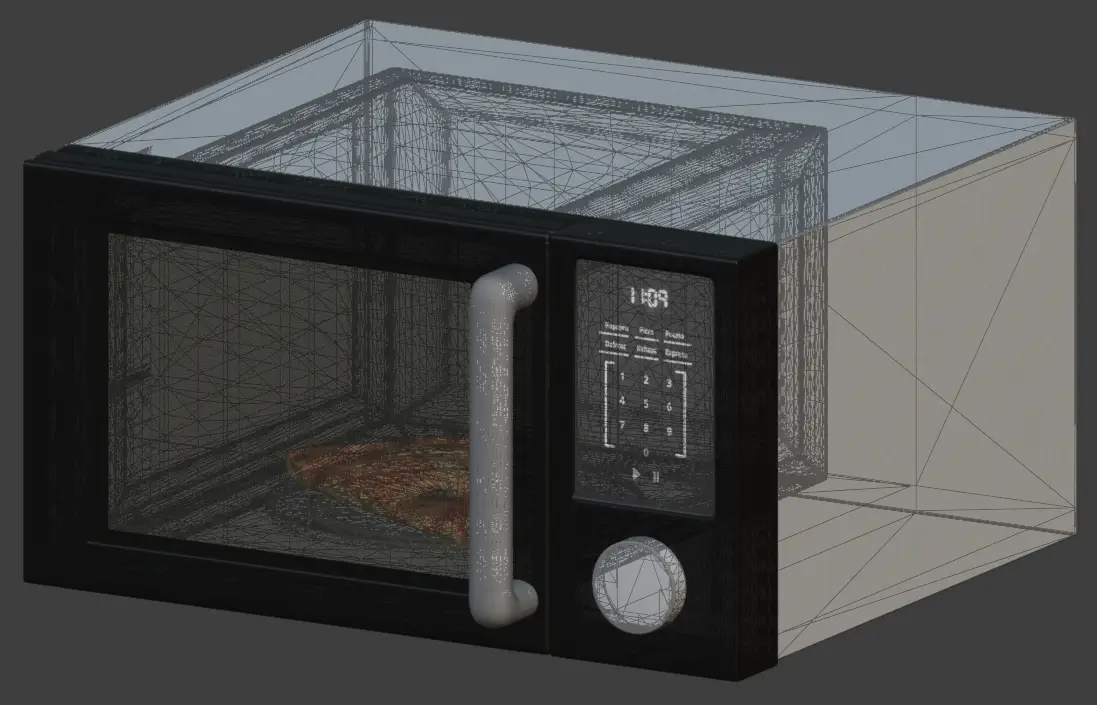
Removing Geometry Behind the Glass
This microwave has a window with a transparent material. RapidPipeline identifies meshes with transparent materials and won't remove parts that are visible behind them.
The Ignore Transparency setting can be used to force the removal of objects occluded by transparent materials.
Input with occluded geometry behind a transparent glass mesh
Output with all interior meshes removed via "Ignore Transparency"
Examine the Results
To properly analyze the results, it helps to show interior geometry. Enable the Wireframe mode in the Viewport, and set X-Ray to zero.
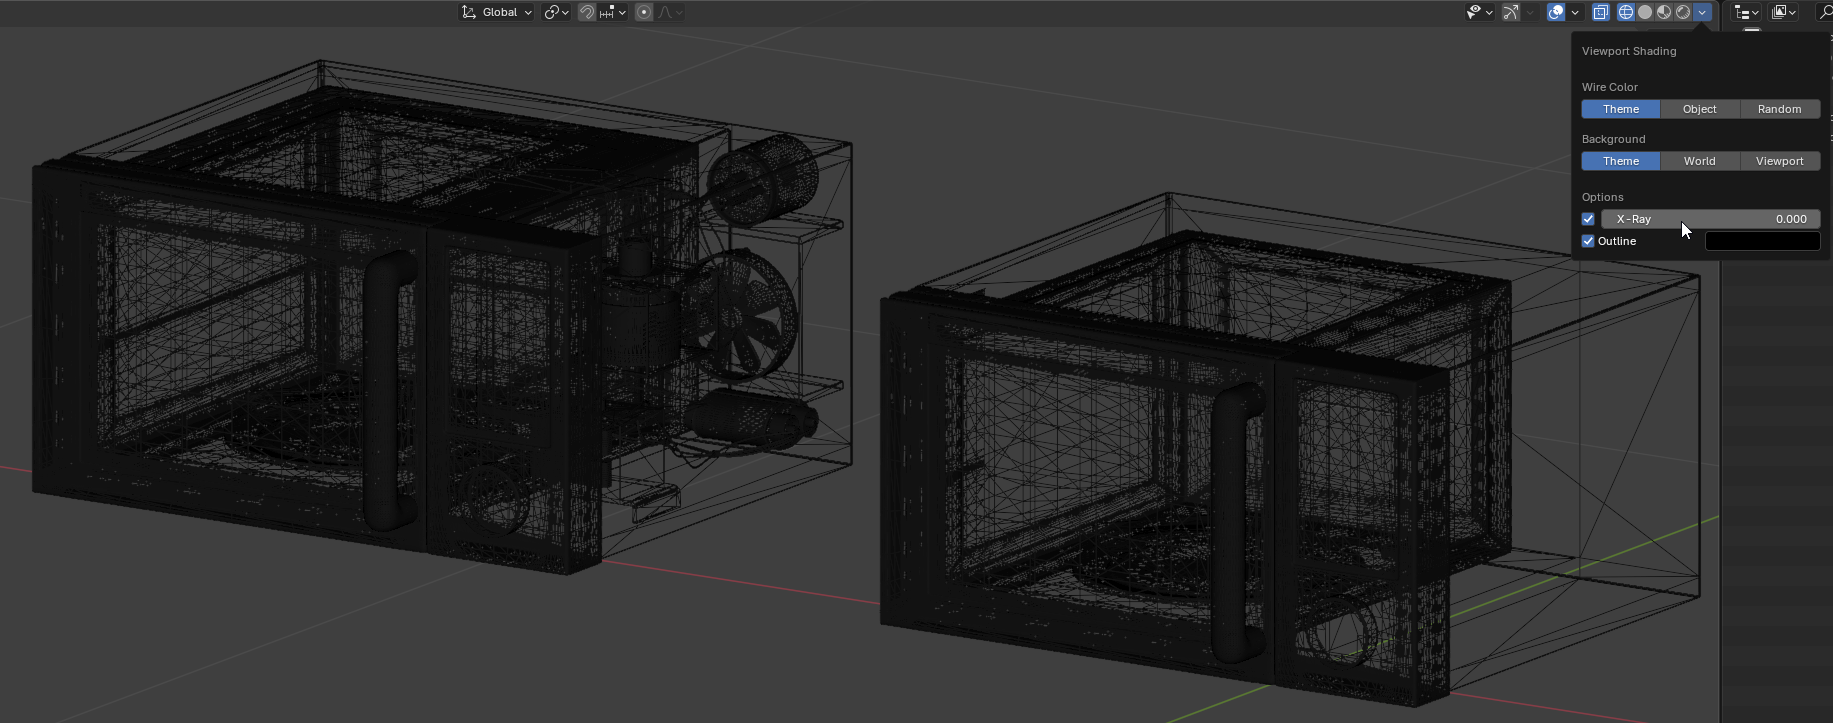
X-Ray views of the input and output
Next Steps
Learn how to optimize by decimating and baking with Decimate and Bake Atlas!
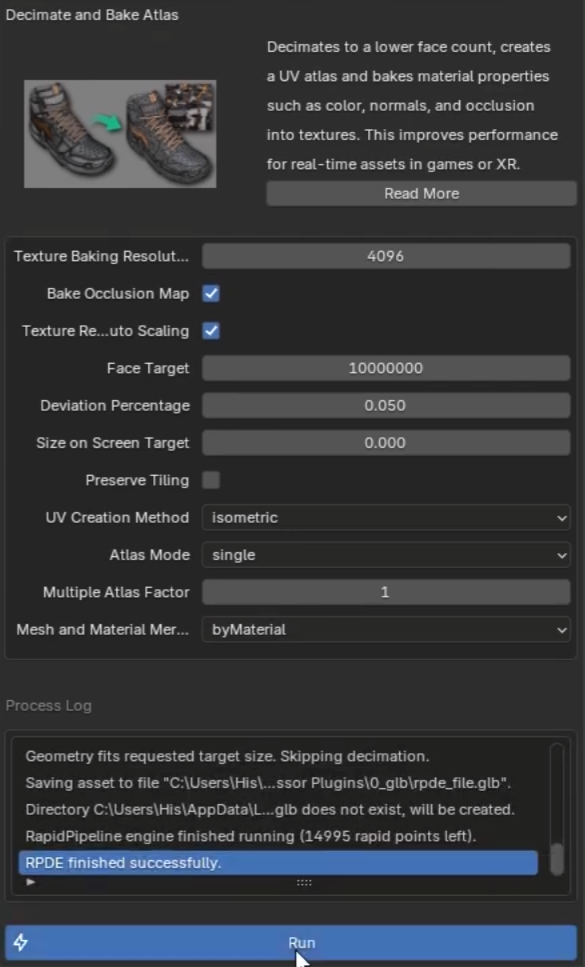
Decimate and Bake Atlas
| This tutorial contains these key points: |
|---|
| ✔️ Use the Blender add-on |
| ✔️ Run "Decimate and Bake Atlas" action |
| ✔️ Examine the results |
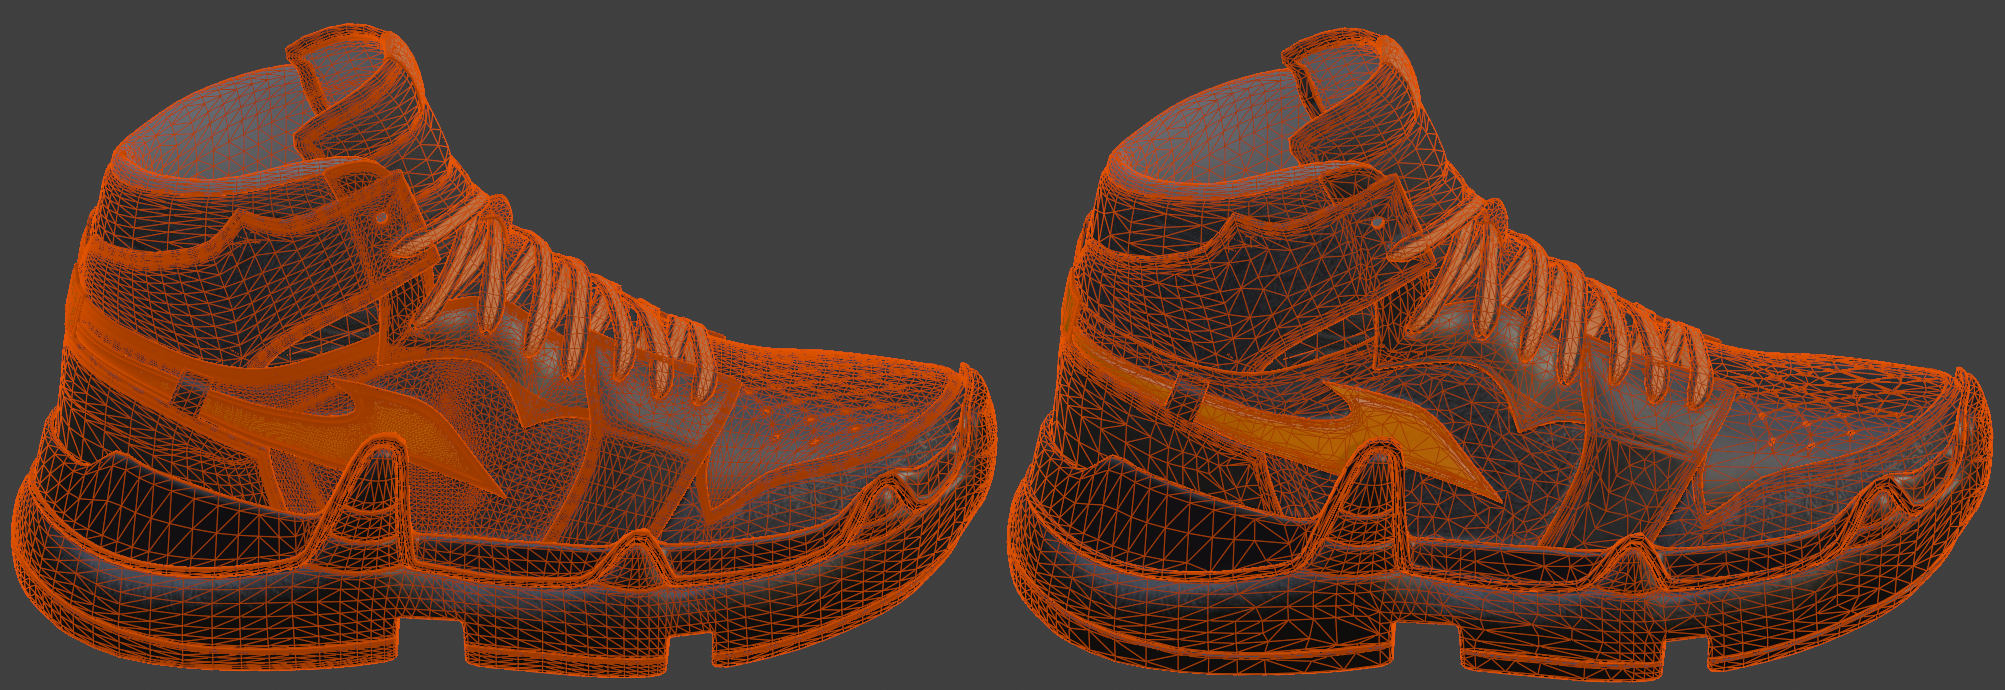
This tutorial shows how use the RapidPipeline Processor add-on in Blender to simplify the geometry of a model with decimation and bake the material and texture information into a new UV atlas.
The asset used in this tutorial is the 'Belz's RTFKT Challenge' (https://skfb.ly/6VnPP) by Belzar Sirus is licensed under Creative Commons Attribution (http://creativecommons.org/licenses/by/4.0/).
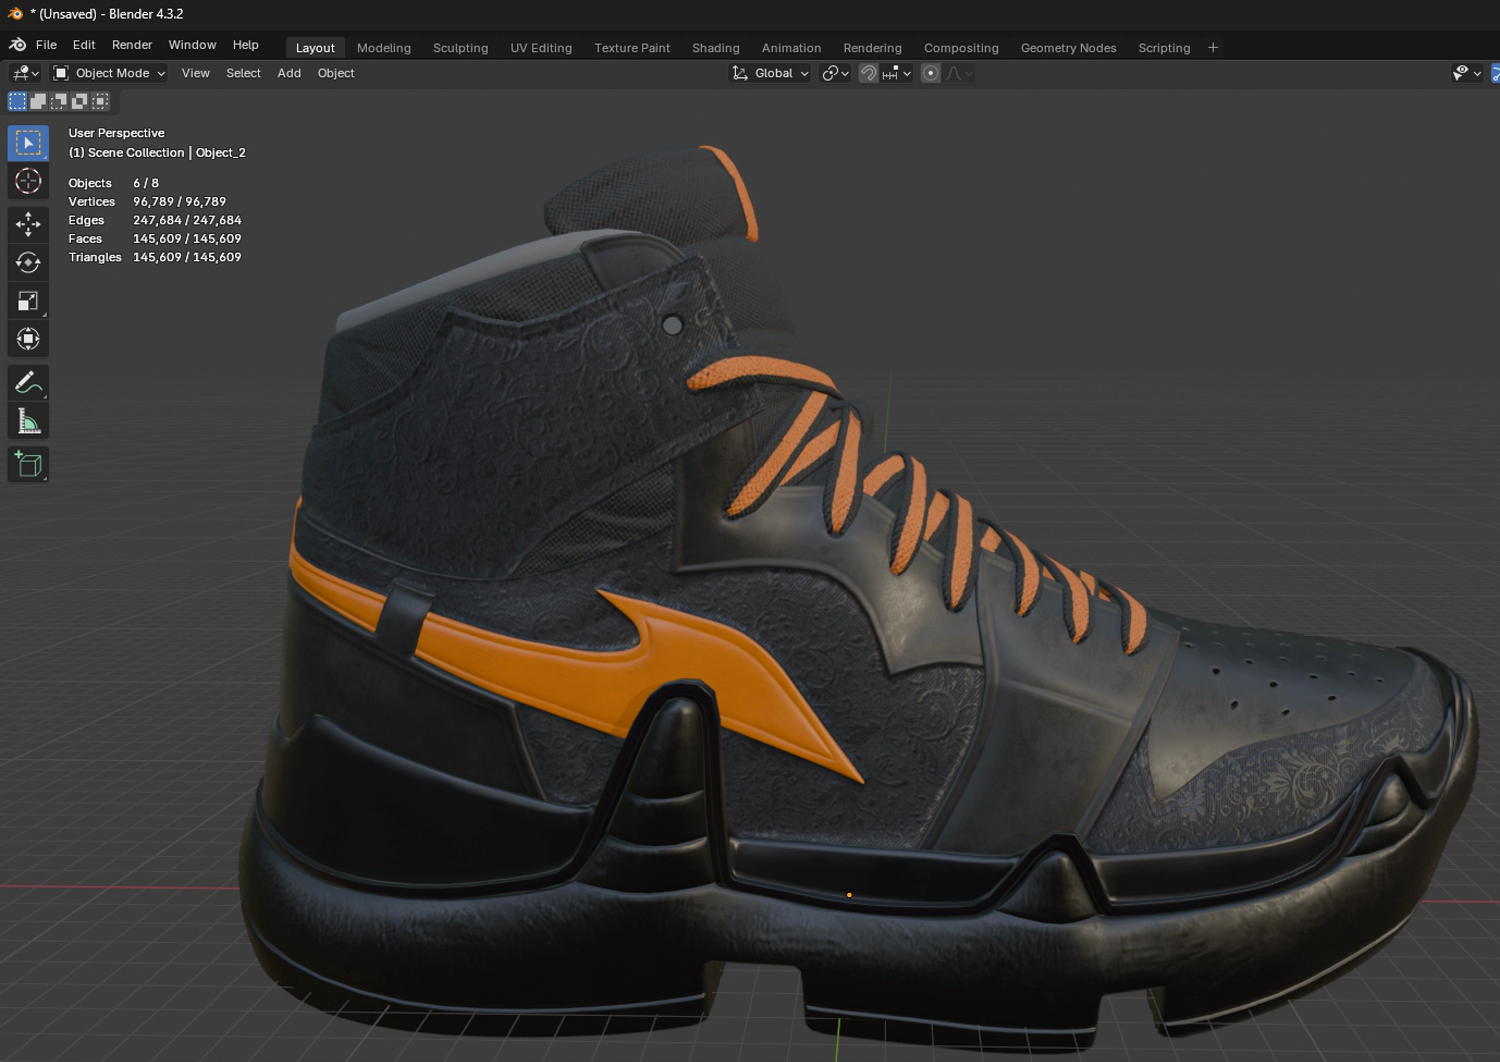
The input model with 145k triangles
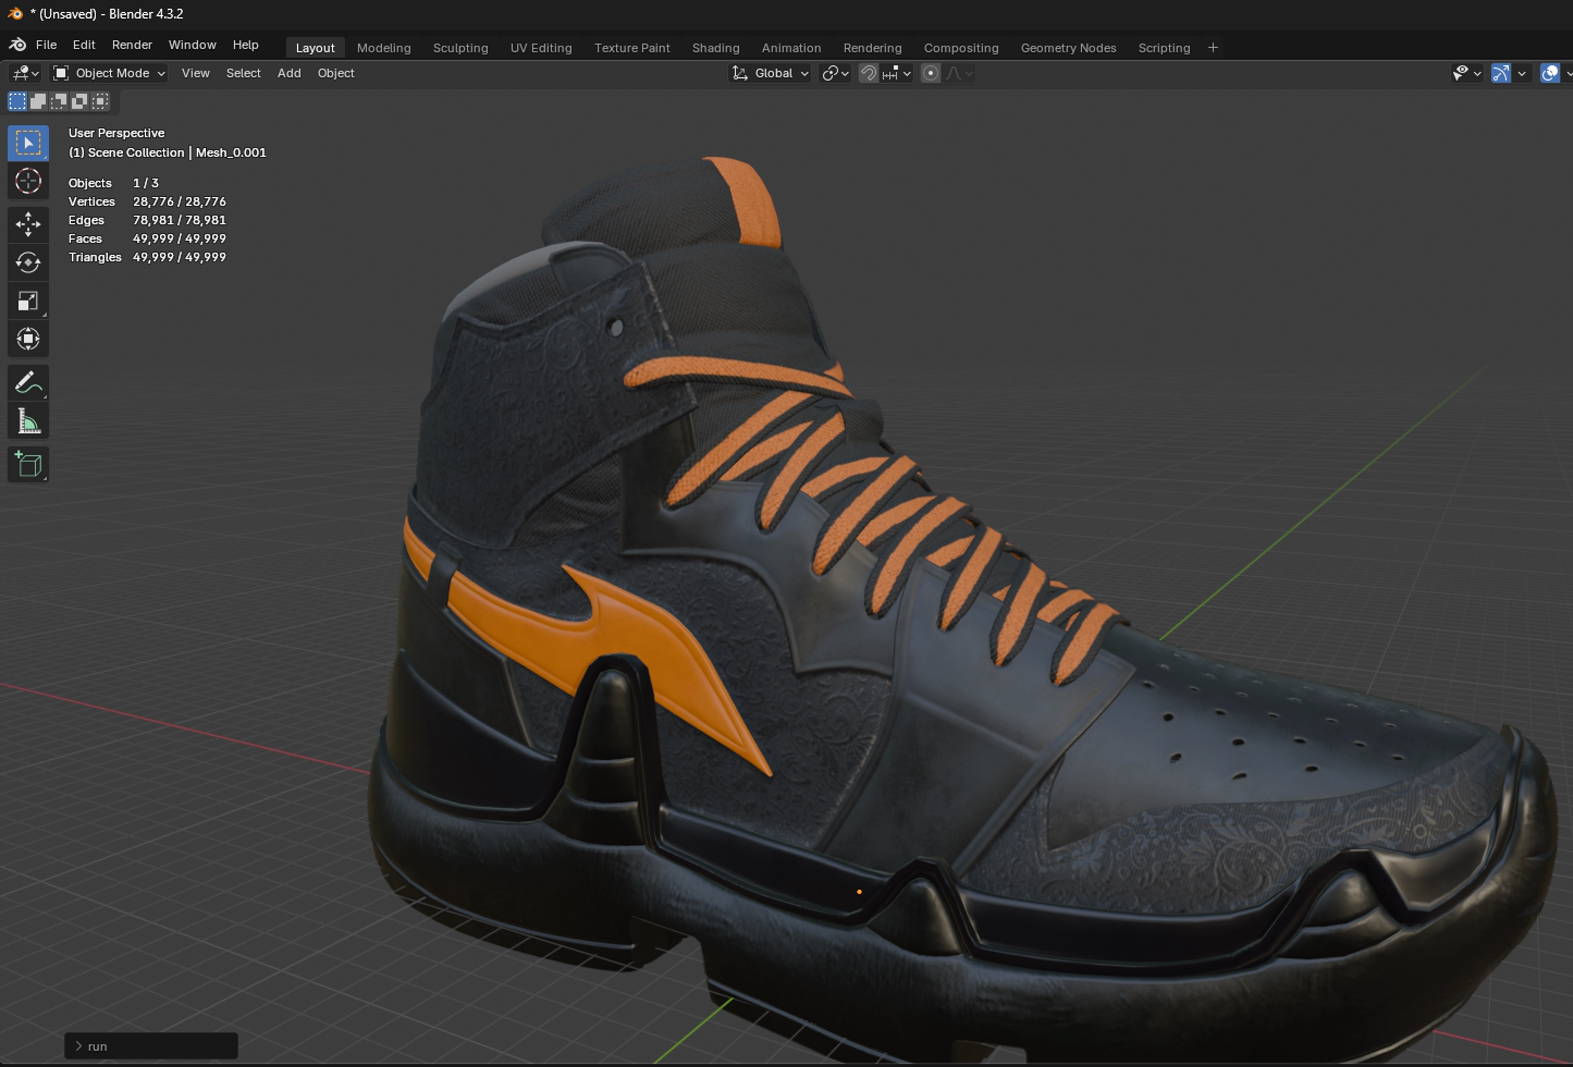
The shoe after optimization with 50k triangles
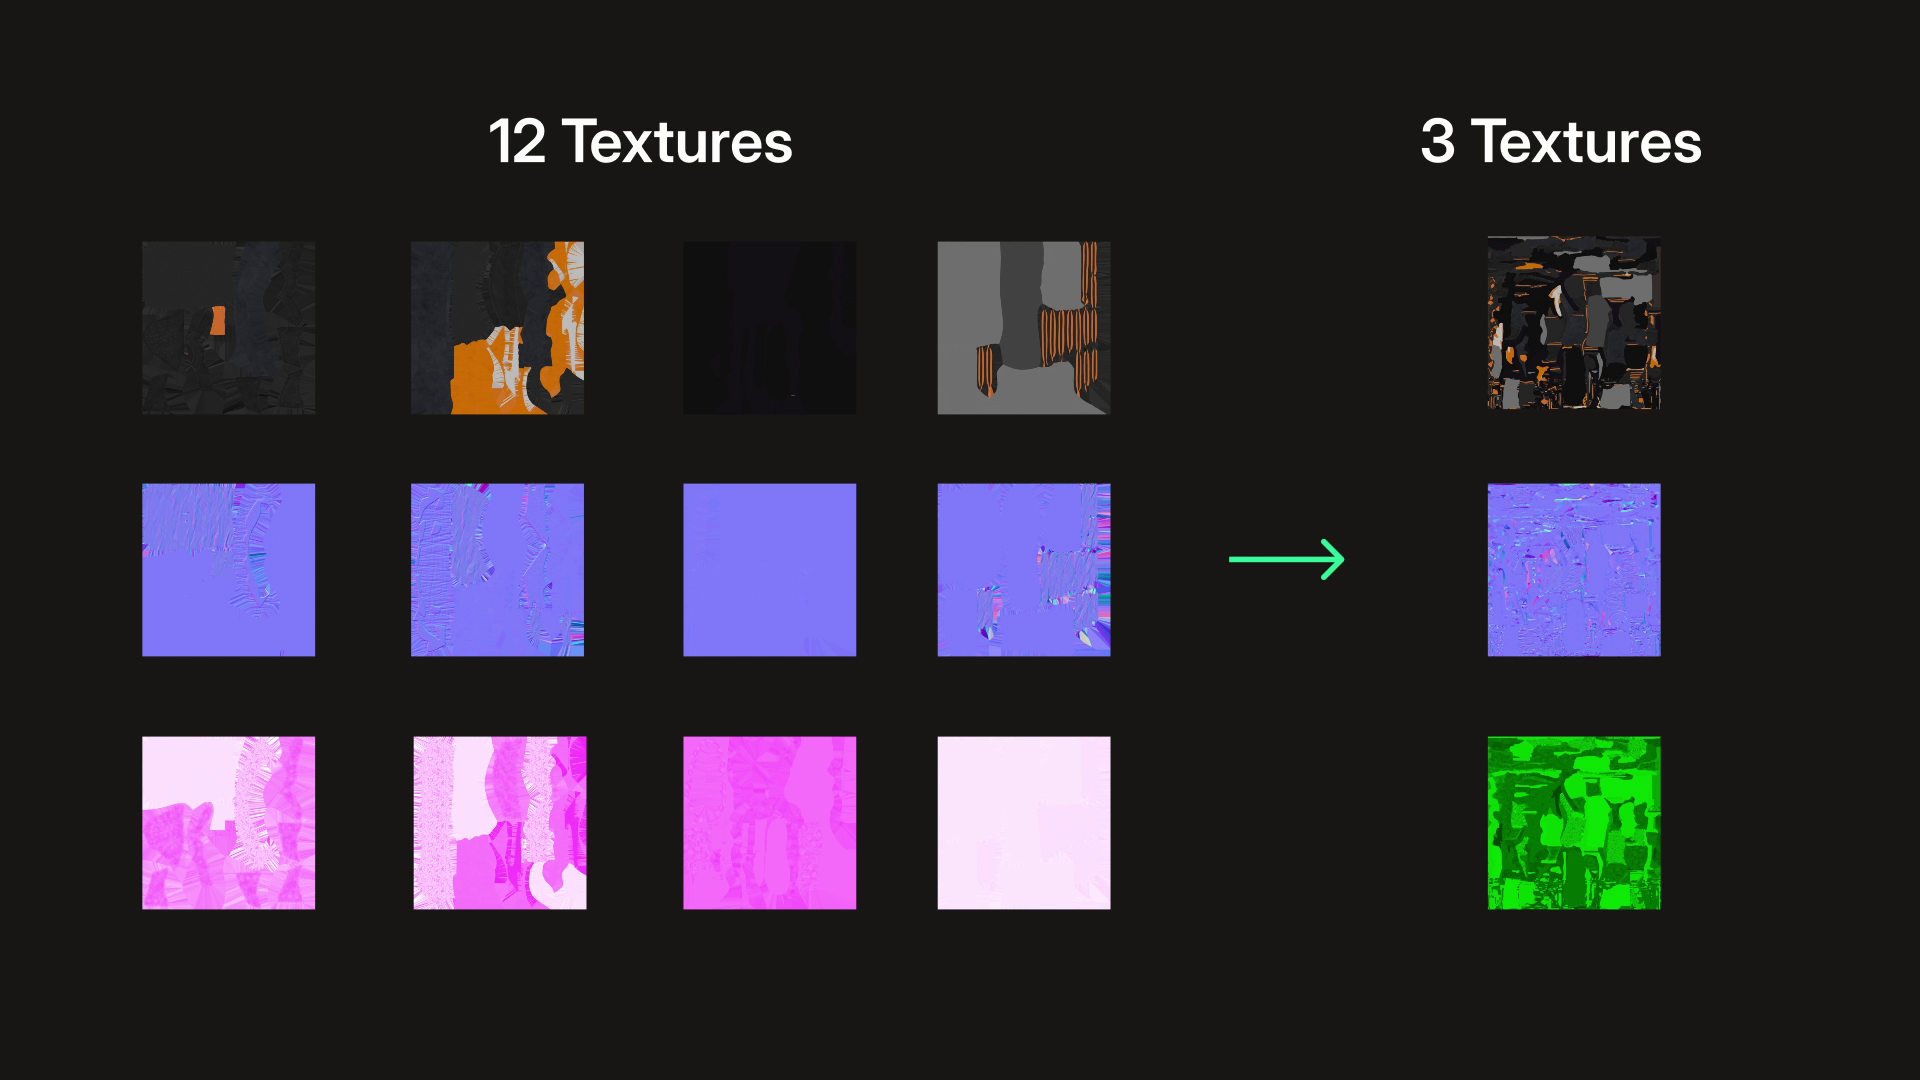
The textures before and after optimization
Decimate and Bake Atlas Action
In the 3D viewport open the sidebar (default hotkey
n) and chooseRapidPipeline.Inside the add-on window, choose the action
Decimate and Bake Atlas.Set the Face Target to
50000, which will reduce the mesh to less than 50k triangles.Press the
Runbutton.
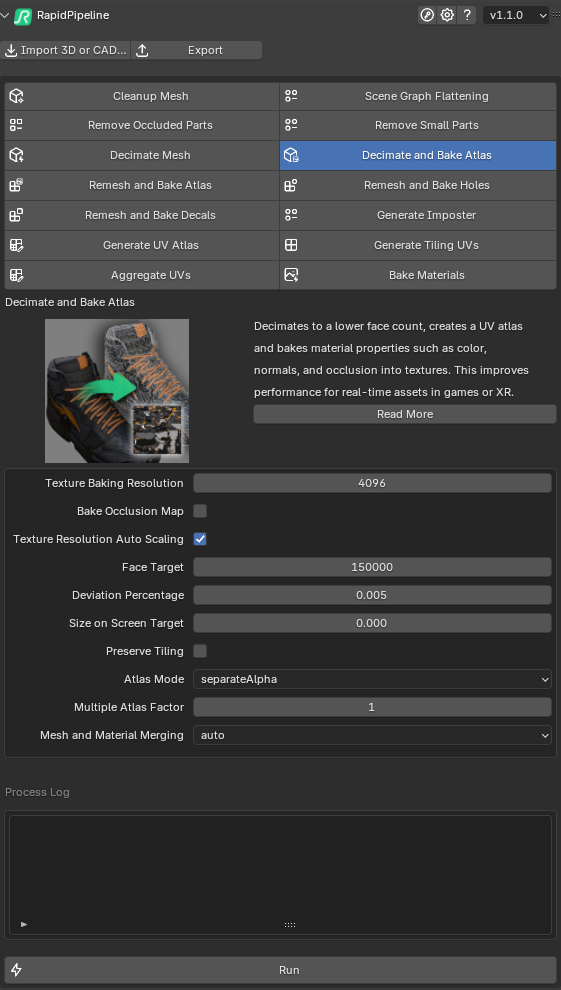
The action Decimate and Bake Atlas opened in the add-on
Decimation actions by default use a deviation target. When the Deviation Percentage is more than zero, the Face Target will act as an upper limit for the face count, instead of acting as a forced target. Increasing the Deviation Percentage will allow the optimizer to go lower when possible. However if you simply want to reach an exact face target, the Deviation Percentage should be set to 0.
Examine the Results
To see the results with proper shading and the effect of the texture baking, set the Viewport Shading Method to Material Preview.

Viewport Shading Method set to "Material Preview"
To fully check the mesh optimization, open the Overlays menu and enable Geometry, so you can see a wireframe overlay on your model.

Viewport Overlays set to "Geometry"
Input and output with Geometry overlays
Next Steps
Learn more about importing files with the Import 3D and CAD files actions!
Remesh and Bake Holes
| This tutorial contains these key points: |
|---|
| ✔️ Use the Blender add-on |
| ✔️ Select a part with intricate holes |
| ✔️ Run the "Remesh and Bake Holes" action |
| ✔️ Examine the results |
This tutorial shows how use the RapidPipeline Processor add-on in Blender to simplify a 3D model. It walks through the use of the Remesh & Bake Holes action, and explains how to use it for closing holes and baking them into an alpha texture.
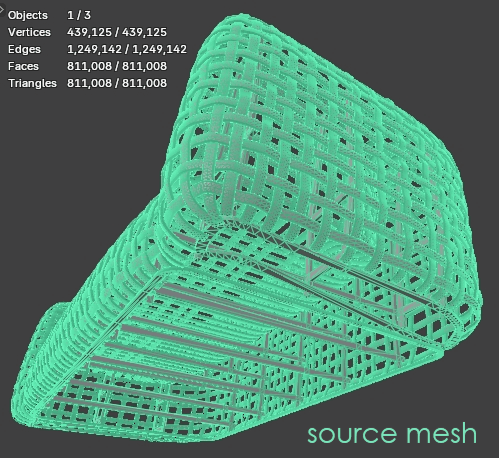
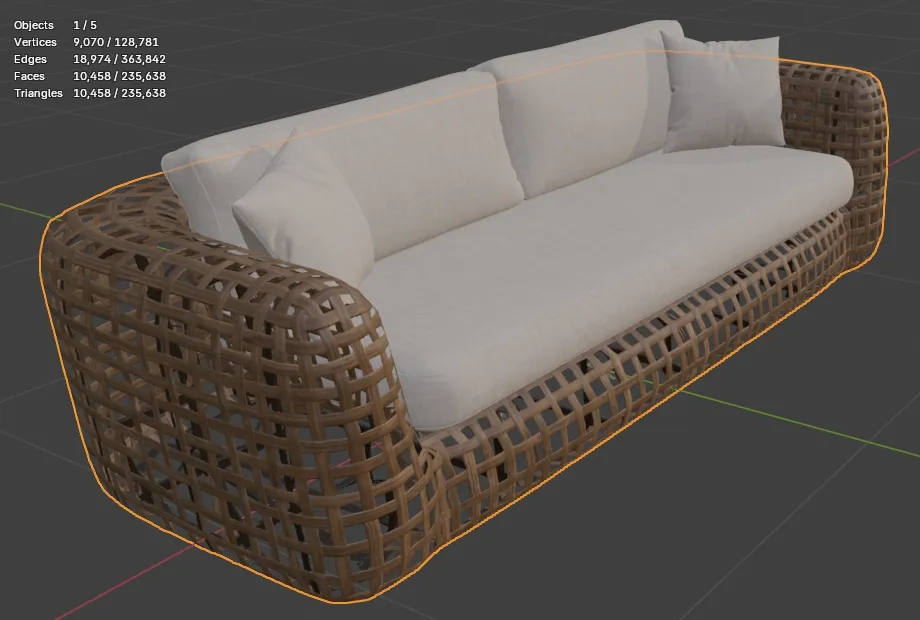
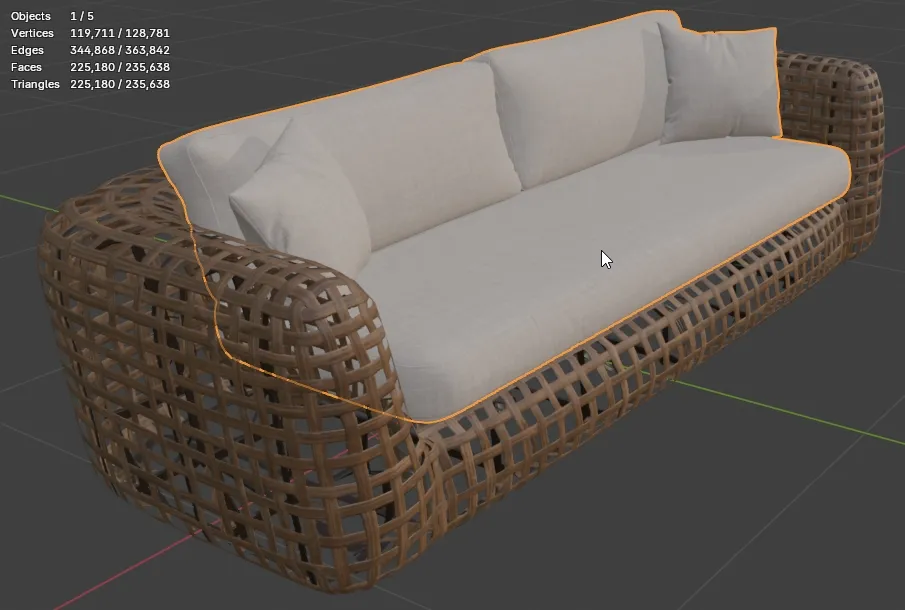
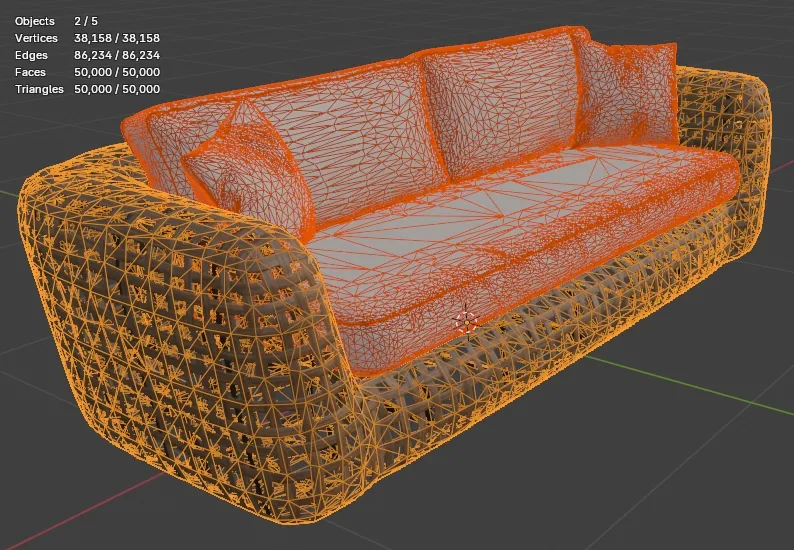
The asset used in this tutorial is a high-resolution model "wicker sofa" (https://skfb.ly/prBJM) by Md Imamul Hasan licensed under Creative Commons Attribution (http://creativecommons.org/licenses/by/4.0/).
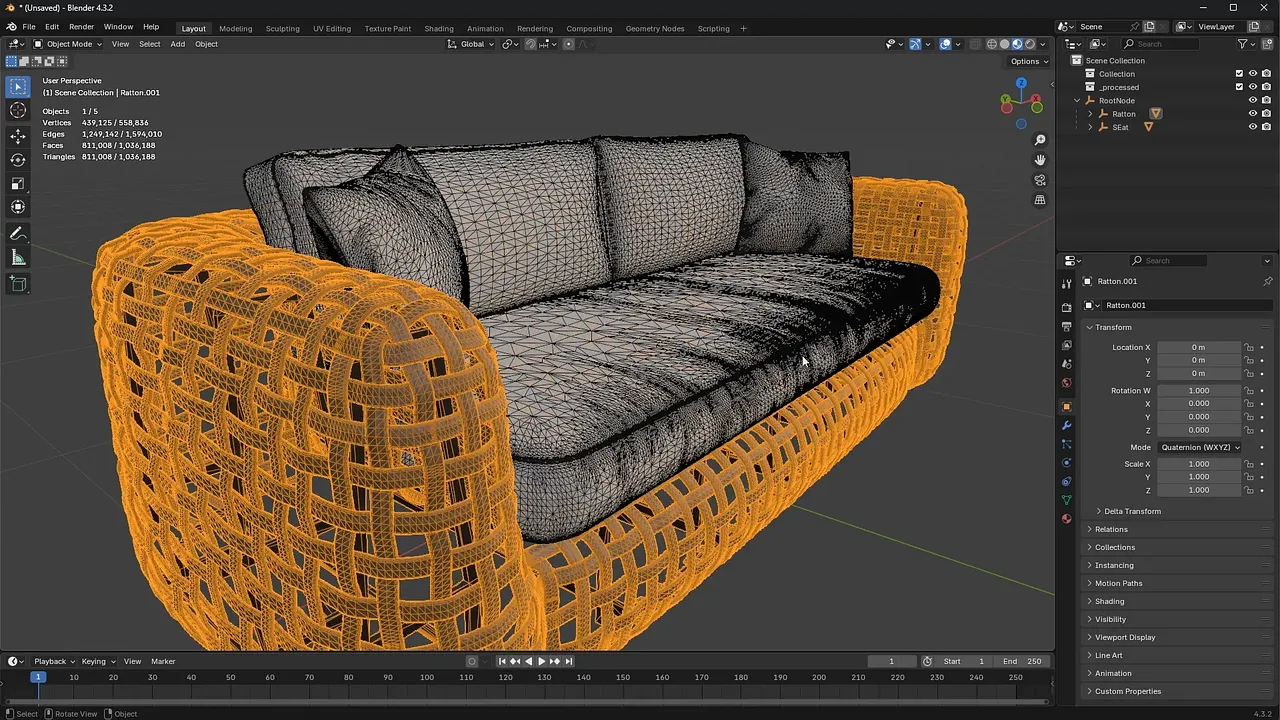
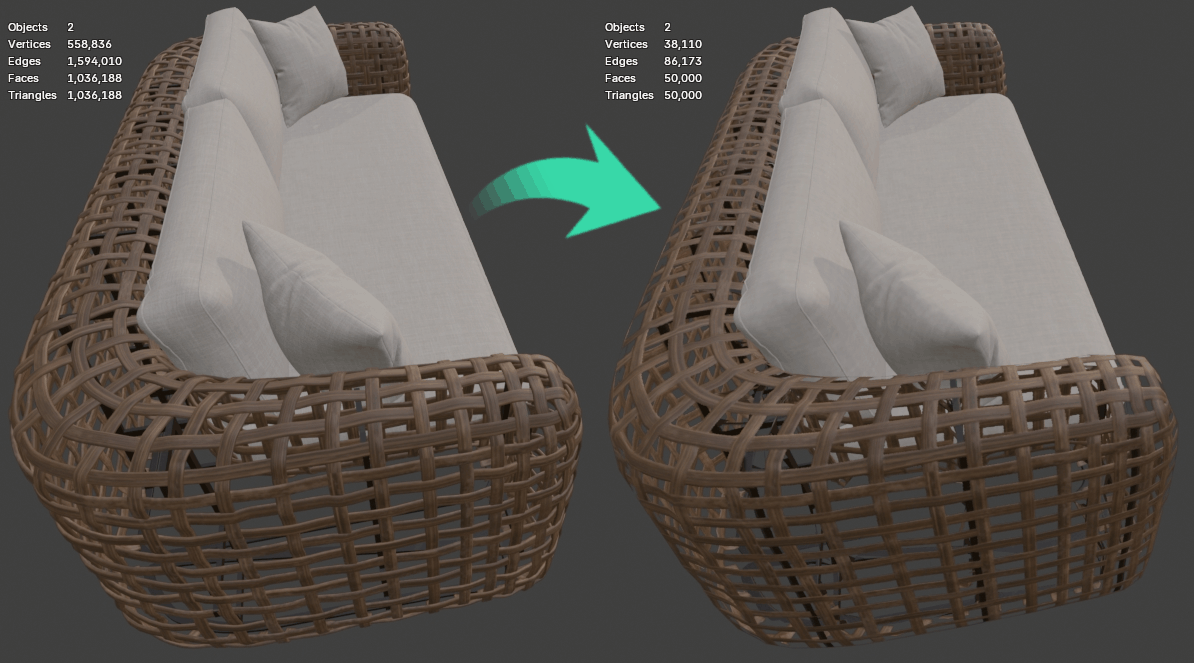
The input model has 811,008 triangles just for the wicker alone.
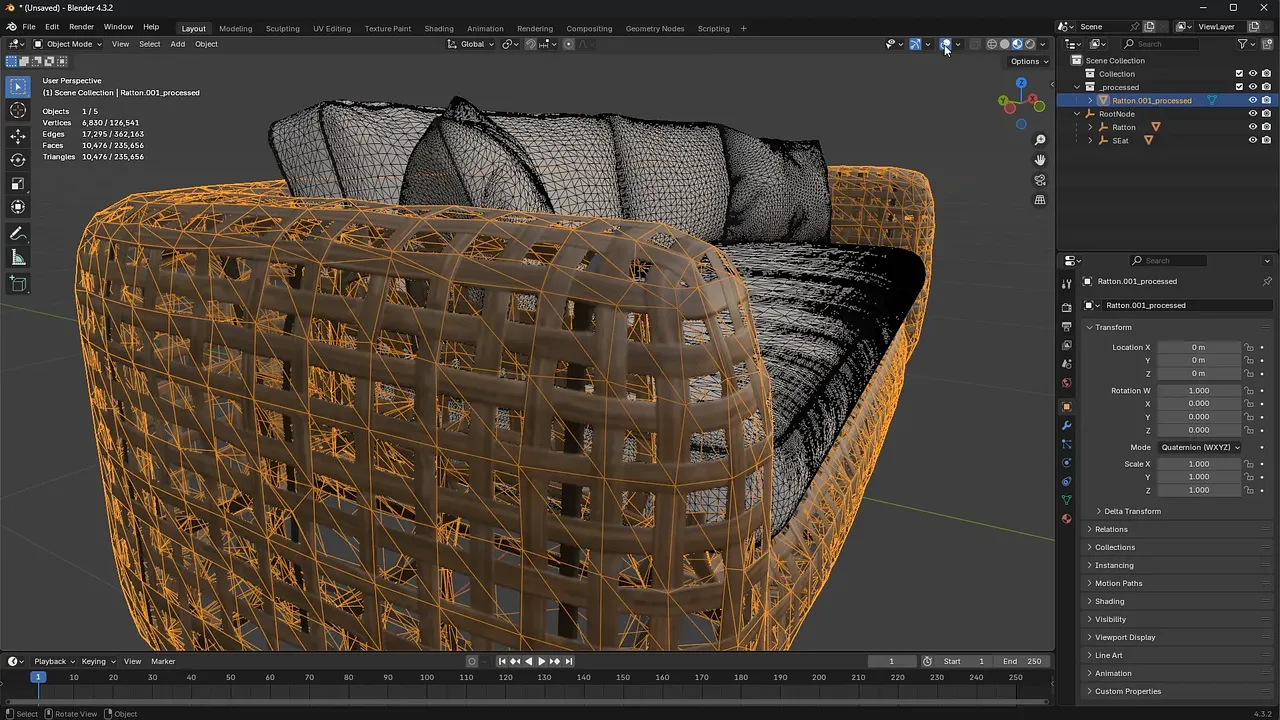
After processing, the wicker has only 10,476 triangles and uses an alpha texture for the holes.
The wicker has been remeshed, and the full complement of PBR textures were automatically baked from the high-resolution source meshes.
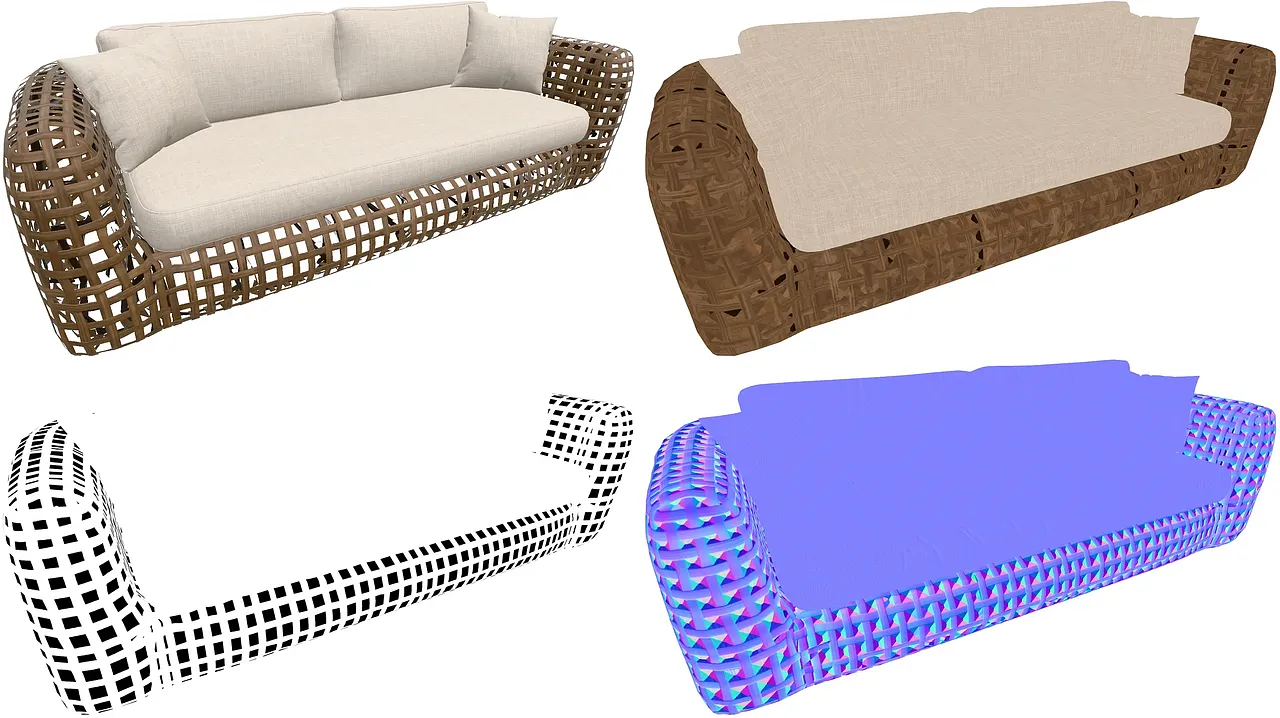
The remeshed wicker sofa (upper left), baked color (upper right), baked alpha (lower left), and baked normal (lower right).
Remesh and Bake Holes Action
Select the wicker mesh by clicking on it in the 3D viewport.
Open the Sidebar (default hotkey
n) and choose RapidPipeline.Choose the action
Remesh and Bake Holes.Adjust settings as needed. Here we're using the defaults to create 50k triangles with 4k textures.
Press the
Runbutton.
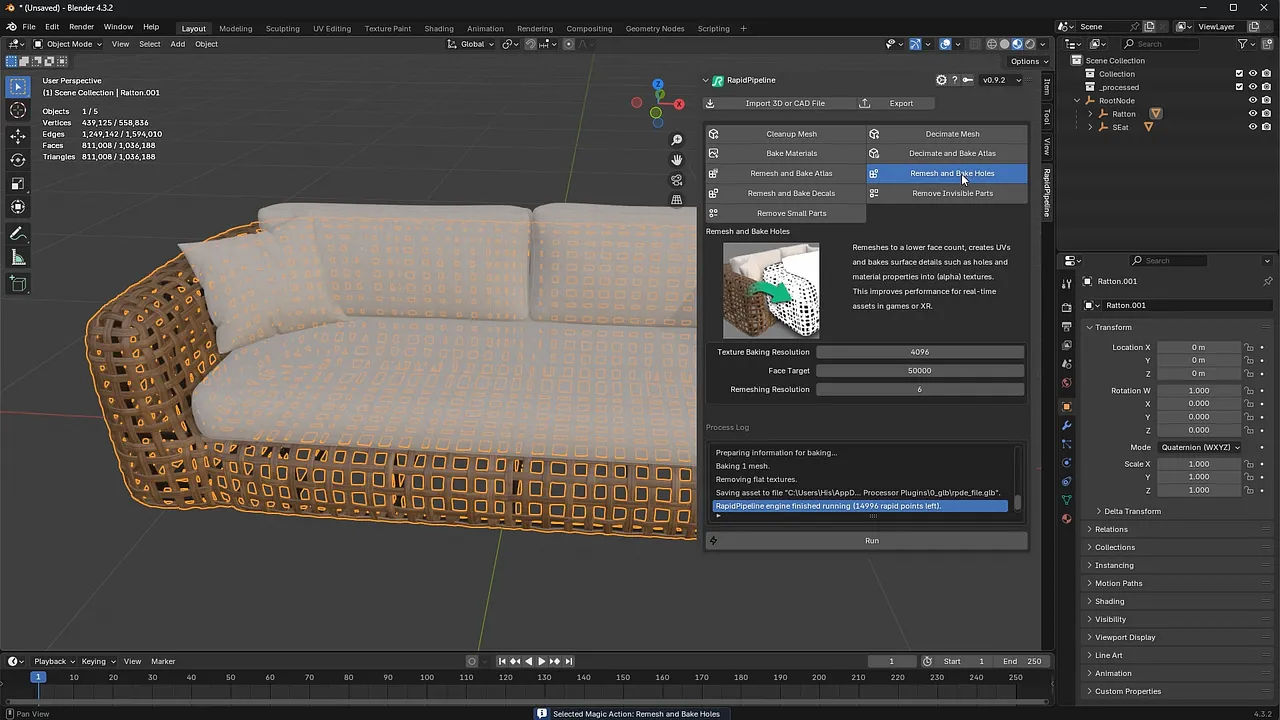
Examine the Results
To see the triangle counts, turn on Statistics in the Blender viewport.

When the input wicker is selected, the total triangle count is 1,036,188 and the wicker alone is 811,008 triangles.
When the output wicker is selected, the total triangle count is 235,656 and the wicker alone is 10,476 triangles.
To examine the output in a web viewer, export a GLB file, then drag-and-drop into the glTF Sample Viewer. An exported GLB can also be uploaded to the RapidPipeline Web Platform for conversion into other formats, like USDz.
Next Steps
Try the Remesh and Bake Decals action!
Remesh and Bake Decals
| This tutorial contains these key points: |
|---|
| ✔️ Use the Blender add-on |
| ✔️ Select a part |
| ✔️ Run "Remesh and Bake Decals" action |
| ✔️ Examine the results |
This tutorial shows how use the RapidPipeline Processor add-on in Blender to simplify a model by generating a simple, clean mesh and bake details such as graphic images and logos into textures using the Remesh and Bake Decals action. This optimization method is optimal for assets like apparel with seams or prints. For more information see the Blender Add-On Documentation.
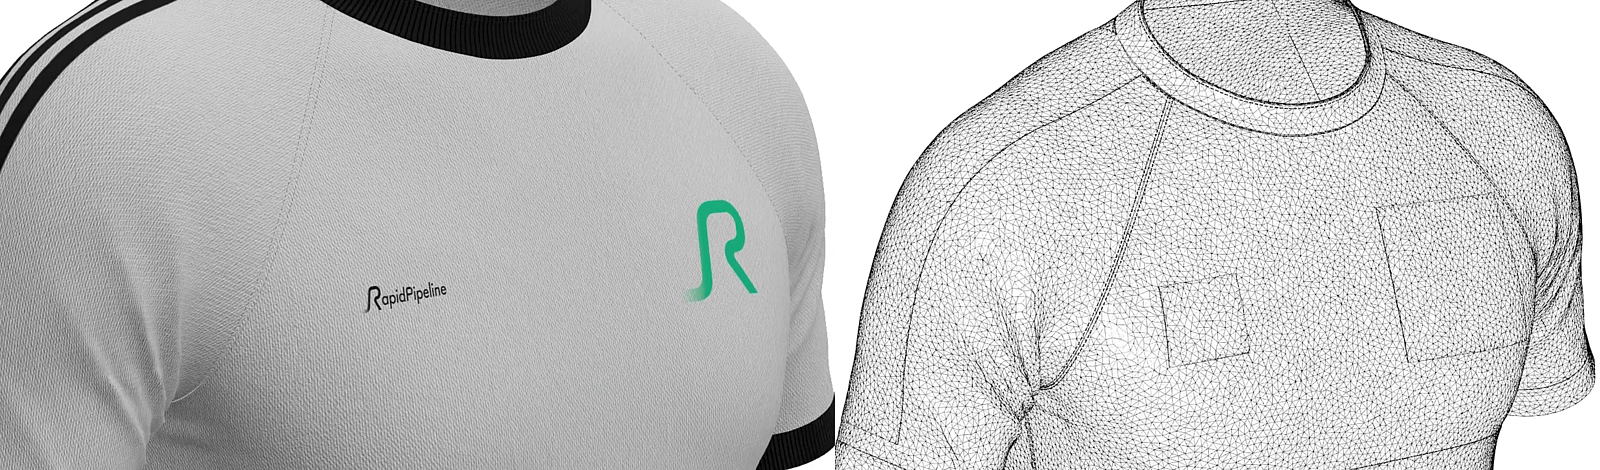
The t-shirt input model
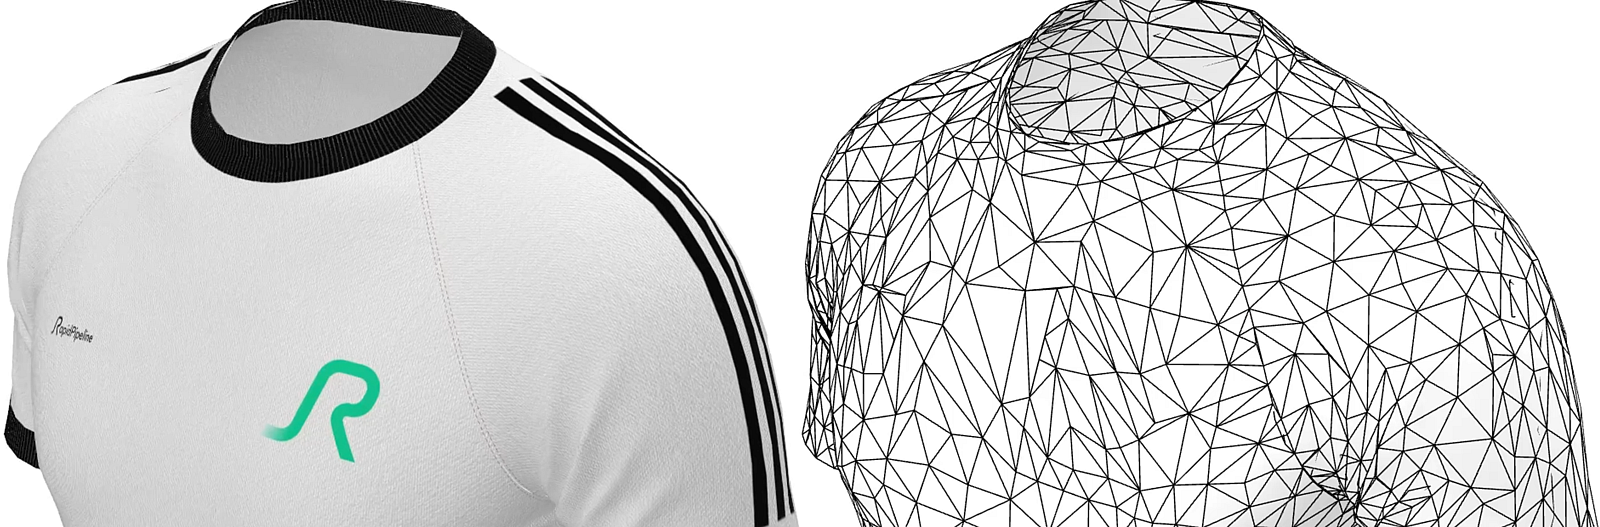
The t-shirt after automatic remeshing, baking, and optimization.
Here is a preview of the processing´s output: the input t-shirt (top) has 32 nodes and 700k faces, and the output (bottom), 1 node and 8k faces.
The fabric, trims, seams and prints have been remeshed into a single mesh, and the details have been baked into texture maps.
Remesh and Bake Decals Action
Open the Sidebar (default hotkey
n) and choose RapidPipeline.Choose the action
Remesh and Bake Decals.Adjust settings as needed. Here we're using the defaults to create 50k triangles with 4k textures.
Press the
Runbutton.
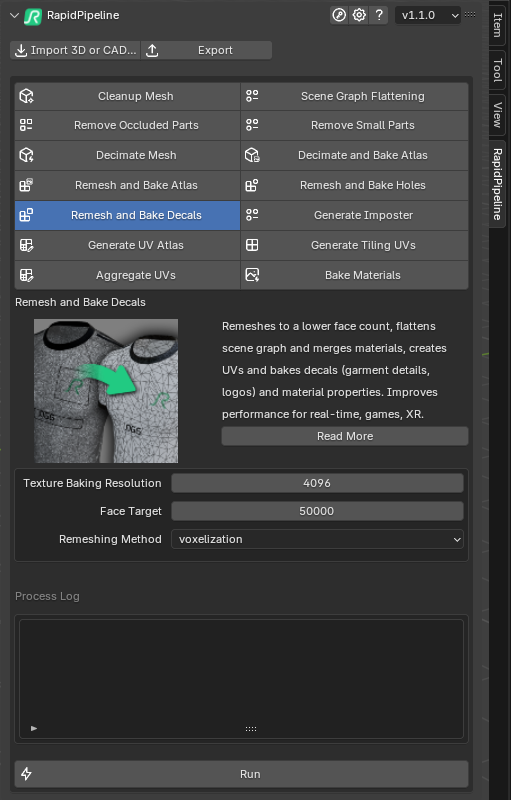
The Remesh and Bake Decals interface
Examine the Results
To see the triangle counts, turn on Statistics in the Blender viewport.
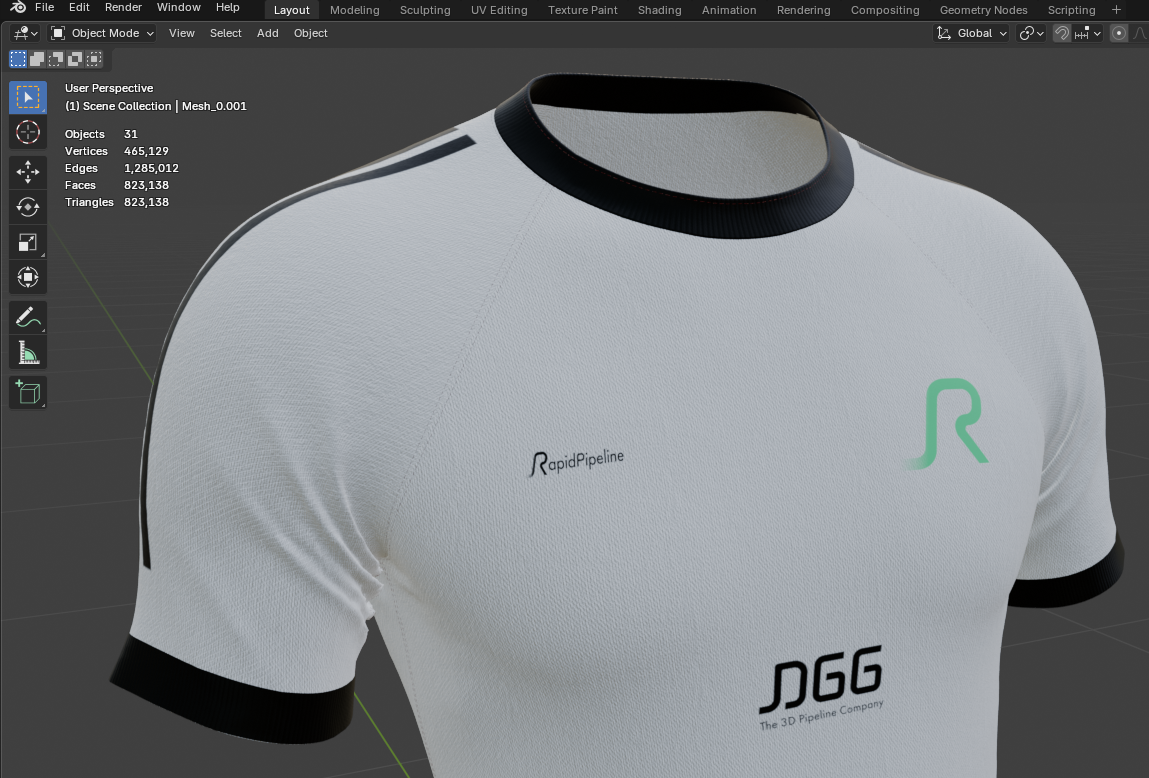
The input triangle count is 823,138 with 31 nodes
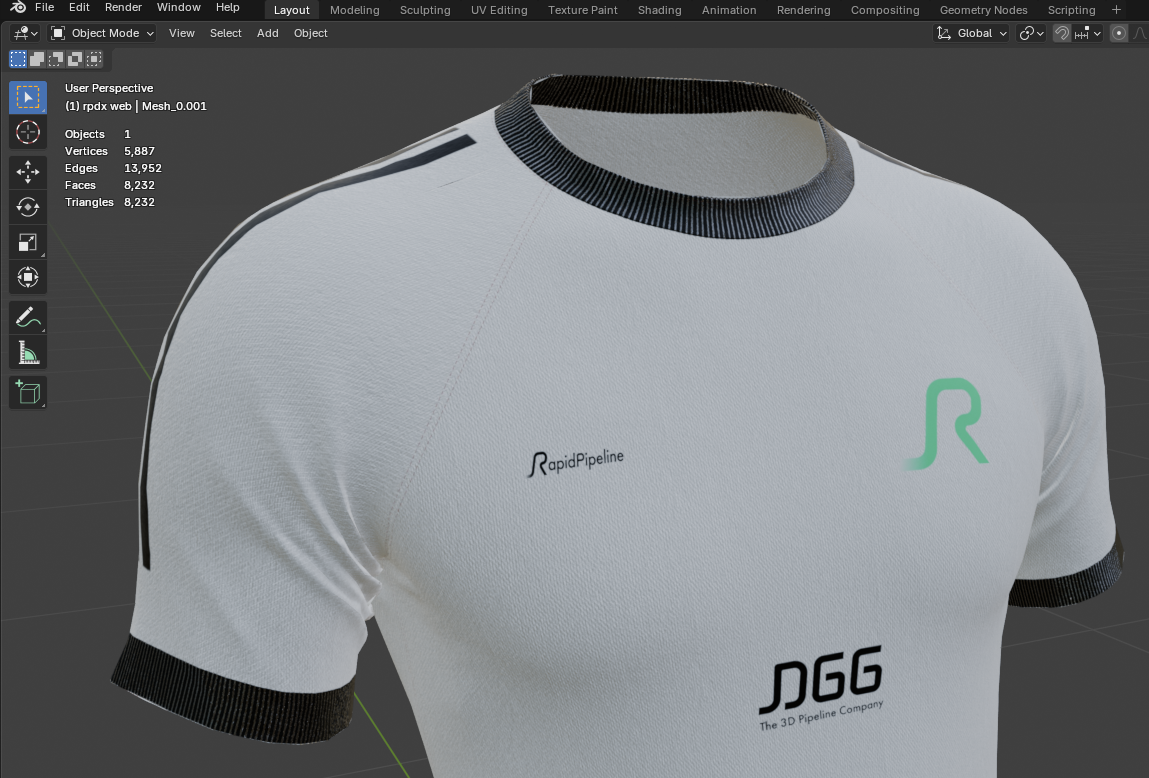
The output triangle count is 8,232 with 1 node
To examine the output in a web viewer, export a GLB file, then drag-and-drop into the glTF Sample Viewer. An exported GLB can also be uploaded to the RapidPipeline Web Platform for conversion into other formats, like USDz.
Next Steps
Learn how to optimize assets with the Decimate and Bake action!
Expert Mode
Expert Mode in the RapidPipeline Blender add-on unleashes the full power of the toolset, where every option is exposed and all settings are available for use. This enables fully-customizable workflows for deep processing tasks.
Actions are quick and easy for new users, while Expert Mode offers fine-grained customization for expert users.
How to run Expert Mode Operations
Open a model in Blender, and select the mesh parts to be processed.
- If no parts are selected, all visible meshes will be affected.
In the 3D Viewport open the Sidebar (default hotkey
n) and chooseRapidPipeline.Switch UI modes by going to
Settings(gear icon) -> checkExpert Mode-> press theBackbutton to save.Click on the section headers to expose their options (Scene Graph Flattening, 3D Edit, etc.) and adjust settings as desired.
Click the Run button.
- The selected meshes are processed.
- Once processing is complete, the selected meshes are hidden, and the newly-processed meshes are placed into a new Collection.

Settings Tabs
![]()
The RapidPipeline Blender add-on is powered by the RapidPipeline 3D Processor. Each of the settings are explained in the 3D Processor Settings Documentation. Look for the "In the Blender add-on" tabs in each setting category.
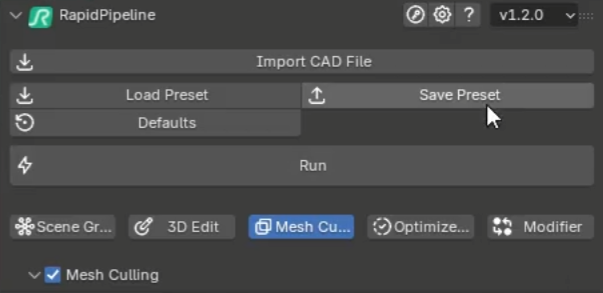
Scene Graph Flattening: Control the scene graph, specifying how nodes are merged or kept.
3D Edit: Edit normals, scale, generate UVs, assign textures, center the model, and more.
Mesh Culling: Removal of invisible interior geometry and/or small features.
Optimize/Bake: Mesh and material optimization, including options for decimation, remeshing, texture atlas baking, UV aggregation, and more.
Modifier: Optimize to a specific target, either file size or screen size.
Function Buttons

 Enter Authentication Token:
 - The add-on can be authenticated here after installation, and the token can be updated. This also has a link to the Terms and Conditions.
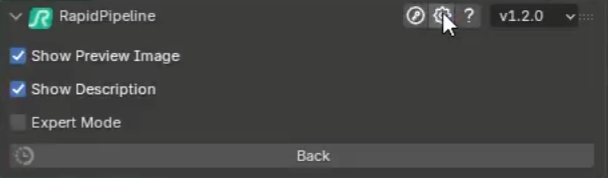
 Settings:
 Show Preview Image: Toggle the display of the image that appears at the top of each Action.
Show Description: Toggle the display of the summary text that appears at the top of each Action.
Expert Mode: Toggle between Actions buttons and Expert Mode.
 Help:
Help: - Links to Documentation, Feedback, Support, and About.
 Versions:
- Change the interface to show a previous version's layout. These versions generally apply only to the Actions buttons.
Import CAD File:
- Import a CAD format asset into Blender using RapidPipeline 3D Processor.
- This is available if you have a RapidPipeline CAD Edition plan, which extends CAD file support in RapidPipeline.
- It prompts for a supported CAD format, then uses RapidPipeline 3D Processor to tesselate the model and import it into Blender.
Load Preset:
- Load a RapidPipeline Processor settings .JSON file.
- All current settings are overridden by the loaded settings.
- Settings must be in RapidPipeline 3D Processor 7.x format. Avoid legacy 6.x presets which may be present in your web platform account, these are indicated with the tag "Legacy".
Save Preset:
- Save the current settings as a RapidPipeline Processor settings .JSON file.
- Saved settings can be shared with other team members.
- Saved settings can be used in other interfaces for RapidPipeline 3D Processor: Web Platform, REST API, CLI, or the Blender Plugin.
Defaults:
- Resets all settings in the current window to their default values.
- Any settings you change are preserved for the current session only; if you wish to save your settings changes then it's best to use the Save Preset button.
Run:
- Start processing selected objects using the current settings.
- Once processing is complete, the source mesh is hidden, a new Collection is created for the result, and the result is selected.
Expert Mode: Remeshing & Decimation
| This guide contains these key points: |
|---|
| ✔️ Use the Blender add-on |
| ✔️ Enable Expert Mode |
| ✔️ Create a Settings Preset Config |
| ✔️ Remesh selected parts |
| ✔️ Decimate the remaining parts |
| ✔️ Export a GLB |
| ✔️ Compare the results |
This tutorial shows how use Expert Mode in the RapidPipeline Processor add-on in Blender to simplify a 3D model, optimizing parts with small holes using the Remesher, baking the holes into an alpha map, and decimating the rest of the model.
The resulting optimized output model in our real-time web viewer.
This tutorial makes use of the RapidPipeline Processor add-on for Blender, for more information see the Blender add-on Documentation. The add-on runs on a powerful 3D data optimization and automation toolset, for more about this see the 3D Processor Reference.
Input model (left) has been remeshed, and textures were baked including an alpha map for the holes. Source model is 55mb with 1,036,188 triangles, and the optimized model is 4.8mb with 50,000 triangles.
This tutorial uses a high-resolution wicker sofa model available free here from Sketchfab. Credits: "wicker sofa" (https://skfb.ly/prBJM) by M I H is licensed under Creative Commons Attribution (http://creativecommons.org/licenses/by/4.0/).
Using the Remesher
First step is to complete the installation process to make sure the RapidPipeline Processor add-on is installed and ready to use.
The remeshing will be done first, so select the wicker by clicking on it in the Main Window.

Turn on
Statisticsin the Blender viewport.
In the top left corner of the viewport, notice that the total triangle count is 1,036,188.

- The desired total for the optimized model is 50,000 triangles. At that resolution the model will be fairly compact but still retain significant detail from the original.
In the 3D Viewport open the Sidebar (default hotkey
n) and chooseRapidPipeline.
Open the Settings dialog by clicking the gear icon, then enable Expert Mode, and click the Back button.


In the Optimize tab, turn on
Enabled. This turns on decimation and remeshing.

Enable the 3D Model Optimization Method and set it to use
Mesh and Material Optimization.

- Materials can be optimized alone, but in this case both the meshes and the materials need to be changed because the Remesher creates a whole new mesh and bakes textures from the source meshes onto the new mesh.
Set the Mesh and Material Optimization to
Remesher.

Set the Remeshing Method to
Shrinkwrap.

The two remeshing methods Shrinkwrap and Voxelization produce different results, which can be leveraged in different situations.
Shrinkwrap is generally better with mechanical shapes and hard angles, while Voxelization is better with organic meshes like clothing and characters.
- In the Target secton set the Faces to
Faces Valueand type in25000.
- The desired final triangle count for the entire sofa will be 50,000. The wicker can be limited to half of that, which ensures there will be enough resolution left for other half (fabric cushions).
The Remesher Target is an upper limit. If the Remesher needs less triangles it will do this automatically, but it will never exceed this limit.
- In the Material Merger section, set the Material Regenerator to
Generate UV Atlas.
- The remesher will create a totally new mesh, and transfer the materials over from the source meshes. This setting tells RapidPipeline Processor to create UVs for this new mesh.
- Make sure the Normal Map Baking Mode is set to
always.
- This will bake a bump map to preserve the bevels and details from the source model.
- Next to Ambient Occlusion Map Baker, turn on
Enable.
- This will bake an ambient occlusion map for the new mesh, which also helps to preserve shading detail from the source meshes.
- Enable the Texture Baking Resolution, and set the Default Texture Map Resolution to
4096.
- The original textures are 2k, but since we are replacing the detailed wicker mesh with an alpha texture, we want to make sure we have enough pixels for smooth edges. If this resolution isn't good enough, the RapidPipeline Processor can simply be re-run with a higher resolution.
The next setting Bake Topological Holes to Alpha Map is an advanced setting which is hidden by default. To expose this setting, go to the top of the UI and set the Settings Level to
Expert. This exposes all available settings.

Scroll down to the Texture Baker section and enable the checkbox for Bake Topological Holes to Alpha Map.

- This will preserve the holes from the source meshes, by baking them into an alpha map for the new mesh, which is created by the Remesher.
- Scroll to the top of the Remesher section, set the Resolution to
6.
- The Resolution usually needs to be fine-tuned to match the size of the holes in the source topology. It decides how fine the remesh grid will be, which affects whether the new mesh will cover or poke through the existing holes. The greater the Resolution, the sharper the corners will be, but also the more likely the new mesh will start to sink into the holes.
A demonstration of Shrinkwrap resolution values for the wicker part of the sofa.
The upper resolutions for the Remesher are constrained by the Remesher Target value of 25,000 faces, which was set earlier. If higher resolutions are desired the Remesher Target can be adjusted, or it can disabled entirely. This can be useful for detailed meshes which may require deep cuts to be preserved.
- For this model the holes are covered completely by Resolution 6. A value of 5 also works, but the underside of the sofa starts to distort. 6 offers enough resolution to keep details, while also covering the original holes. This allows the alpha map to do the heavy lifting, and requires a lot less vertices.
- The remaining settings can be left to their defaults. Click the
Runbutton to process the model.
- RapidPipeline Processor optimizes the meshes quickly, and when complete the original source meshes are hidden, and the new remeshed wicker is shown.
- Notice in the Statistics that the new wicker has only 10,458 triangles, not 25,000. This is because the Remesher only needed that many to accomplish the job at Resolution 6. The Remesher Target was set to 25,000 triangles, but this is only an upper limit. This target matters more when using higher Resolution values.
The Remesher Settings File
The finished settings for the Remesher can be preserved for reuse using the Save and Load buttons. Here's what that looks like:
{
  "optimize": {
    "3dModelOptimizationMethod": {
      "meshAndMaterialOptimization": {
        "remesher": {
          "target": {
            "faces": {
              "value": 25000
            }
          },
          "materialMerger": {
            "materialRegenerator": {
              "uvAtlasGenerator": {
                "textureBaker": {
                  "normalMap": {
                    "mode": "always",
                    "recomputeNormals": true,
                    "skipNormalsRoughnessThreshold": 0.0,
                    "normalMapScale": 1.0,
                    "tangentSpace": true
                  },
                  "aoBaker": {
                    "strength": 0.5,
                    "replaceOriginal": true,
                    "filterRadius": 3.0,
                    "textureSamples": 48
                  },
                  "bakingResolution": {
                    "default": 4096
                  },
                  "sampleCount": 4,
                  "texMapAutoScaling": true,
                  "bakeCombinedScene": false,
                  "topologicalHolesToAlpha": true,
                  "powerOfTwoResolution": "none",
                  "inpaintingRadius": 32.0
                },
                "method": "isometric",
                "segmentationCutAngle": 88.0,
                "segmentationChartAngle": 130.0,
                "maxAngleError": 114.0,
                "maxPrimitivesPerChart": 10000,
                "cutOverlappingPieces": true,
                "atlasMode": "single",
                "allowRectangularAtlases": false,
                "packingResolution": 1024,
                "packingPixelDistance": 2,
                "atlasFactor": 1
              }
            },
            "materialMergingMethod": "auto"
          },
          "method": "shrinkwrap",
          "resolution": 6,
          "filterBackProjected": false
        }
      }
    }
  }
}
Decimate the Cushions
To optimize the rest of the sofa, first select the cushions mesh.
Back in RapidPipeline Processor, go to the Optimize tab and change Mesh and Material Optimization to
Decimator.

- The cushions don't have a bunch of small holes, so traditional mesh decimation is best.
- Under the Target, set the Faces to
Faces Value, and set the Faces Value to39542.
- The desired overall triangle count is 50,000 triangles, and the wicker was remeshed to only 10,458, so this means the rest of the sofa can use the remaining 39,542 triangles.
- Set the Material Optimization to
Material Merger.
- This will make sure to merge the selected parts together into a single texture set and material, using texture baking and UV atlasing.
- Make sure the Normal Map Baking Mode is set to
always.
- This will bake a bump map to preserve the original details from the source mesh. This is especially useful if mesh creases in the fabric are being simplified down by the decimation.
Enable the Ambient Occlusion Map Baker, to bake an occlusion map.
Enable the Texture Baking Resolution, and set the Default Texture Map Resolution to
2048.

- This was the resolution used for the original cushion texture. If a smaller file size is needed, this number can simply be reduced and decimation can be re-run on the source mesh.
- The remainder of the settings can stay at their defaults. Click the
Runbutton to process the selected parts.
- RapidPipline Processor finishes optimizing the meshes quickly, and when complete the original source meshes are hidden and the decimated mesh is shown. Shift-click on the remeshed wicker to show the full Statistics.
The finished result of the Remesher and the Decimator is two meshes, with a combined triangle count of 50,000.
The Decimator Settings File
The finished settings for the Decimator can be preserved for reuse using the Save and Load buttons. Here's what that looks like:
{
  "optimize": {
    "3dModelOptimizationMethod": {
      "meshAndMaterialOptimization": {
        "decimator": {
          "target": {
            "faces": {
              "value": 39542
            },
            "deviation": {
              "percentage": 0.0
            }
          },
          "materialOptimization": {
            "materialMerger": {
              "materialRegenerator": {
                "uvAtlasGenerator": {
                  "textureBaker": {
                    "normalMap": {
                      "mode": "always",
                      "recomputeNormals": true,
                      "skipNormalsRoughnessThreshold": 0.0,
                      "normalMapScale": 1.0,
                      "tangentSpace": true
                    },
                    "aoBaker": {
                      "strength": 0.5,
                      "replaceOriginal": true,
                      "filterRadius": 3.0,
                      "textureSamples": 48
                    },
                    "bakingResolution": {
                      "default": 2048
                    },
                    "sampleCount": 4,
                    "texMapAutoScaling": true,
                    "bakeCombinedScene": false,
                    "topologicalHolesToAlpha": false,
                    "powerOfTwoResolution": "none",
                    "inpaintingRadius": 32.0
                  },
                  "method": "isometric",
                  "segmentationCutAngle": 88.0,
                  "segmentationChartAngle": 130.0,
                  "maxAngleError": 114.0,
                  "maxPrimitivesPerChart": 10000,
                  "cutOverlappingPieces": true,
                  "atlasMode": "single",
                  "allowRectangularAtlases": false,
                  "packingResolution": 1024,
                  "packingPixelDistance": 2,
                  "atlasFactor": 1
                }
              },
              "materialMergingMethod": "auto",
              "keepTiledUVs": false,
              "tilingThreshold": 1.5
            }
          },
          "preserveTopology": false,
          "preserveNormals": false,
          "preserveMeshBorders": true,
          "preserveMaterialBorders": false,
          "collapseUnconnectedVertices": true,
          "boundaryPreservationFactor": 0.5,
          "collapseDistanceThreshold": 0.004999999888241291,
          "method": "quadric"
        }
      }
    }
  },
  "export": [null]
}
Exporting to glTF
There are two methods to export. You can disable Expert Mode to expose RapidPipeline's own Export button, or you can use Blender's built-in exporter. Here we'll just use Blender's exporter.
Make sure the remeshed wicker and the decimated cushions are selected, then go to the File menu, choose Export, then glTF 2.0.
In the Blender File View dialog make sure to open the Include dropdown and choose
Selected Objects.

- This will exclude the source meshes, and export only the two new optimized meshes.
- Expand the Data dropdown, then the Material dropdown, and set Images to
WebP Format.
- Textures will be compressed into WebP format, a highly optimized file format with minimal visual artifacts.
- When finished exporting, the new GLB file can be viewed in web 3D viewers like the glTF Sample Viewer. The GLB can also be uploaded to the RapidPipeline Web Platform for conversion into other formats, like USDz.
Source model is 55mb with 1,036,188 triangles, and the optimized model is 4.8mb with 50,000 triangles.
Input / Output Statistics
The source model was 55mb with 1,036,188 triangles.
The processed model is 4.8mb with 50,000 triangles!
| Input Asset | Output Asset |
|---|---|
| 1,036,188 triangles | 50,000 triangles |
| File size 55mb | File size 4.8mb |
Expert Mode to CLI Automation
| This tutorial contains these key points: |
|---|
| ✔️ Use the Blender add-on |
| ✔️ Export your settings to a JSON file |
| ✔️ Download preconfigured Import and Export settings |
| ✔️ Integrate them all into the CLI |
| ✔️ Examine the outputs |
This tutorial shows how to transition from using the RapidPipeline Processor add-on in Blender to process single assets at a time, into setting up a batch-processing pipeline using the RapidPipeline CLI.
Import a CAD File
It's a good idea to import an example file, which will help you decide which settings to use.
We can set the Tessellation Resolution to extraFine, because the extra detail allows our Decimator plenty of room to automate the best surface detail.
Remove T-Junctions will help resolve any cracks that may appear between patches when they're tessellated.
Convert Z- to Y-Up is also a good to convert the axis from Z-up to Y-up, because most CAD files are oriented differently than what's used in most rendering and web3d software.
Fix Winding Order helps with flipping any inverted faces, resulting from mirroring or negative scale.
Once the file is imported, you can enable Statistics in the Viewport Overlays, to expose how many nodes there are and how many triangles overall.
Decimate and Bake Atlas Action
We can use an Action to design an initial set of settings, which we'll export later for our CLI processing.
Decimate and Bake Atlas has a good set of tools for optimizing CAD assets.
Bake Occlusion Map is great for PBR rendering realism, as it captures all the self-shadowing details from complex 3D meshes.
Face Target can be set to a high number like 10 million, to control the upper bound for how high each asset can go.
We can use the Deviation Percentage to do the bulk of the decimation work, since it is a quality-based metric rather than an arbitrary triangle count. It will examine the local curvature of each asset to determine what the optimization amount should be. A deviation of 0.05 is a fairly high value, which will optimize assets to be within 5% of the original curvature. You should adjust this value to work with the kinds of assets you are working with.
Atlas Mode can be set to Single, which will create a single shared bake for all materials and nodes in the asset, which keeps the output efficient. If the asset has UVs already, this will create a new 2nd UV in an atlas layout. Two textures will be baked for most CAD assets: an ambient occlusion texture for self-shadowing detail, and a normal map to preserve all the original high-resolution shading details.
Mesh and Material Merging can be set to byMaterial, which will merge nodes that use the same material. This helps improve rendering performance by reducing draw calls, which is especially important when the asset is used for real-time rendering.
We can test the settings by running this on an example CAD asset. Feel free to adjust settings as needed, and re-run the process on the original input asset.
Expert Mode in Blender
Once you've edited settings in an Action, you can open the Settings and choose Expert Mode. This will copy your settings from the Action, and expose all the advanced 3D Processor settings.
Examining the tabs will show the settings from the Action have been loaded here.
Additional settings can be added, beyond what the Action allowed. Mesh Culling is a good process to add for CAD assets, since it can easily remove hidden surfaces from the asset.
The Lump Threshold can be increased, allowing it to be more aggressive in removing hidden parts.
Export Settings into a Config Preset
The Save Preset button can be used to export all the advanced settings into a preset config JSON file.
It's a good idea to use a sensible file name so it's easier to specify this in your command line later.
Save this into the same folder on your computer as where you are storing your CAD files, for simplicity.
Import and Export Settings
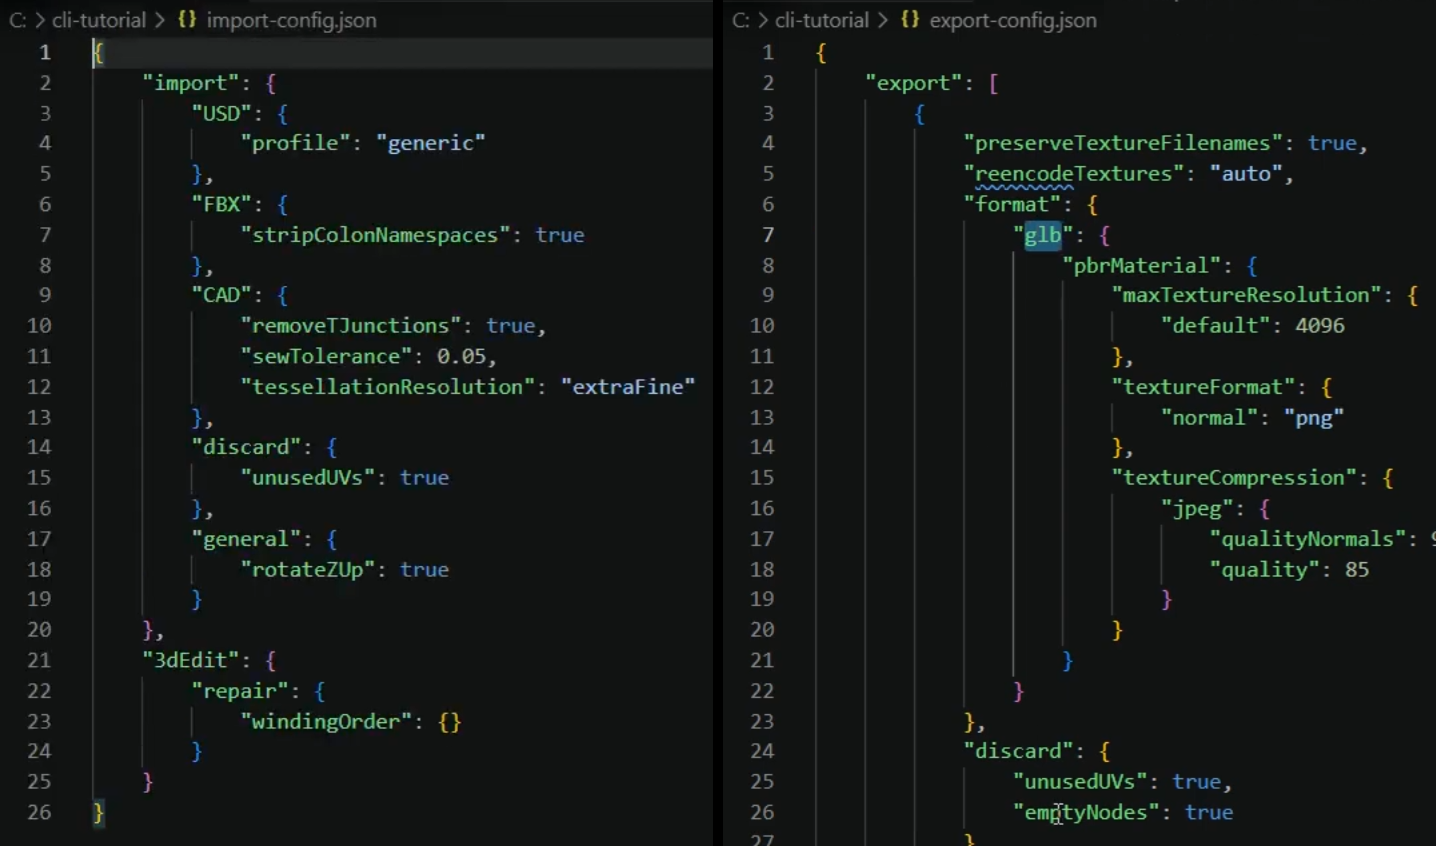
We have two pre-configured presets which are great for controlling how the CLI will import and export your CAD assets. These can be used as-is, or they can be edited to fit your specific needs.
See the Import and Export Sample Configs to download these files. Save these two files into that same folder.
The Export config has four file outputs, but these can be edited or revised however you need.
Using the CLI to Process a File
Open a command line tool like the Windows Powershell.
You can start typing commands, and press Enter to run them.
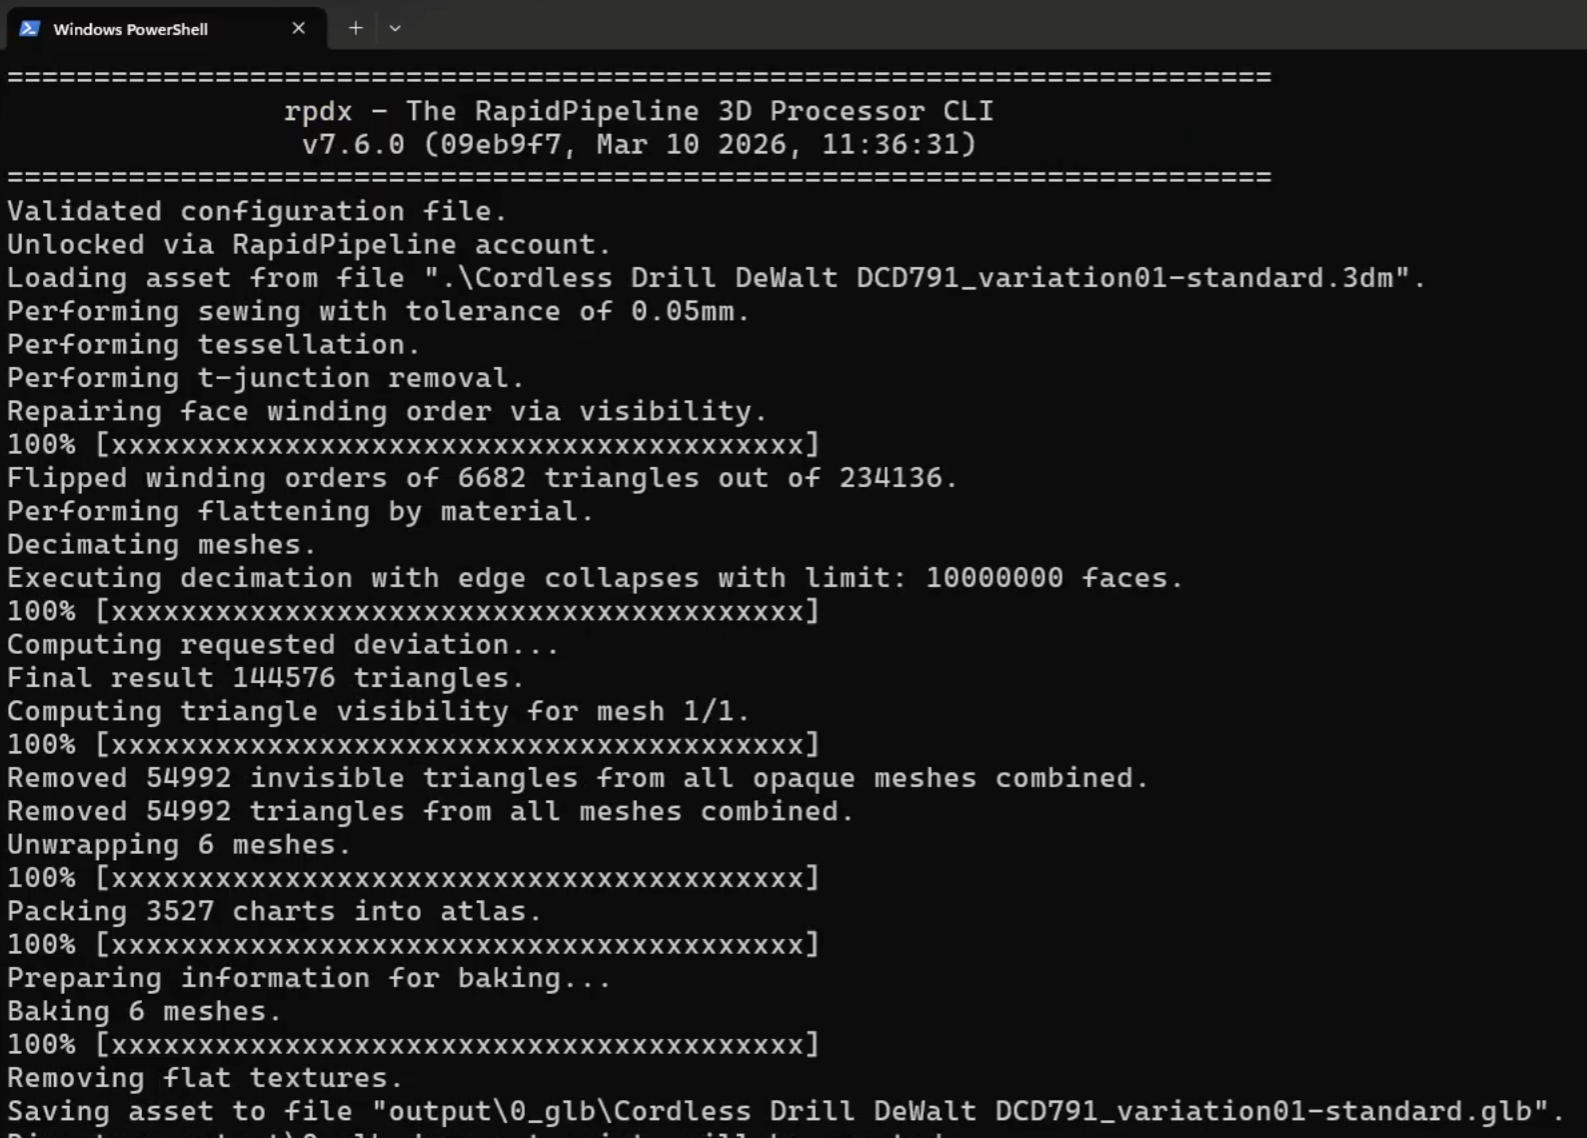
rpdx is the simplest command, it will show you that the RapidPipeline 3D Processor CLI is running properly.
rpdx -h will print a bit of info about how to use the system, including a list of the most commonly used commands.
Our full command line which includes your saved and downloaded configs will look something like this:
rpdx -i '.\Cordless Drill DeWalt DCD791_variation01-standard.3dm' --read_config .\import-config.json --read_config .\cad-processing.json --read_config .\export-config.json -r
Let's break it down:
| Command | Result |
|---|---|
rpdx | Starts the CLI |
-i '.\Cordless Drill DeWalt DCD791_variation01-standard.3dm' | Imports the 3d asset for processing. Note that filenames with spaces will require single quotes (') on either end. |
--read_config .\import-config.json | This loads the import settings configuration file, saved from the website. |
--read_config .\cad-processing.json | This loads the settings configuration file that we saved out from Blender. This is where the "meat" of the 3d processing will be taking place. |
--read_config .\export-config.json | This loads the export settings config file, saved from the website. |
-r | Tells the 3D Processor to process the whole command. |
The export-config.json includes four output files, so it creates an \output folder containing all the files.
Batch Processing with the CLI
Once you have set up the CLI to process a single asset, it is easy to expand this to allow the processing of multiple assets as a fully-automated pipeline.
You can use leverage Python to accomplish this, with our public repository cli-batching-simple.
Examining the Outputs
GLB files can be loaded into online web3D viewers for examination, by simply dragging-and-dropping the GLB file.
glTF Sample Viewer has a tab Advanced Controls which shows how many mesh nodes, how many materials, and the overall triangle count. It also has Debug Channels where you can see the occlusion map and the normal map.
glTF.Report has a tab showing details about the textures being used by the file, including resolution and format info.
Our own Performance Insights for glTF is another great tool for showing some quick statistics on any glTF or VRM file.
USD outputs can be examined in OpenUSD's USD View, and Needle's basic online USD Viewer.
RapidPipeline CAD Data Preparation Samples
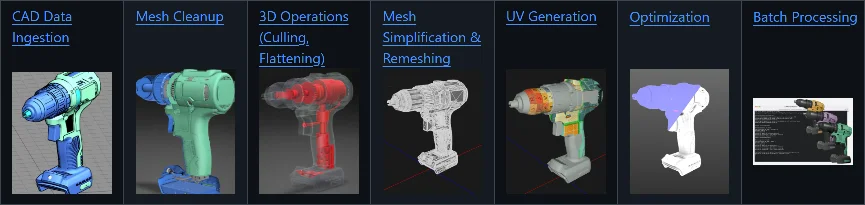
GitHub: RapidPipeline-CAD-Data-Preparation-Samples is a collection of CAD data preparation & 3D processing workflows using publicly available sample assets.
We've included settings recipes for RapidPipeline 3D Processor CLI to illustrate what is needed for an optimal conversion from parametric CAD data into tessellated meshes suitable for CGI and real-time visualization use-cases.
These same settings can be imported into Blender using Expert Mode, allowing the same CAD preparation steps to be performed directly inside Blender.