RapidPipeline for Maya
An introduction on how to use the RapidPipeline Maya plugin.
The plugin runs on a powerful 3D data optimization and automation toolset, more about it here: 3D Processor Reference.
For setup instructions please refer to RapidPipeline for Maya Installation.
Basic Usage
In Maya, all RapidPipeline operations are powered by Actions which offer a curated set of common functions for quick and easy processing.
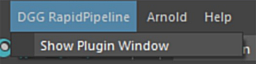
Invoking the Plugin
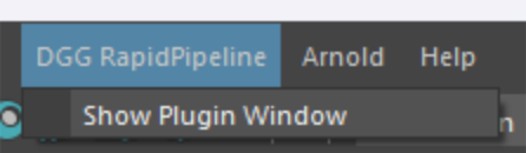
The plugin window is accessed via the Menu Bar, by choosing DGG RapidPipeline, then Show Plugin Window.
The width and height of the plugin window can be resized by dragging any edge.
The window can be docked by right-clicking on the header and choosing Dock. Or by dragging the header to a side of the screen.
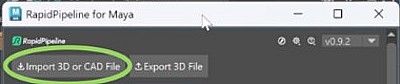
Import a 3D or CAD Model
On the Menu Bar, click on DGG RapidPipeline and choose Show Plugin Window.
Choose Import 3D or CAD file in the Plugin window.
Browse for your file to import. For a list of supported formats see Format & Material Support.
Adjust import settings in the popup window. Each of the settings are explained in the Actions Documentation.
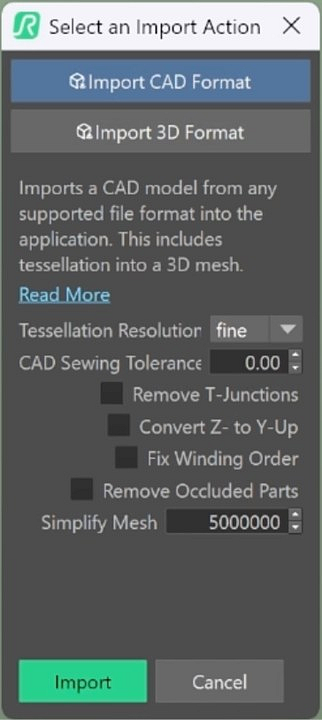
The 3D asset is now imported into the scene. Imported assets can now be edited with Actions.
Please check the Known Limitations Section in the Reference Docs, as currently not all input data is supported (no animations, only Standard Surface materials).
Process a 3D Model
Open a model in Maya, and select the mesh parts to be processed.
- If no parts are selected, all visible meshes will be affected.
On the Menu Bar, click on DGG RapidPipeline and choose Show Plugin Window.
Click on an Action to expose the options, and adjust settings as desired.
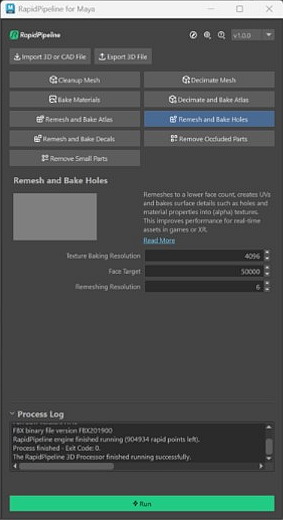
Click the Run button.
- The selected meshes are processed.
- Once processing is complete, the original mesh is hidden, and the processed mesh is shown.
- A new Group is created for the results.
Exporting a 3D Model
On the Menu Bar, click on DGG RapidPipeline and choose Show Plugin Window.
Unhide any meshes to be exported. Only visible meshes will be saved into the new file.
Click the
Export 3D Filebutton.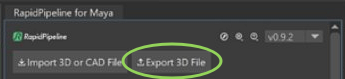
In the Export window, choose a format to export to. For a list of supported formats see Format & Material Support.
Enter a file name, and press
Save.In the Export Settings popup, configure as desired, then press
Export. Each of the settings are explained in the Actions Documentation.
Maya Actions Tutorials
Here are guides that walk through each RapidPipeline Action within the Maya plugin.
For detailed documentation about the individual settings, please see the Actions Reference.
Import 3D or CAD File
| This tutorial contains these key points: |
|---|
| ✔️ Use the Maya Plugin |
| ✔️ Select a part |
| ✔️ Run "Import CAD Format" Action |
| ✔️ Examine the results |
This tutorial shows how use the RapidPipeline Processor Plugin in Maya to import a 3D or CAD model.
It walks you through the use of the Import 3D or CAD file Option, focusing on the Import CAD Format Action, and explains the available import options.
As an example model see below a coffee machine model, in SolidWorks Part format (.SLDPRT), can be easily imported into Maya with the RapidPipeline Plugin. During this process, the model gets automatically tessellated, see a preview of this process below:
The example asset in this tutorial is based on a Coffee Machine model by bob-640, sourced from GrabCAD, solely used for documentation purposes and in accordance with GrabCAD’s Terms of Use.
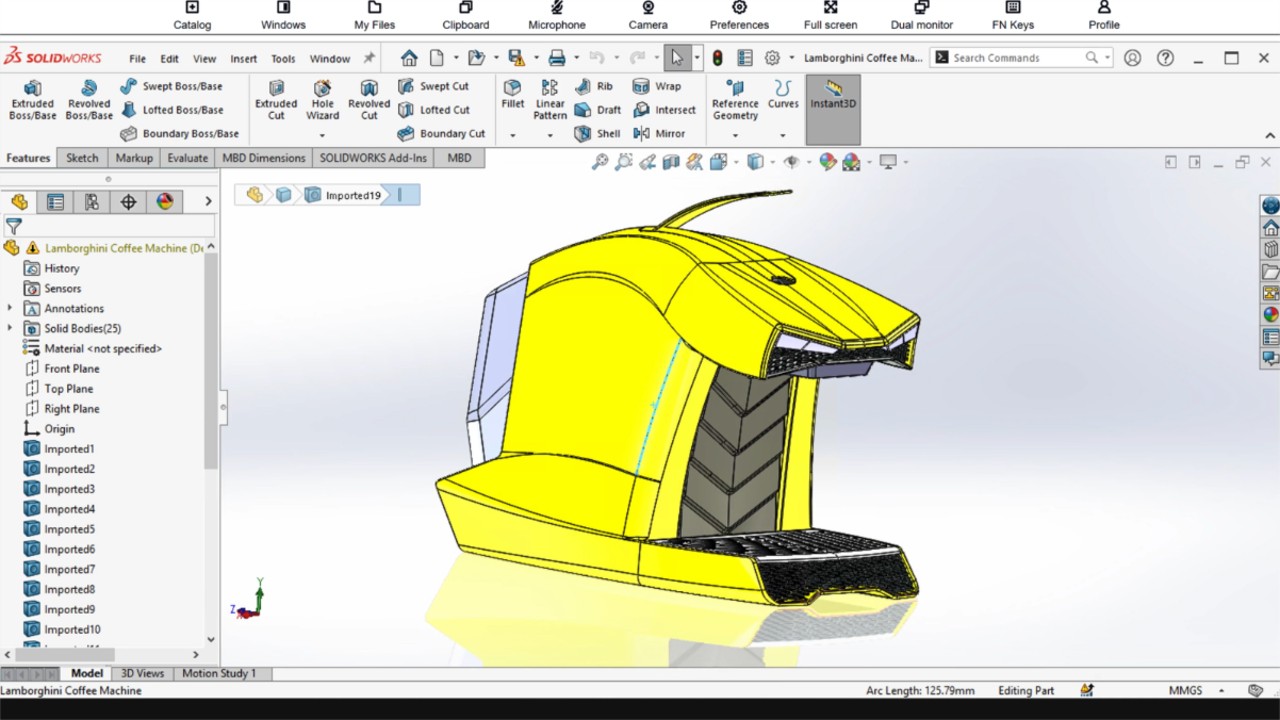
The coffee machine original model (in SolidWorks).
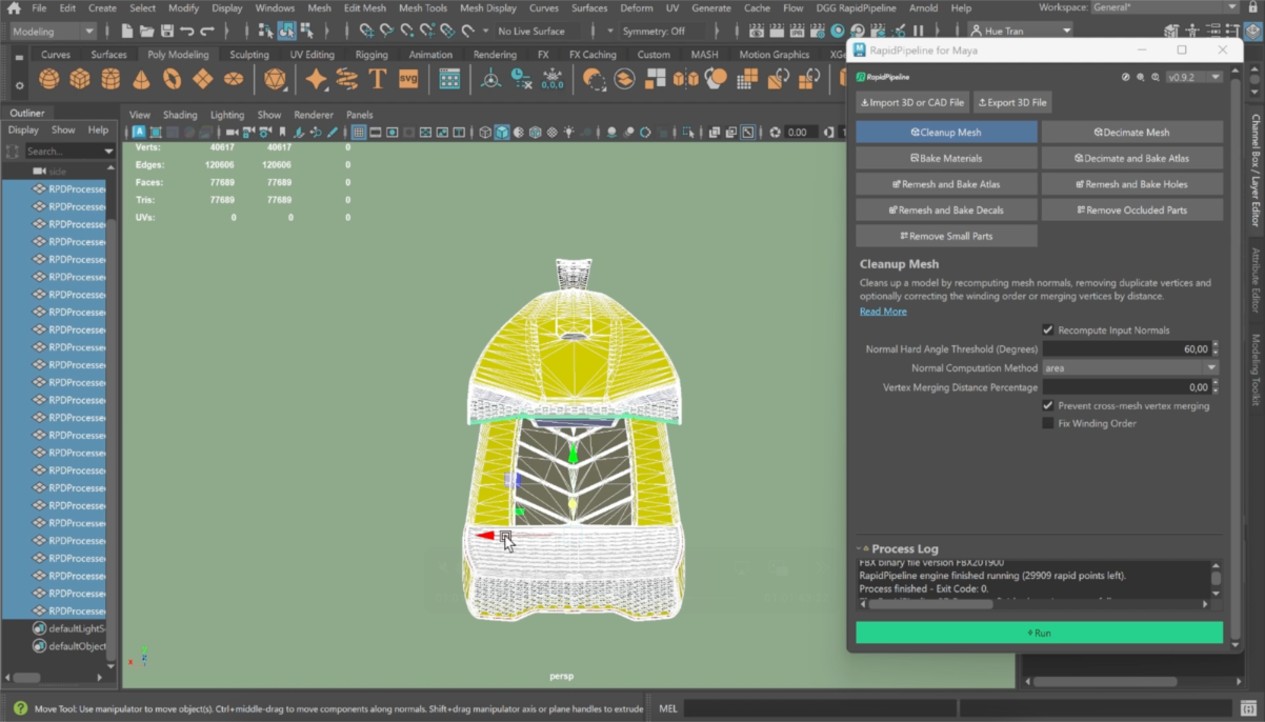
The coffee machine model inside Maya.
Import CAD Format Action
Here are the steps to achieve the same result as seen in the preview above.
On the Menu Bar, click on DGG RapidPipeline and choose Show Plugin Window.
Choose Import 3D or CAD file in the Plugin window.
Browse for your file to import. For a list of supported formats see Format & Material Support.
Adjust import settings in the popup window. Each of the settings are explained in the Actions Documentation.
The 3D asset is now imported into the scene. Imported assets can now be edited with Actions.
This will import your CAD model with default values. However, there are different settings you can tweak to fix common CAD-related issues during import, or even already perform optimization during the import step. For detailed information about each option, see the Actions Reference Documentation.
Examine the Results
To properly analyze the results, enable "Wireframe on Shaded" from the Viewport Shading drop-down menu. This will display the mesh topology in the viewport. The outputs when selecting Tessellation Resolution fine and coarse are displayed in the picture below, where the face count differences are shown.

"Wireframe on shaded” option in the Viewport Shading drop-down menu.
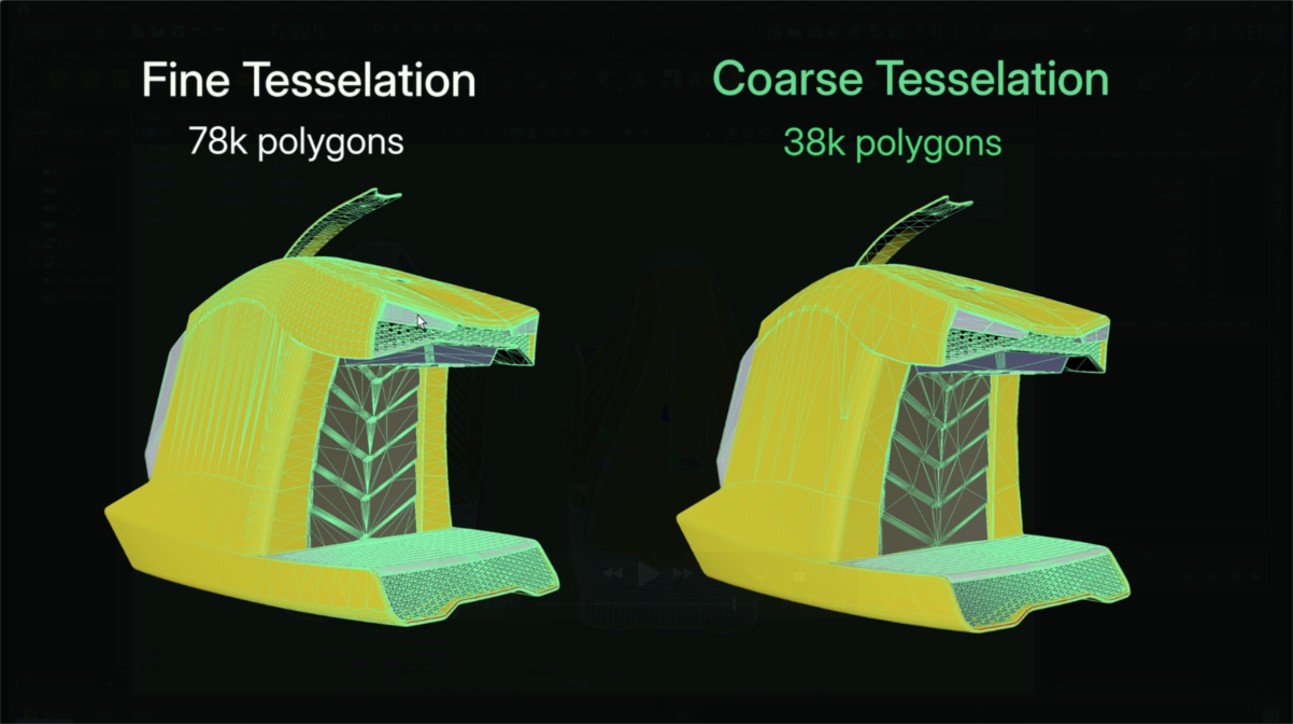
The imported model with tessellation resolution “fine” and “coarse”.
Next Steps
To fix winding order, normal or topology issues in your model, try the Cleanup Mesh action!
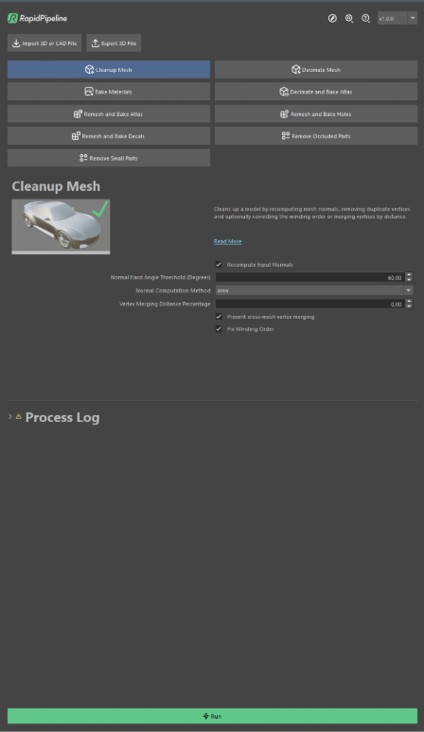
Cleanup Mesh
| This tutorial contains these key points: |
|---|
| ✔️ Use the Maya Plugin |
| ✔️ Select a part |
| ✔️ Run an Action |
| ✔️ Examine the results |
This tutorial shows how use the RapidPipeline Processor Plugin in Maya to clean up model´s geometry and fix frequent mesh issues. This page will guide you through the use of the Action Clean Up Mesh with a CAD model example with faulty normals/winding order.
See below an overview of the performed fixes during this tutorial: the normals and winding order of the mesh, wrong in the original file, have been fixed in the output.
The example asset in this tutorial is based on 'Gusto - electric sports car concept' by Mikko Hörkkö, sourced from GrabCAD.
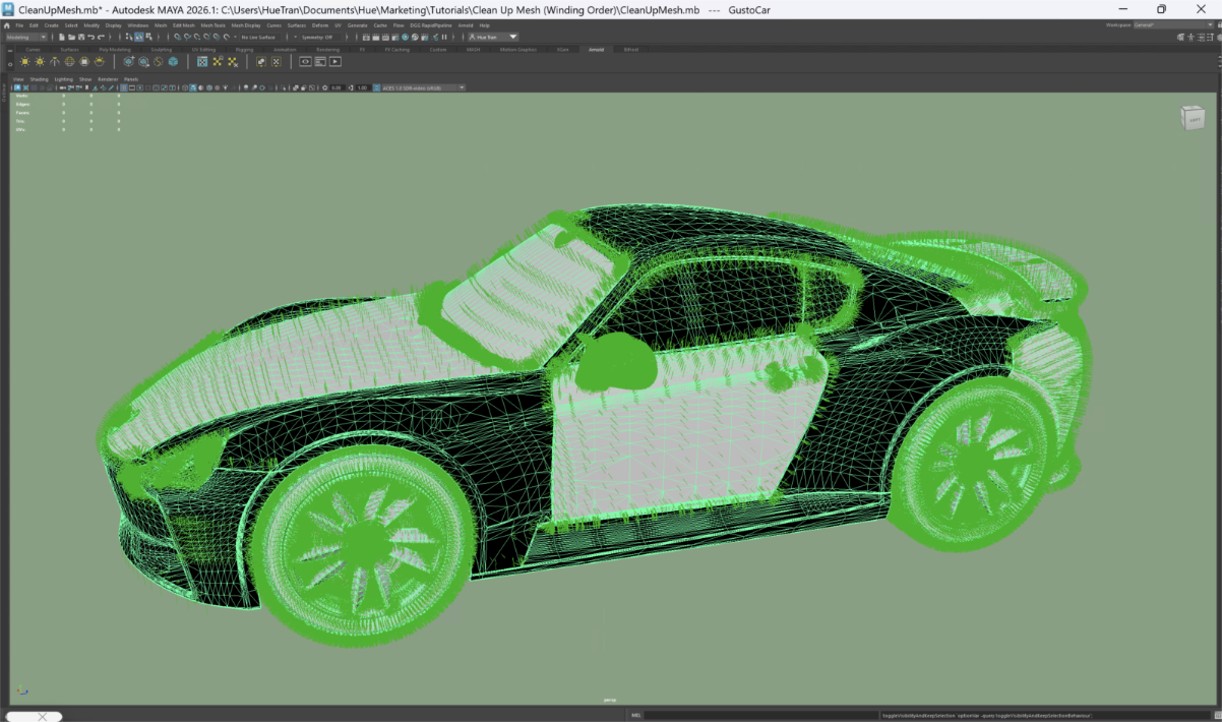
Input with wrong Winding Order.
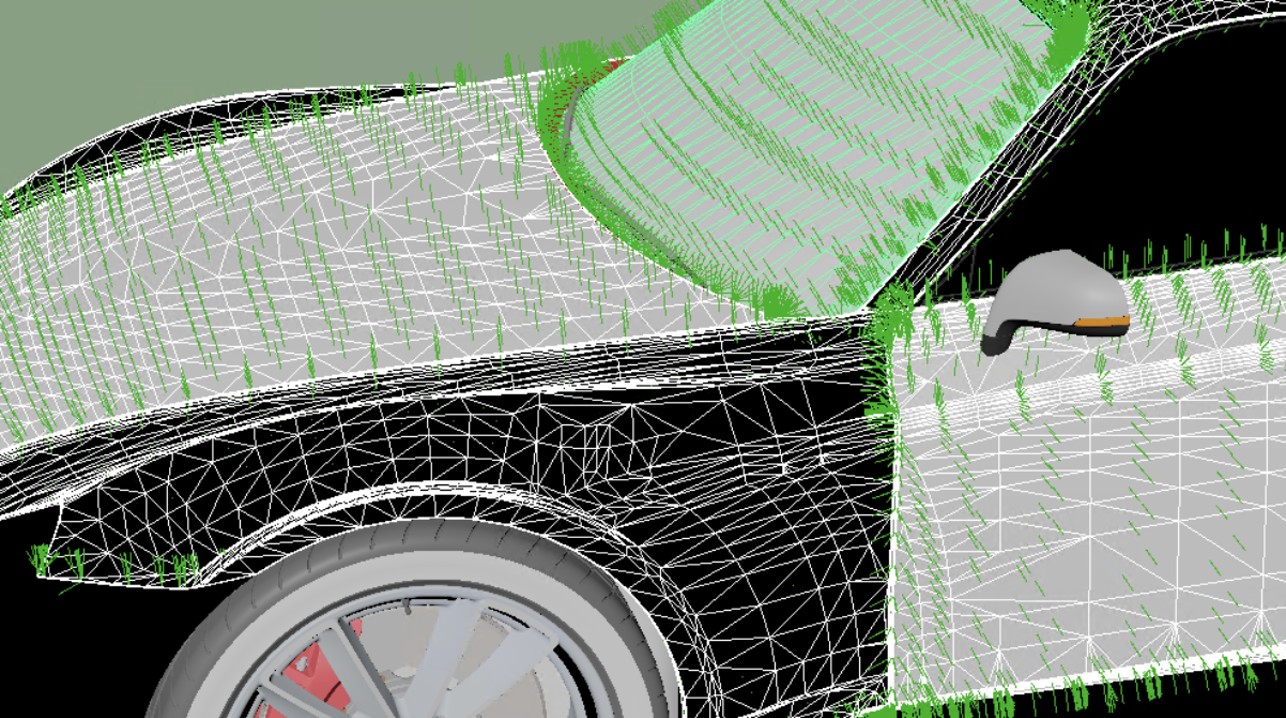
Input with wrong Winding Order (close-up).
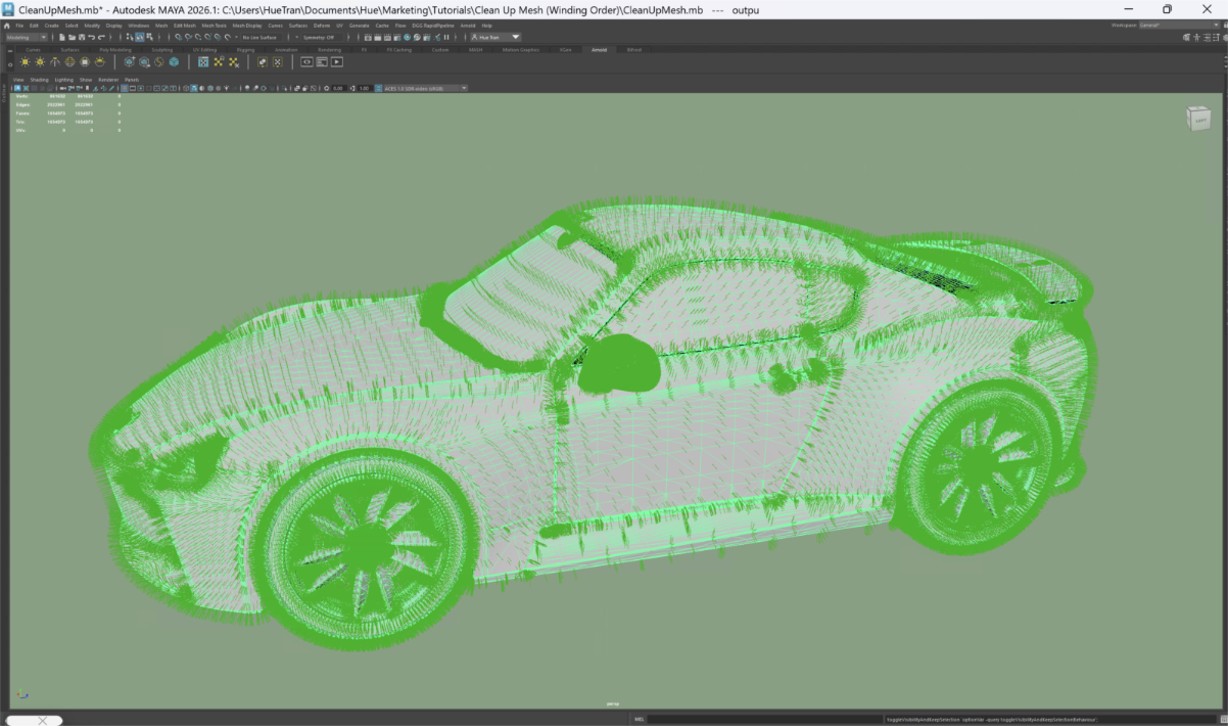
Output with correct Winding Order.
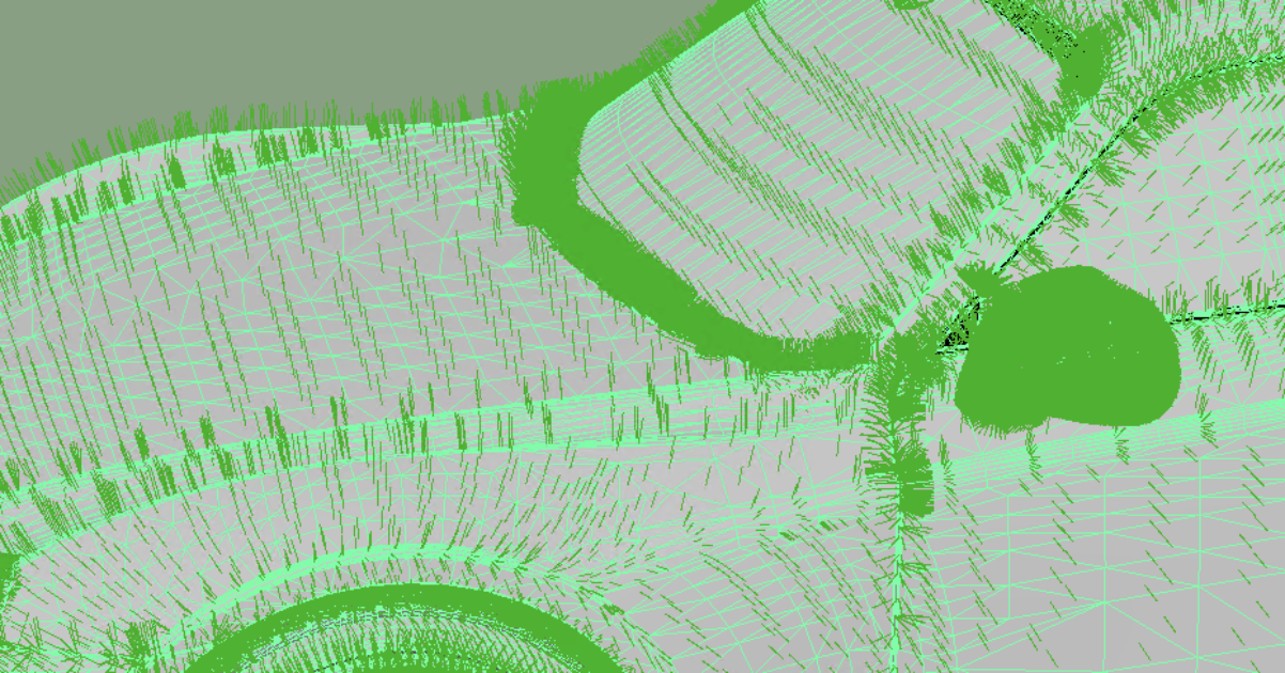
Output with correct Winding Order (close-up).
Clean Up Mesh Action
On the Menu Bar, click on DGG RapidPipeline and choose Show Plugin Window.
Select the faulty meshes by clicking on it in the Viewport, all the model, or do not select anything (all the scene will be processed).
Inside the Plugin window, choose the action
Cleanup Mesh.Enable
Fix Winding Orderin the action settings. Each of the settings are explained in the Actions Documentation.Press the Run button.
The Clean Up Mesh action opened in the plugin.
These settings are optimal for this model, as some parts have incorrect winding order. For other models with faulty mesh normals, the setting Fix Winding Order may not be needed. In that case, simple use Recompute Input Normals. The angle at which recomputed normals will be considered “hard” is controlled with the Normal Hard Angle Threshold setting.
Examine the Results
To inspect the winding order fix in Maya, select the mesh that contains the roof of the car. Then, go to the Display menu in the top bar and navigate to Polygons > Face Normals or Vertex Normals to enable normal visualization.
You can follow the same steps for the input and the output model to examine the winding order fix closely.
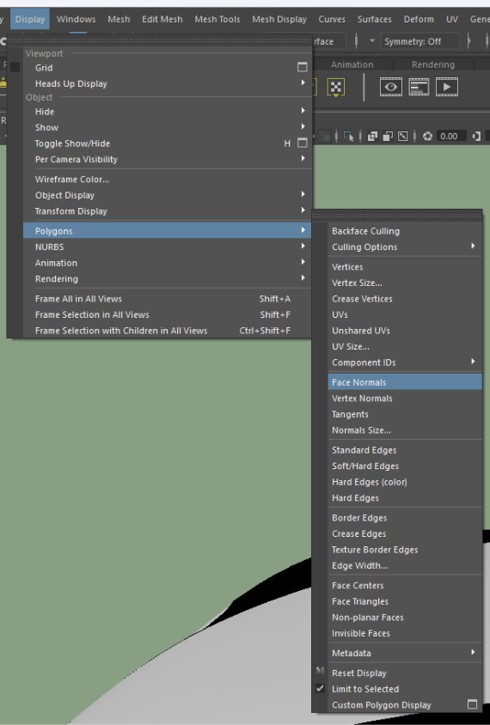
The Face Normals option inside the Display menu.

The Input with wrong Winding Order (normal view).
The output with correct Winding Order (normal view).
Next Steps
To optimize your model further, try the Remove Occluded Parts action!
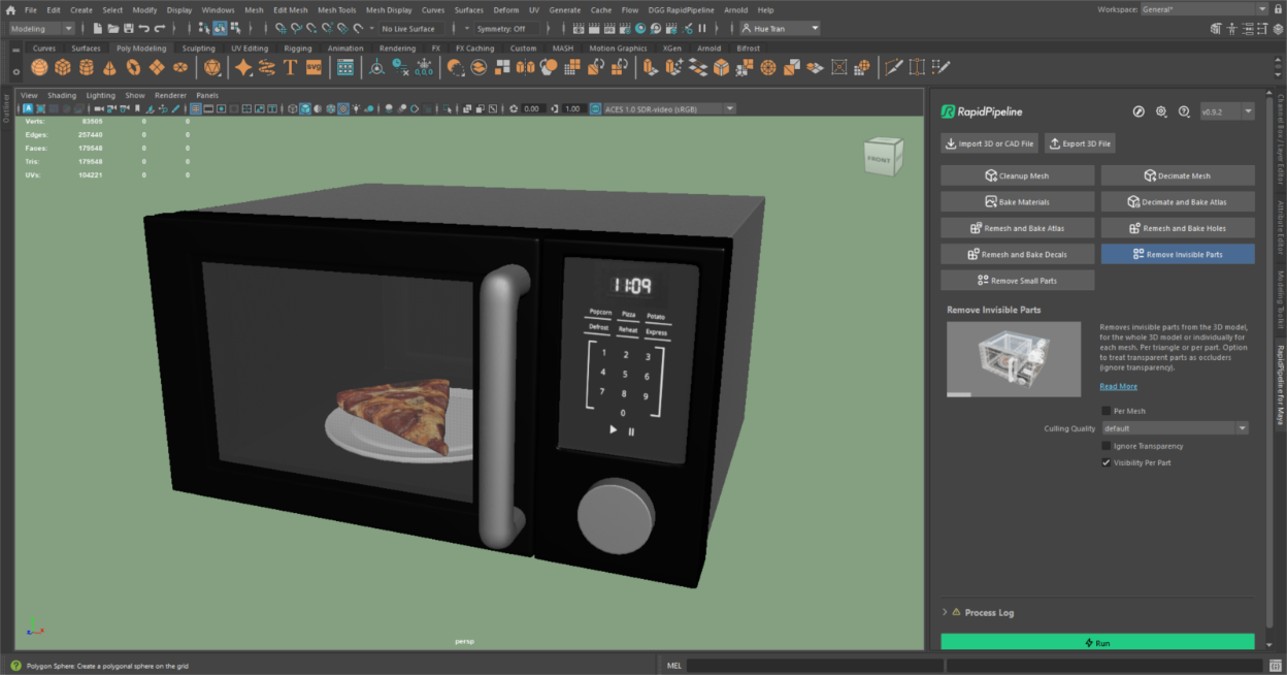
Remove Occluded Parts
| This tutorial contains these key points: |
|---|
| ✔️ Use the Maya Plugin |
| ✔️ Select a part |
| ✔️ Run "Remove Occluded Parts" Action |
| ✔️ Examine the results |
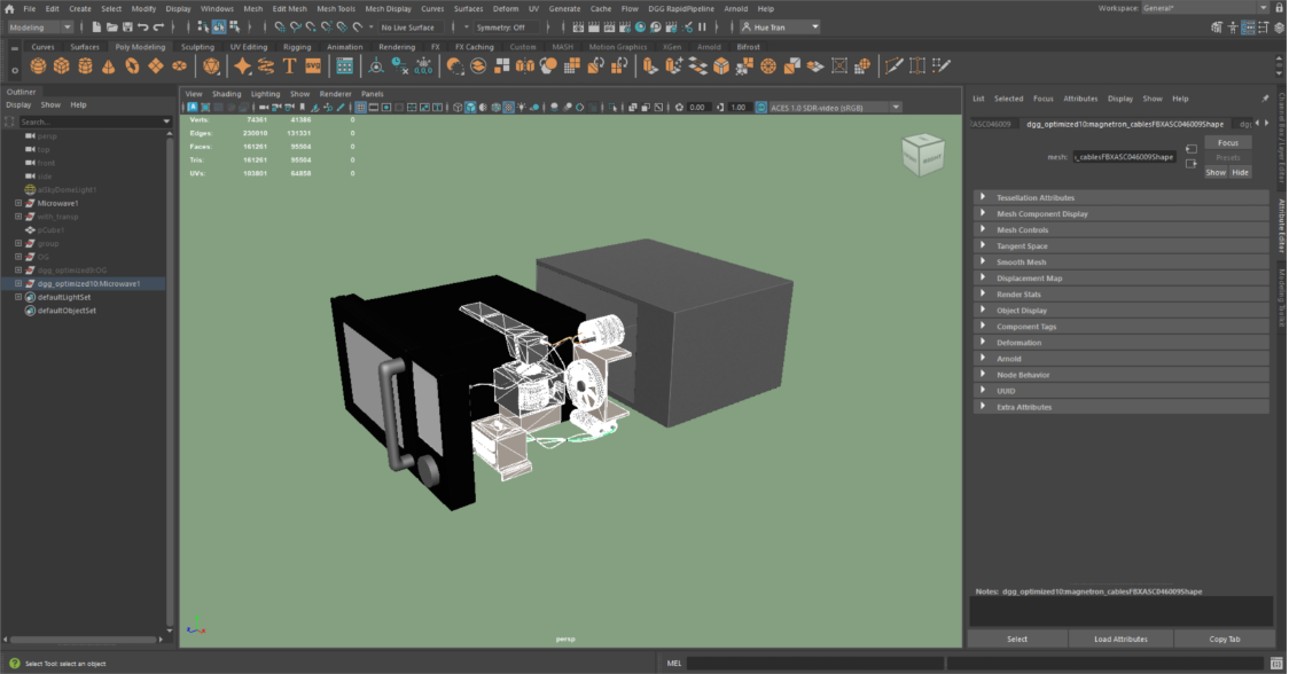
This tutorial shows how to use the RapidPipeline Processor Plugin in Maya to clean up occluded geometry for more light-weight models with the Remove Occluded Parts action. For more information, see the Maya Plugin Documentation.
This microwave includes geometry that cannot be seen from the outside. Like in real microwaves, the inner geometry illustrates the technical details like cables and intricate parts.
This can be important for use cases with wireframes or technical renders. However, it can also be unnecessary and influence performance. Let’s take a look at how to eliminate unnecessary geometry.
Input Microwave Model imported into Maya.
Remove Occluded Parts Action
On the Menu Bar, click on DGG RapidPipeline and choose Show Plugin Window.
Inside the plugin window, choose the action Remove Occluded Parts.
If you also want to remove meshes behind transparent surfaces, such as the pizza behind the glass in the microwave, enable
Ignore Transparency. Each of the settings are explained in the Actions Documentation.Press the
Runbutton.
Input with occluded geometry.
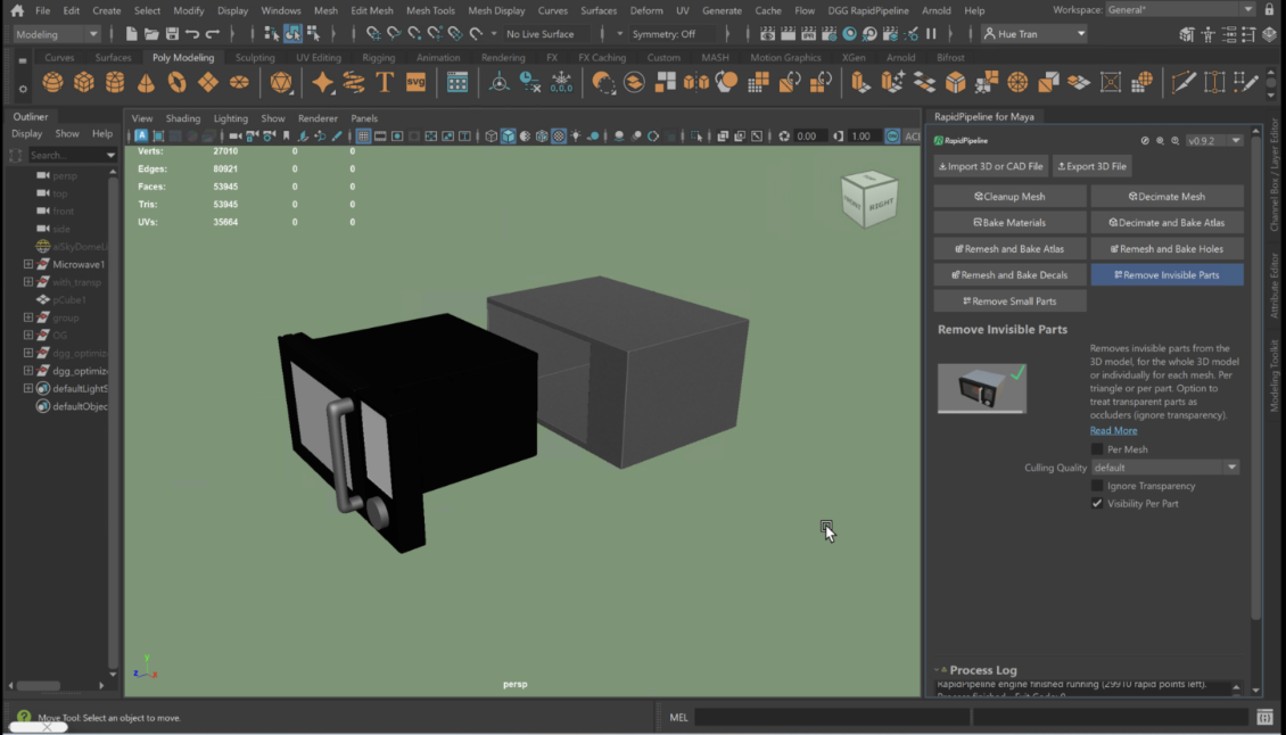
Output without occluded geometry.
This microwave has a window with a transparent material. RapidPipeline identifies the meshes with transparent materials and won't remove parts that are visible behind them.
However, the Ignore Transparency setting can be used to force the removal of objects occluded by transparent materials.
Input with occluded geometry behind a transparent mesh (window).
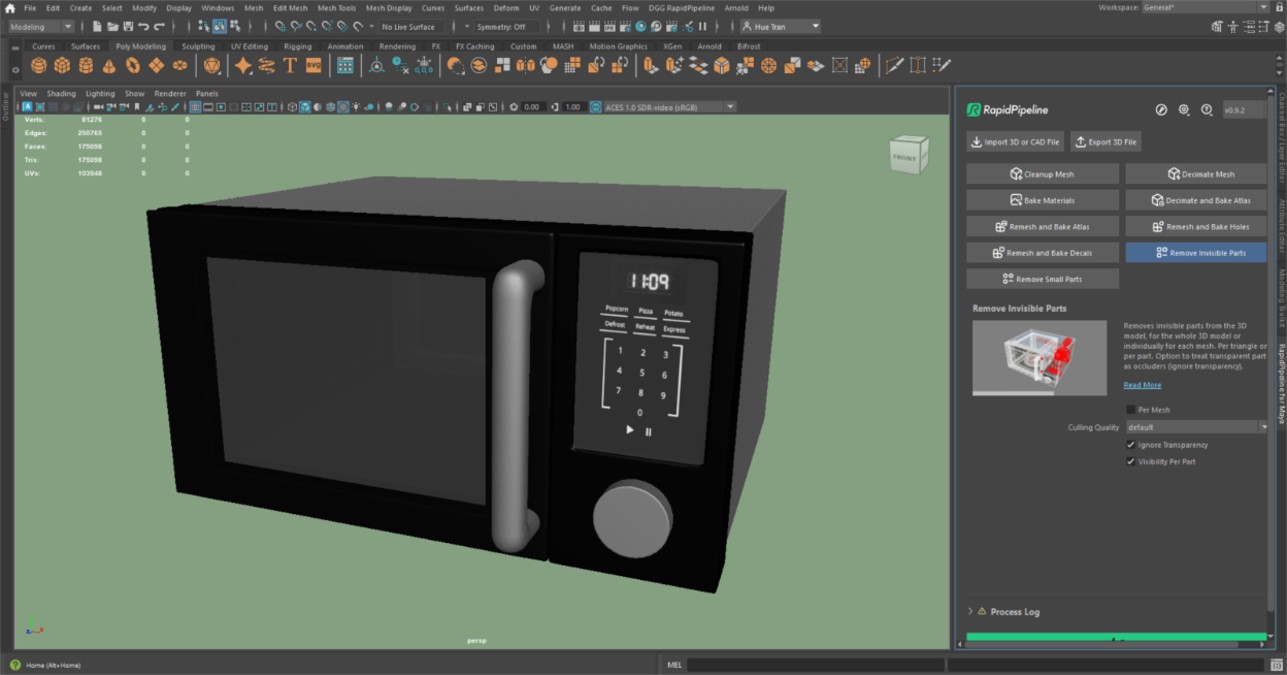
Output with” Ignore Transparency” and without occluded geometry behind the transparent parts.
Examine the Results
Press 4 to turn on the wireframe mode and inspect the model.

Wireframe of the output.
Next Steps
Learn how to optimize models with intricate geometry, like wicker, with our Remesh and Bake Holes Action in Maya!
Remove Small Parts
This tutorial shows how use the RapidPipeline Processor plugin in Maya to filter and remove small parts of your model automatically. This workflow is useful with trims, bolts, screws and similar small parts.
For more information see the Maya plugin Documentation. The Add-On runs on a powerful 3D data optimization and automation toolset, for more about this see the 3D Processor Reference.
The example asset in this tutorial is Degradation Vessel with Gear Pump by Steve Feamster.
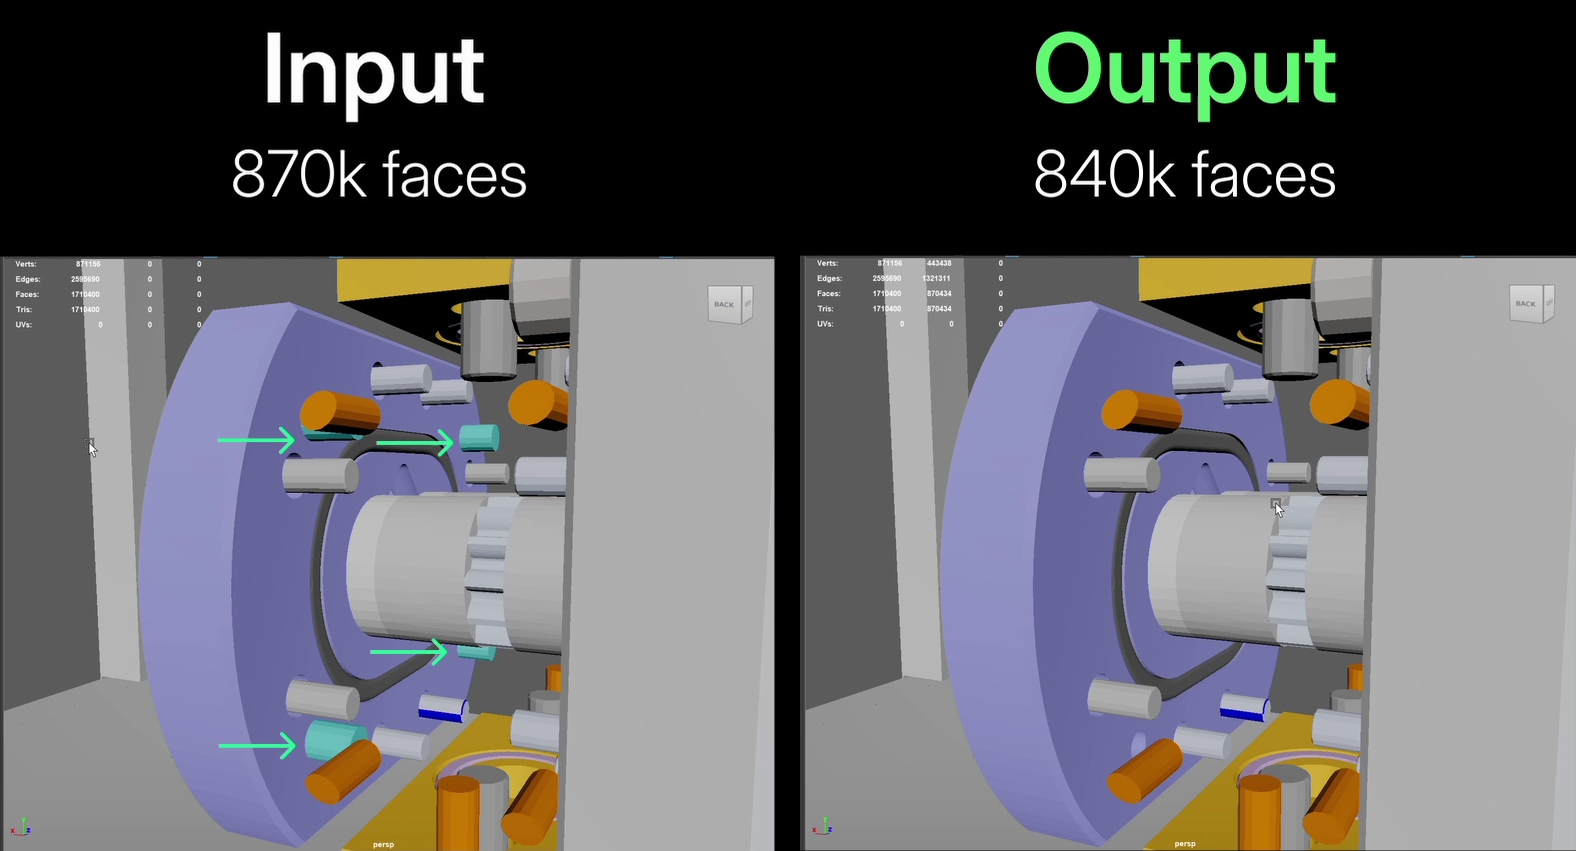
Input (left) and output with small parts removed
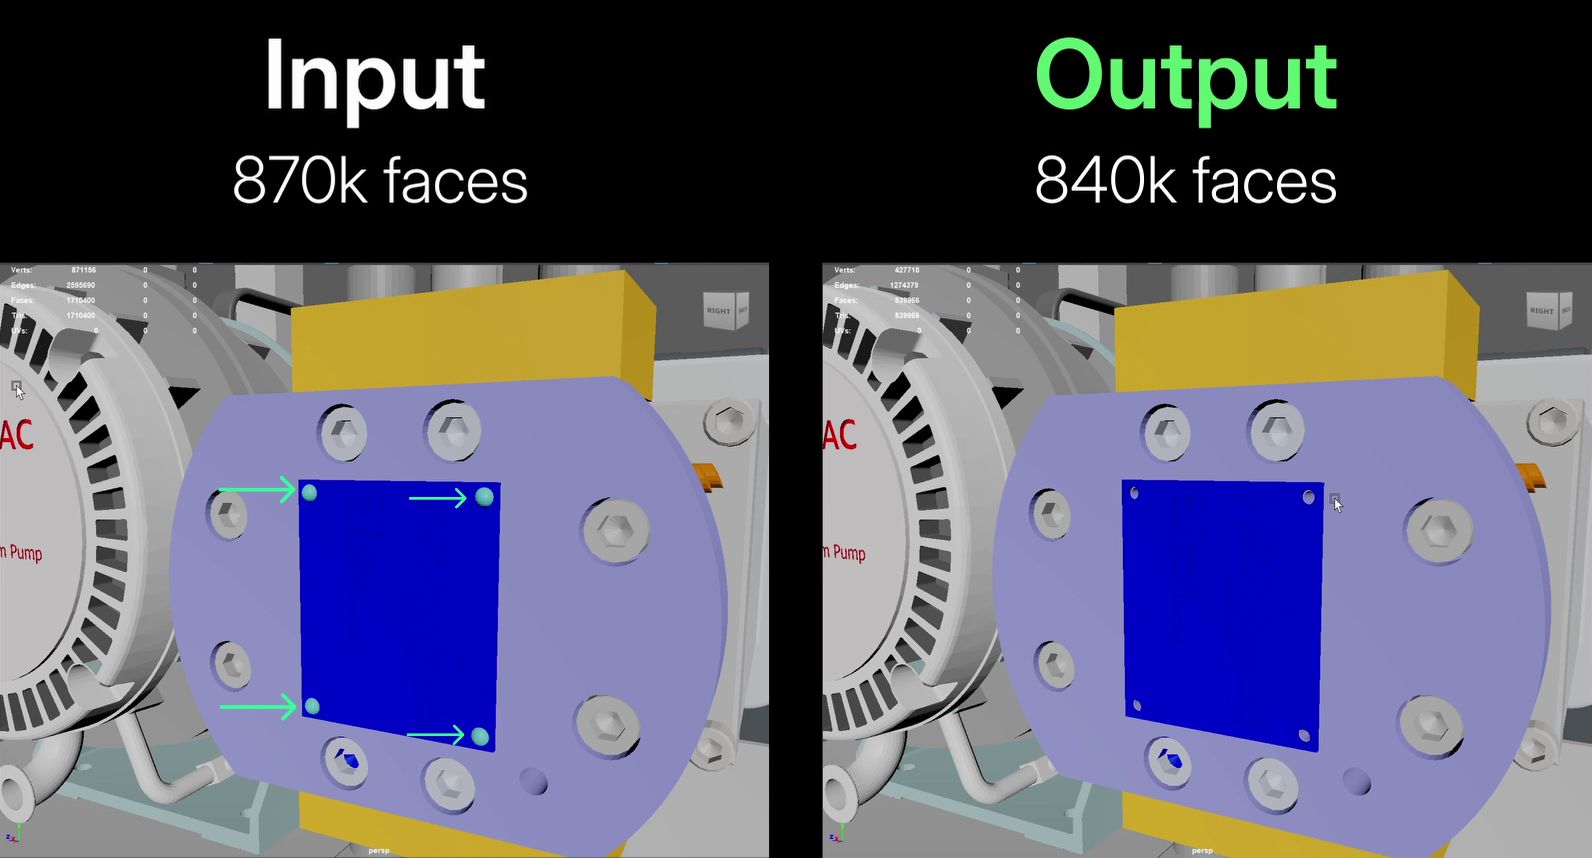
Input (left) and output with small parts removed
Here is a preview of the processing´s output: the input asset has 870,000 triangles and the output has around 840,000 triangles. Over 10 small meshes (screws) from the input model have been automatically removed.
Remove Small Parts Action
On the Menu Bar, click on
DGG RapidPipelineand chooseShow Plugin Window.Select the model you want to optimize (if no selection is made, the whole scene will be processed).
Inside the plugin window, choose the action
Remove Small Parts.Adjust the
Valueparameter as needed. The value is in Meters, so 0.01 means meshes will be removed which are smaller than one centimeter. Each of the settings are explained in the Actions Documentation.Press the
Runbutton.
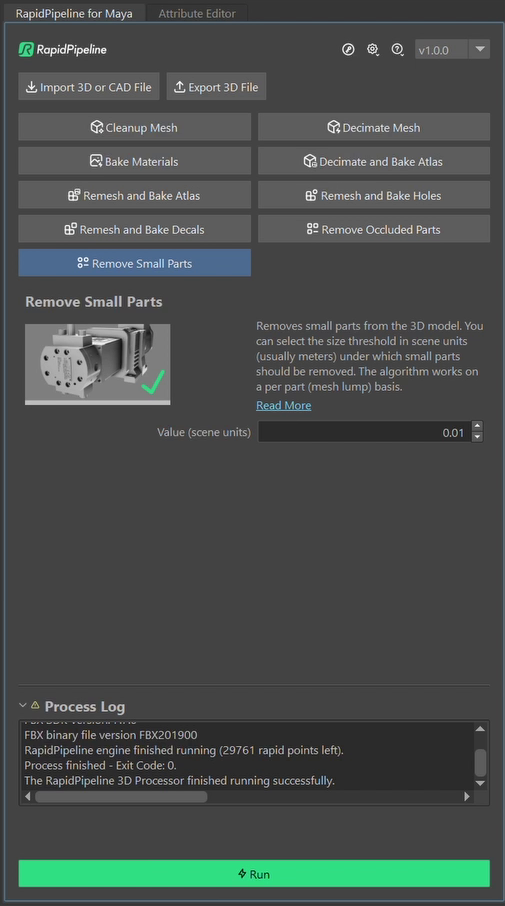
The Remove Small Parts action opened in the plugin
Examine the Results
To examine the results, you can press 4 to turn on the wireframe mode and inspect the model.
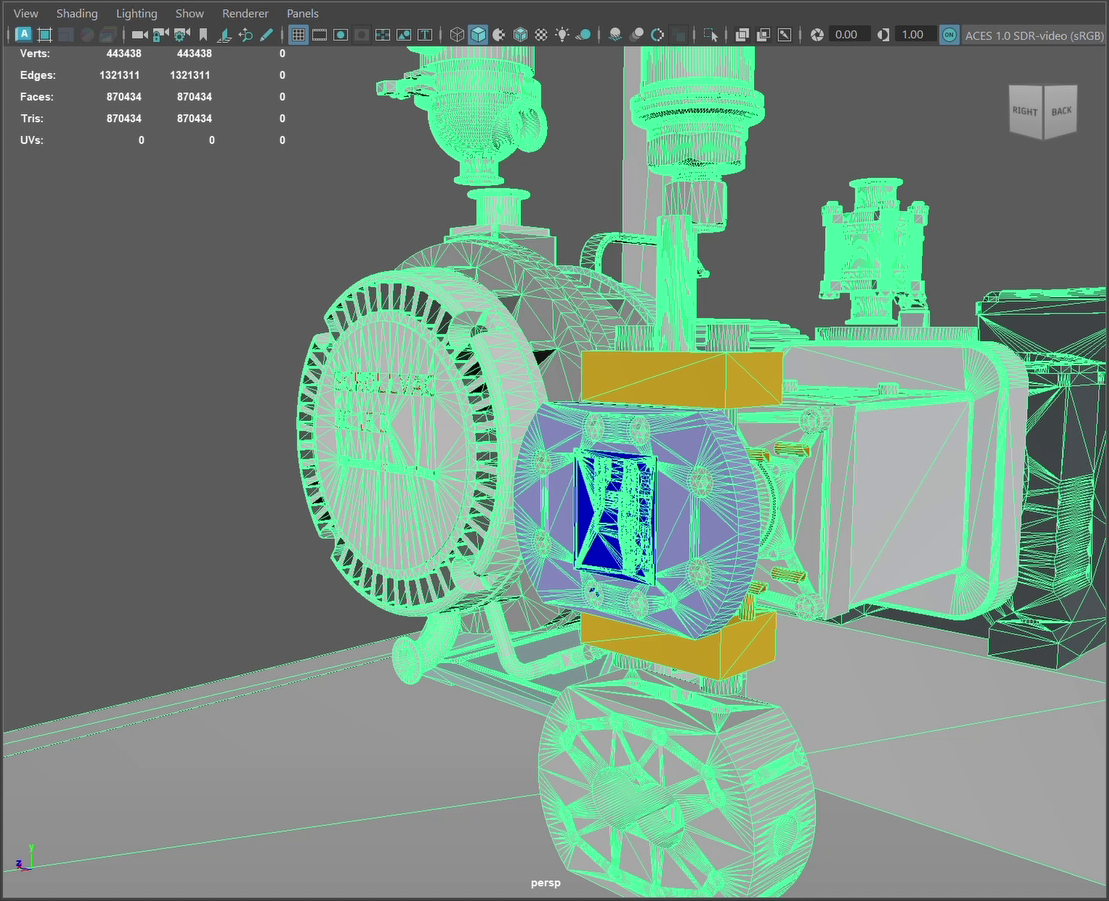
The model displayed with wireframe mode.
Next Steps
Learn how to import models including CAD formats, with our Import 3D or CAD File action!
Decimate Mesh
| This tutorial contains these key points: |
|---|
| ✔️ Use the Maya plugin |
| ✔️ Run "Decimate Mesh" action |
| ✔️ Examine the results |
This tutorial shows how use the RapidPipeline Processor plugin in Maya to simplify the geometry of a model with the Decimate Mesh action.
The asset used in this tutorial is the "Belz's RTFKT Challenge" (https://skfb.ly/6VnPP) by Belzar Sirus is licensed under Creative Commons Attribution (http://creativecommons.org/licenses/by/4.0/).
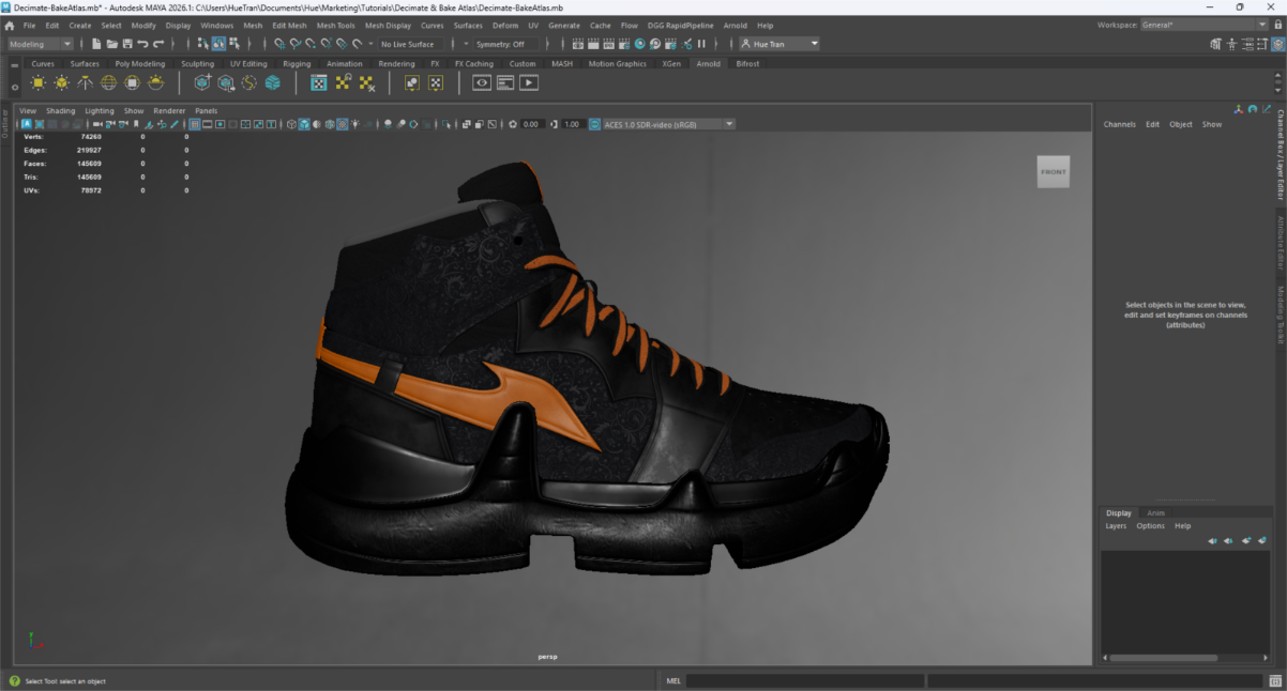
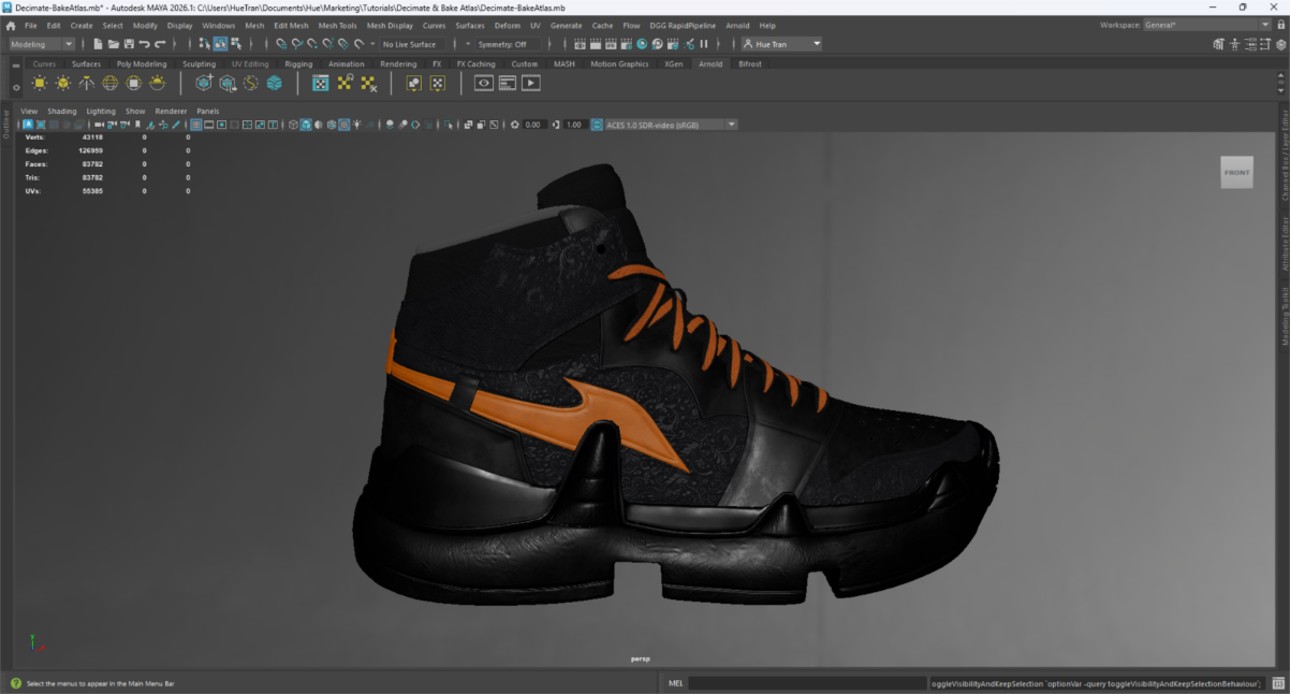
Here is a preview of the processing´s output: the input shoe has about 150K faces while the output has been reduced to 50k faces.
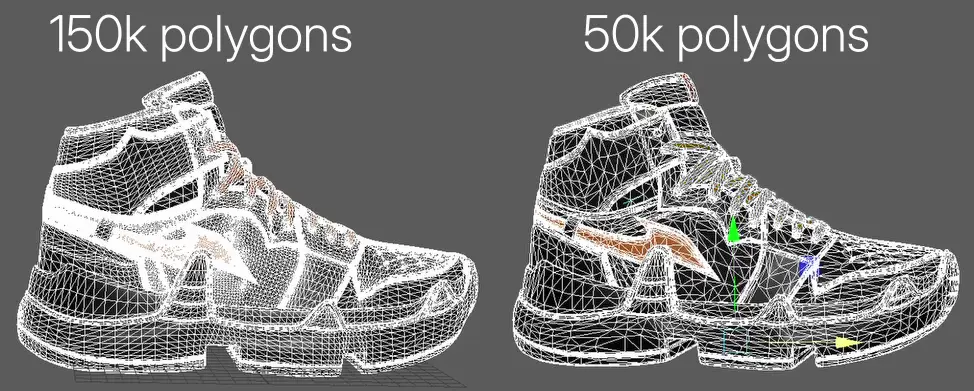
The shoe asset, before and after decimation.
Decimate Mesh Action
Select the model you want to optimize (if no selection is made, the whole scene will be processed).
Inside the plugin window, choose the action
Decimate Mesh.Adjust settings as desired. Each of the settings are explained in the Actions Documentation.
Press the
Runbutton.
Decimation actions by default use a deviation target. When the Deviation Percentage is more than zero, the Face Target will act as an upper limit for the face count, instead of acting as a forced target. Increasing the Deviation Percentage will allow the optimizer to go lower when possible. However if you simply want to reach an exact face target, the Deviation Percentage should be set to 0.
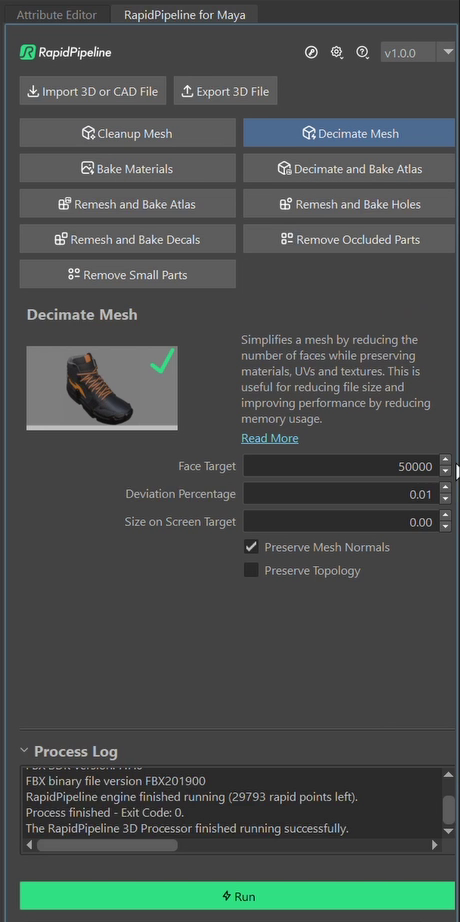
The Decimate Mesh action opened in the plugin
Examine the Results
To fully check the topology optimization by enabling Wireframe on Shaded from the Viewport Shading drop-down menu, so you can see a wireframe view of your models.
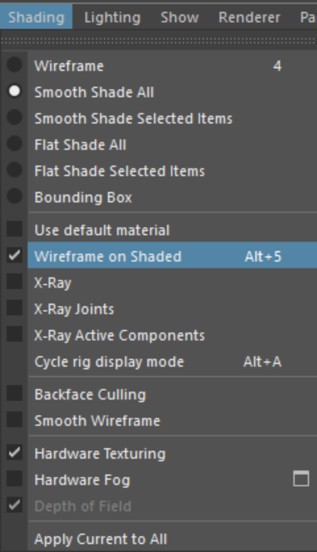
"Wireframe on shaded” option in the Viewport Shading drop-down menu.
Next Steps
Learn more about our Bake Materials action!
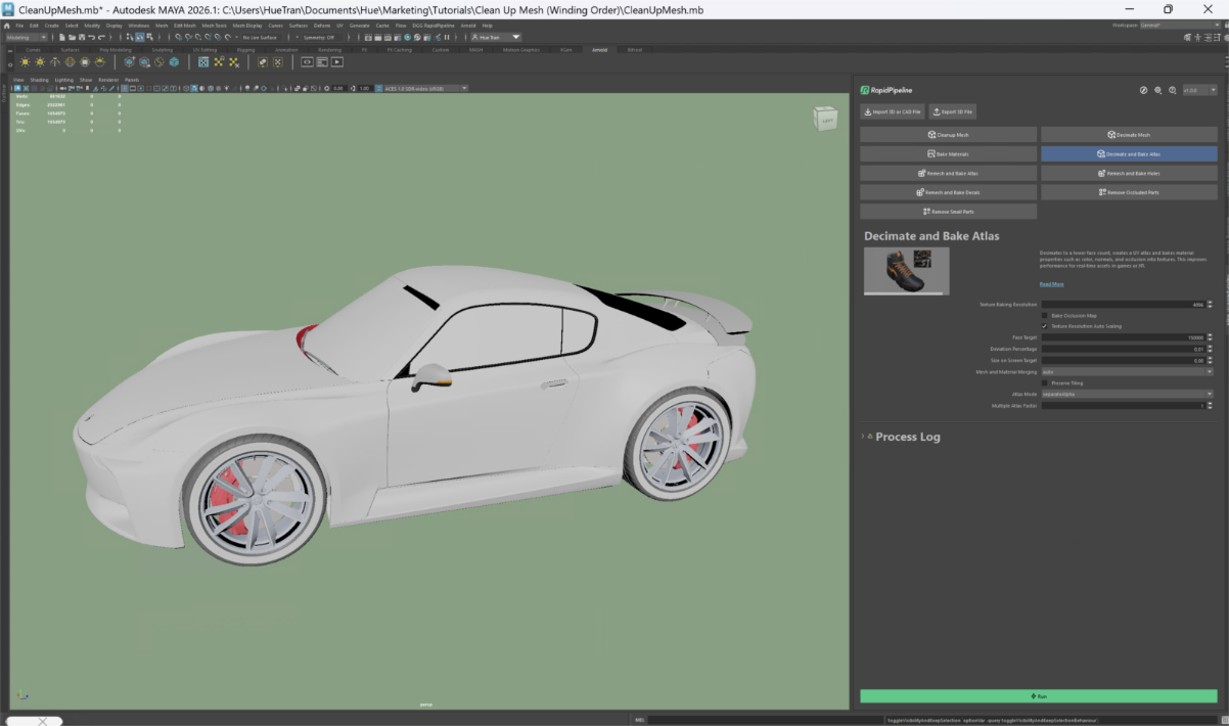
Decimate and Bake Atlas
| This tutorial contains these key points: |
|---|
| ✔️ Use the Maya Plugin |
| ✔️ Select a part |
| ✔️ Run "Decimate and Bake Atlas" Action |
| ✔️ Examine the results |
This tutorial shows how use the RapidPipeline Processor Plugin in Maya to simplify the geometry of a model with decimation and bake the material and texture information into a new UV atlas. For more information see the Maya Plugin Documentation.
The asset used in this tutorial is the "Belz's RTFKT Challenge" (https://skfb.ly/6VnPP) by Belzar Sirus is licensed under Creative Commons Attribution (http://creativecommons.org/licenses/by/4.0/).
The shoe input model.
The shoe after the optimization (baked).
Decimate and Bake Atlas Action
On the Menu Bar, click on DGG RapidPipeline and choose Show Plugin Window.
Select the model you want to optimize (if no selection is made, the whole scene will be processed).
Inside the Plugin window, choose the action
Decimate and Bake Atlas.Adjust settings as desired. Each of the settings are explained in the Actions Documentation.
Press the
Runbutton.
Decimation actions by default use a deviation target. When the Deviation Percentage is more than zero, the Face Target will act as an upper limit for the face count, instead of acting as a forced target. Increasing the Deviation Percentage will allow the optimizer to go lower when possible. However if you simply want to reach an exact face target, the Deviation Percentage should be set to 0.
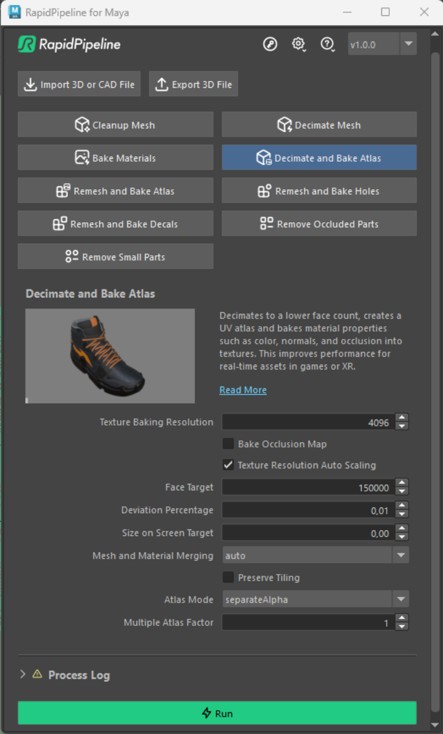
The Decimate and Bake Atlas Action opened in the Plugin.
Examine the Results
To fully check the topology optimization by enabling Wireframe on Shaded from the Viewport Shading drop-down menu, so you can see a wireframe view of your models.
Finally, you can compare the materials and texture count of input and output by opening the Hypershade window (Windows > Rendering Editors > Hypershade, or pressing the shortcut Shift + T). Make sure your object is selected and open the Material Viewer panel at the bottom, and click on the Graph Materials on Selected Objects option.
"Wireframe on shaded” option in the Viewport Shading drop-down menu.
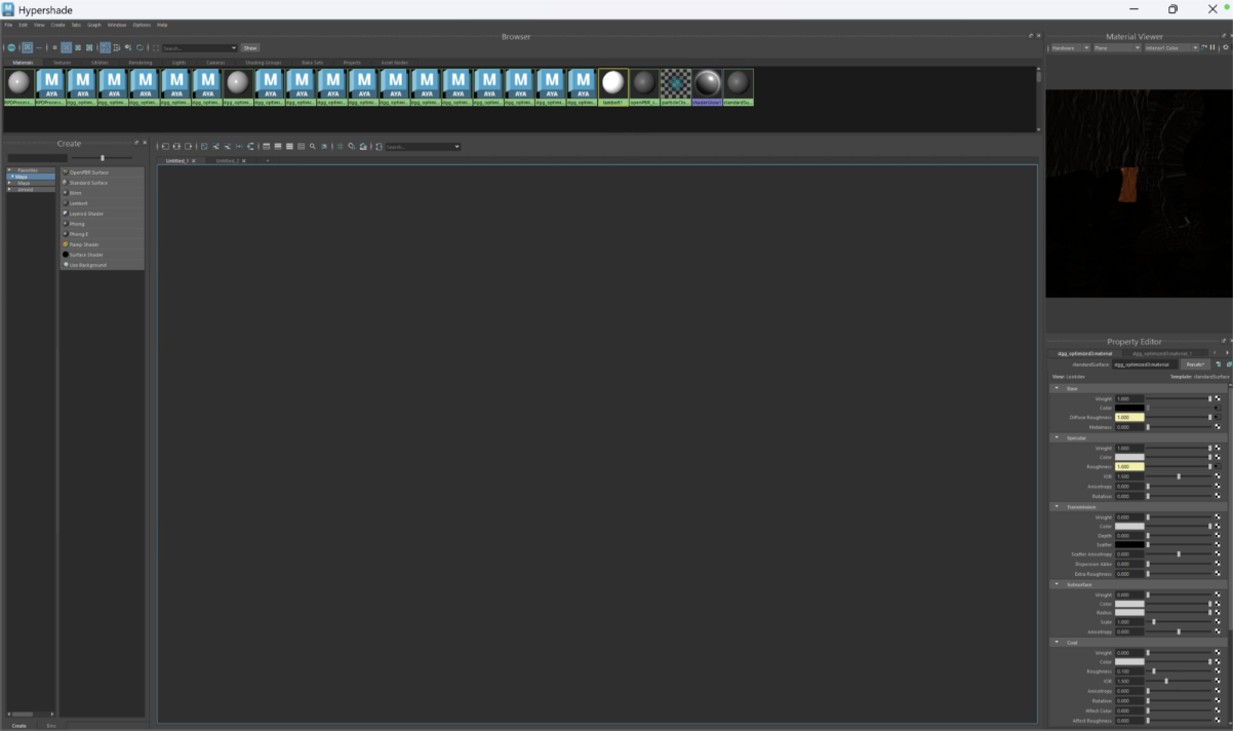
"Material Viewer Panel” inside Hypershade Window.
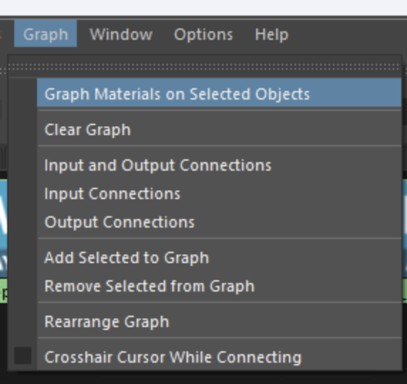
The Graph Materials on Selected Objects option.
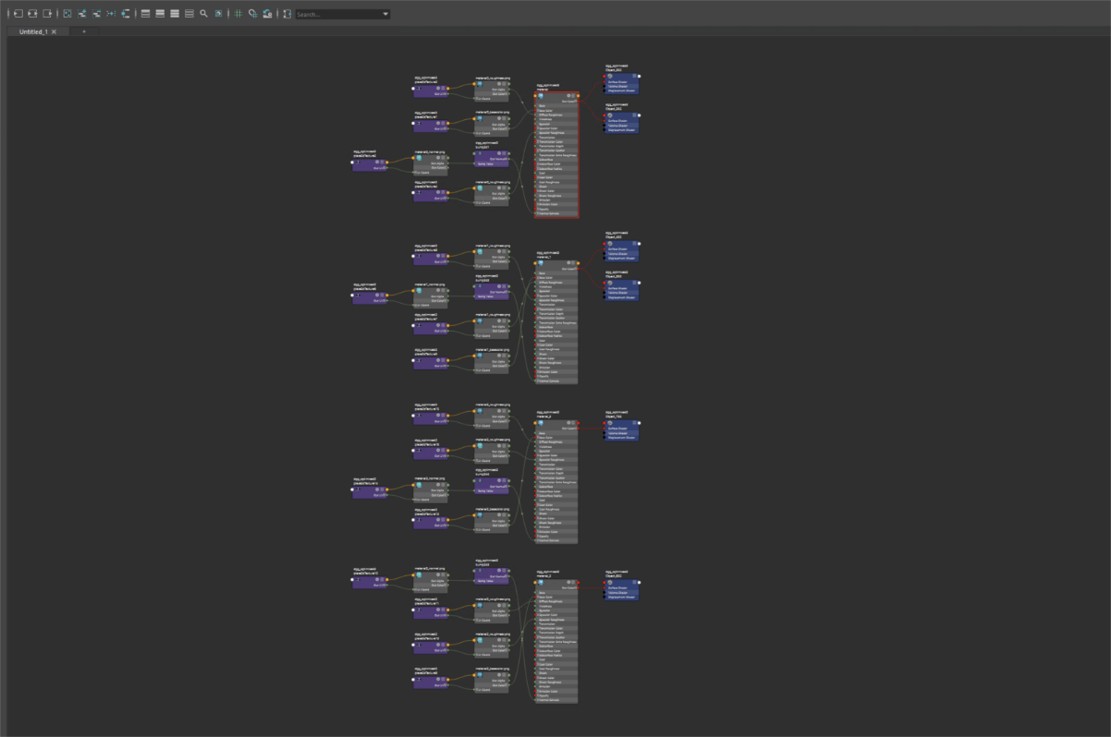
Materials & textures (in graph form) from input model.
Materials & textures (in graph form) from output model. .
Next Steps
Learn more about importing files with the Import 3D and CAD files Actions!
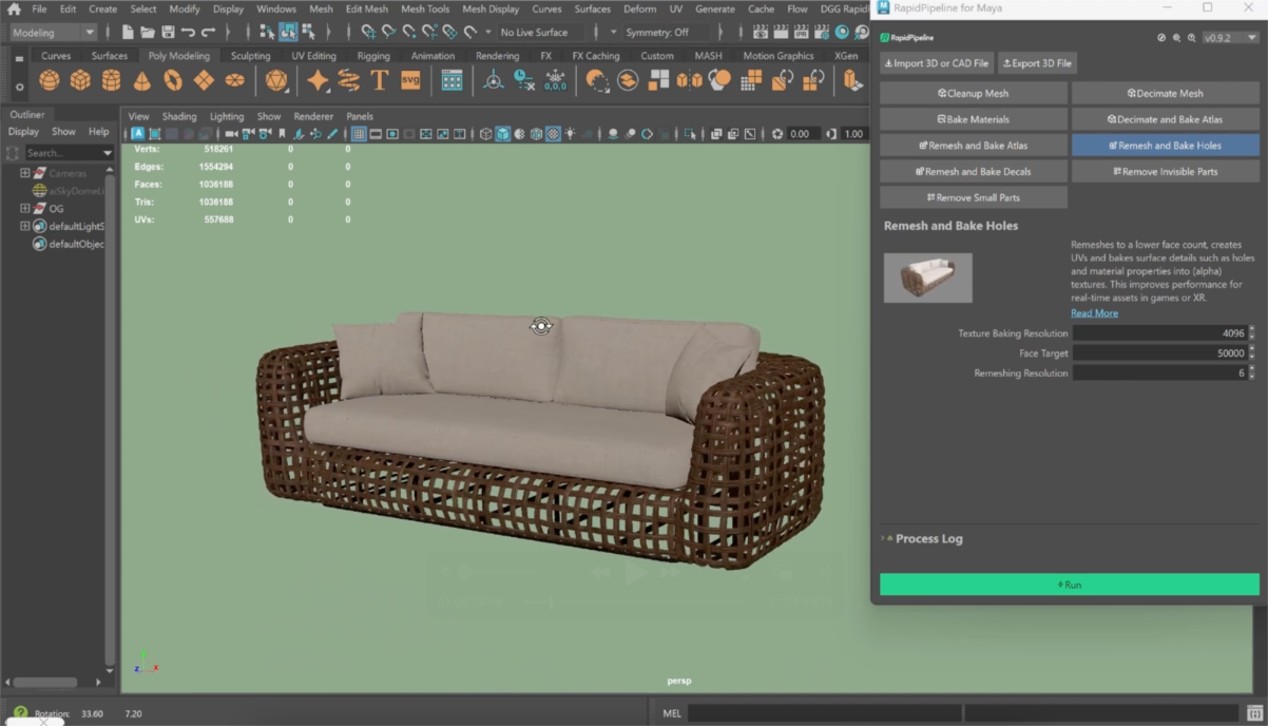
Remesh and Bake Holes
| This tutorial contains these key points: |
|---|
| ✔️ Use the Maya Plugin |
| ✔️ Select a part |
| ✔️ Run "Remesh and Bake Holes" Action |
| ✔️ Examine the results |
This tutorial shows how use the RapidPipeline Processor Plugin in Maya to simplify a 3D model. It walks through the use of the Remesh & Bake Holes Action , and explains how to use it for closing holes and baking them into Alpha information. For more information see the Maya Plugin Documentation.
The asset used in this tutorial is a high-resolution wicker sofa model available free here from Sketchfab. Credits: "wicker sofa" (https://skfb.ly/prBJM) by Md Imamul Hasan is licensed under Creative Commons Attribution (http://creativecommons.org/licenses/by/4.0/).
The wicker sofa input model.
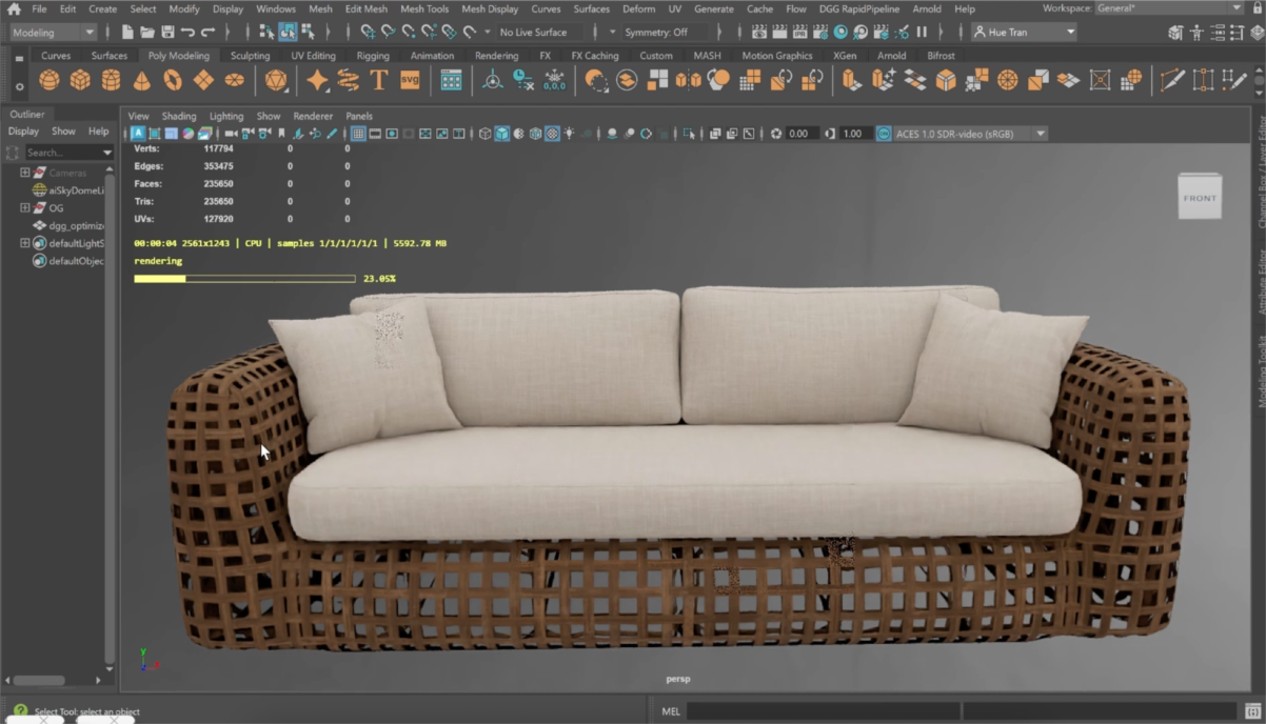
The wicker sofa after processing the wicker.
Here is a preview of the processing´s output: the original wicker (top) is 811,008 triangles, and the output wicker (bottom) is 10,476 triangles.
The wicker has been remeshed, and textures were baked including an alpha map for the holes.
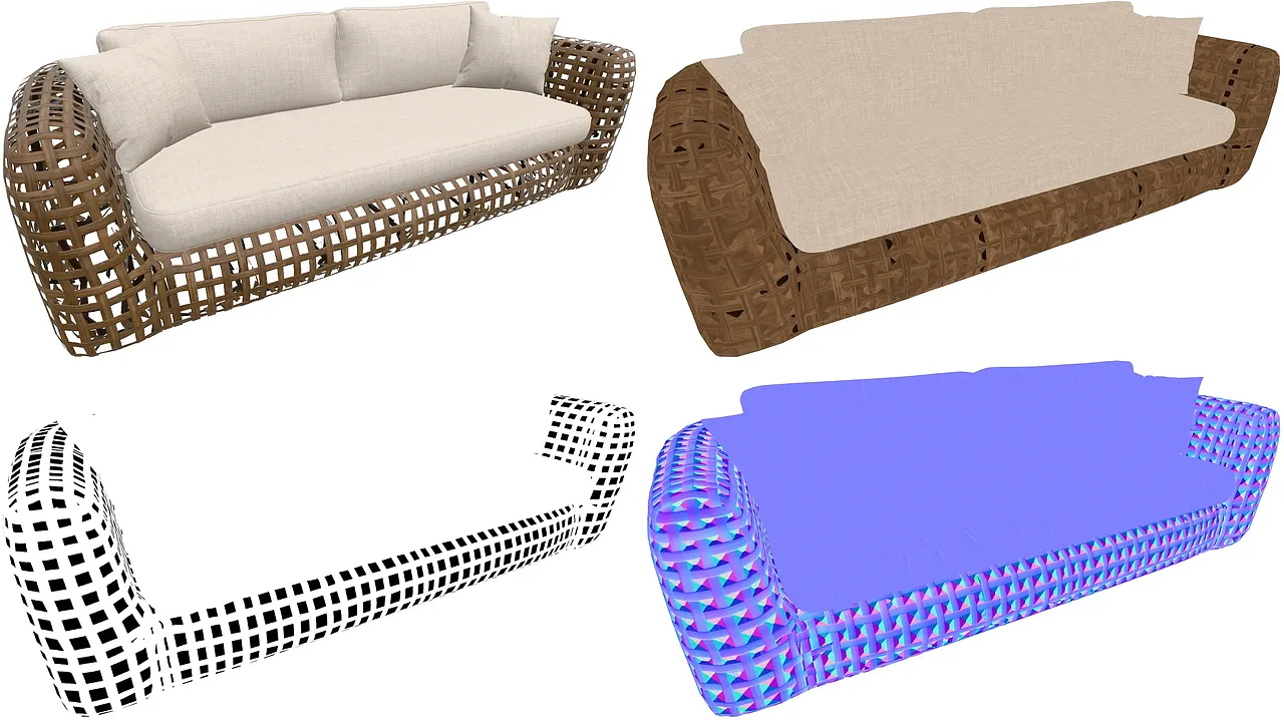
The remeshed wicker sofa (upper left), baked color (upper right), baked alpha (lower left), and baked normal (lower right).
Remesh and Bake Holes Action
Open the Plugin via the Menu Bar, clicking on RapidPipeline and Show Plugin Window.
Select the wicker mesh by clicking on it in the Viewport.
Inside the Plugin window, choose the action
Remesh and Bake Holes.Adjust settings as desired. Each of the settings are explained in the Actions Documentation.
Press the
Runbutton.
Location of the UI in the Menu Bar.

The Remesh and Bake Holes Action opened in the Plugin.
Examine the Results
Maya default viewport settings cause some issues with the baked alpha on the output model. To prevent this issue, open the Renderer Settings by clicking on the square icon. Then, set the Transparency Algorithm to Alpha Cut.
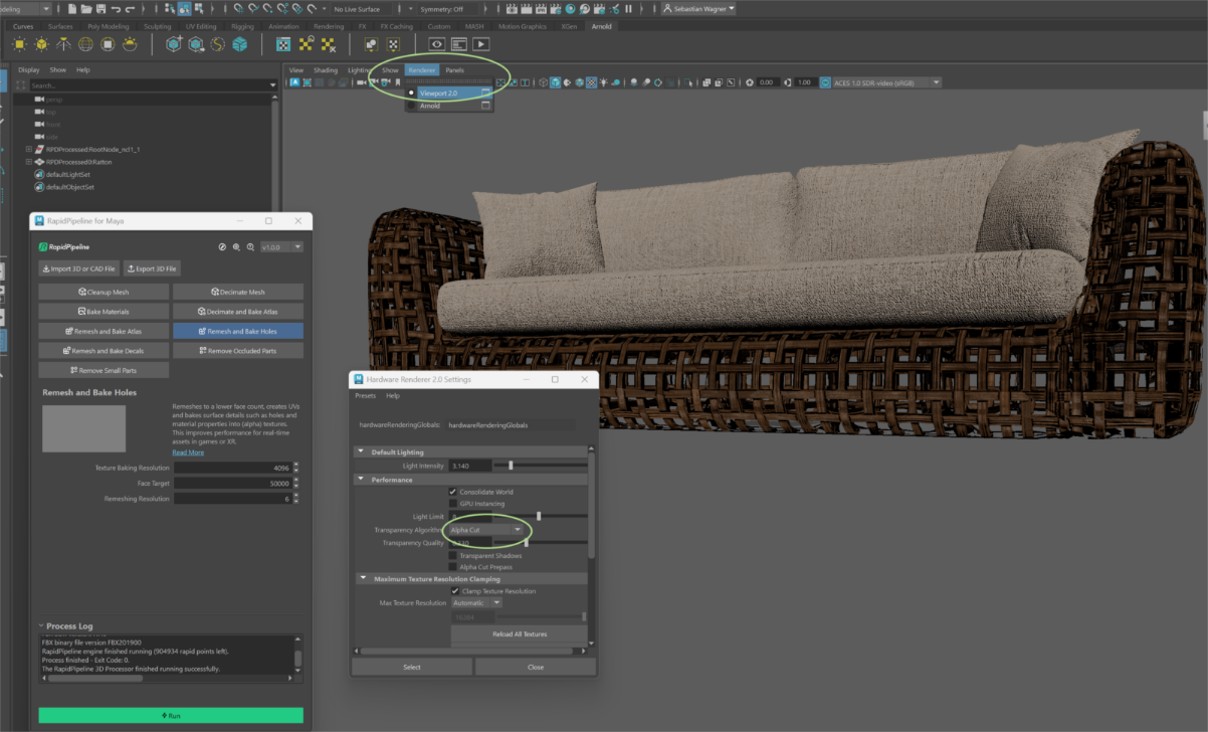
"Alpha Cut” Transparency Algorithm the Renderer Settings.
To see the difference in the mesh and inspect the holes-closure even closer, select the “Flat Shaded” option from the Shading Menu. Optionally, enable “Wireframe on Shaded” as well to overlay the mesh edges on top of the flat shading. You will so be able to see the mesh differences between input and output.
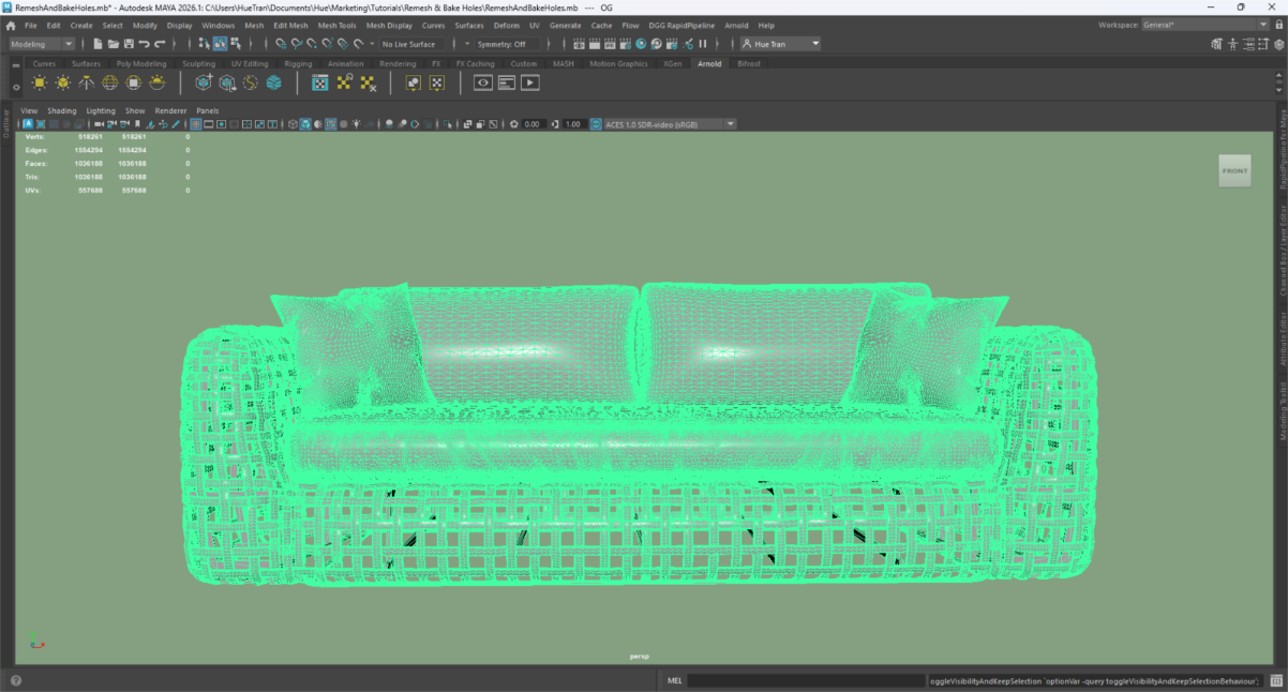
The Input in ”Solid” + “Wireframe on Shaded” Shading.
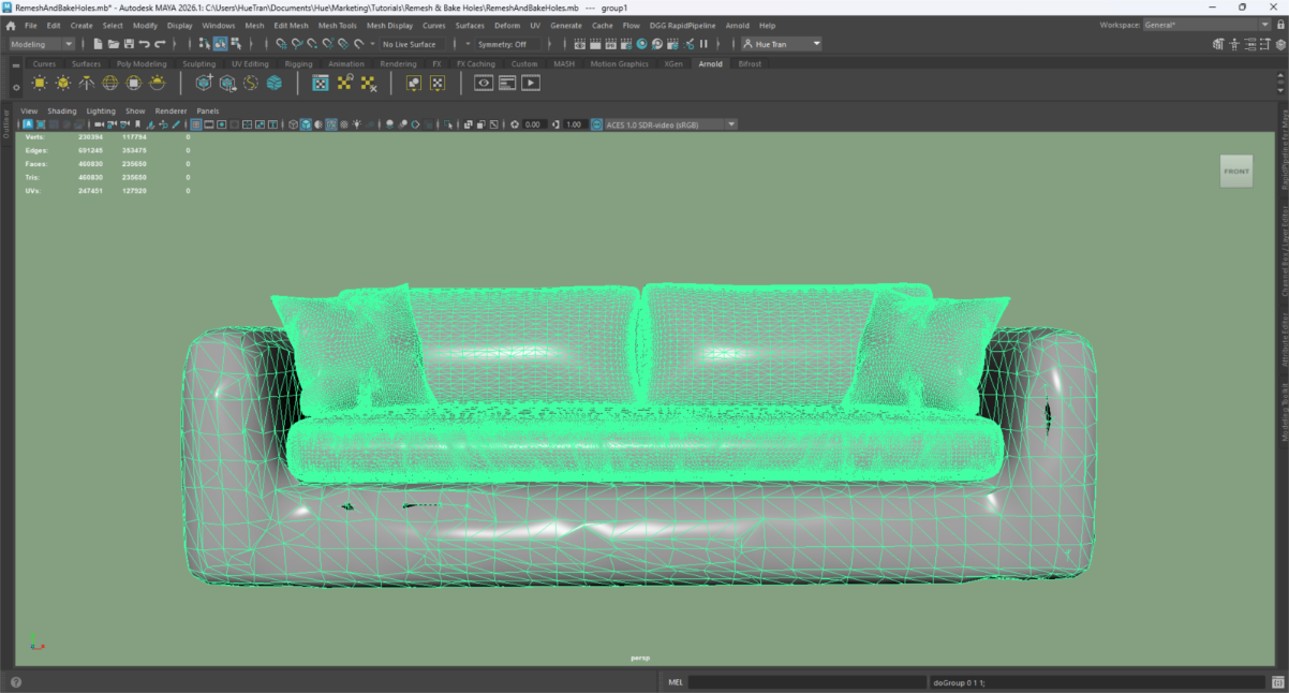
The Output in ”Solid” + “Wireframe on Shaded” Shading.
Next Steps
To optimize the cushions, try the Decimate and Bake Atlas action!
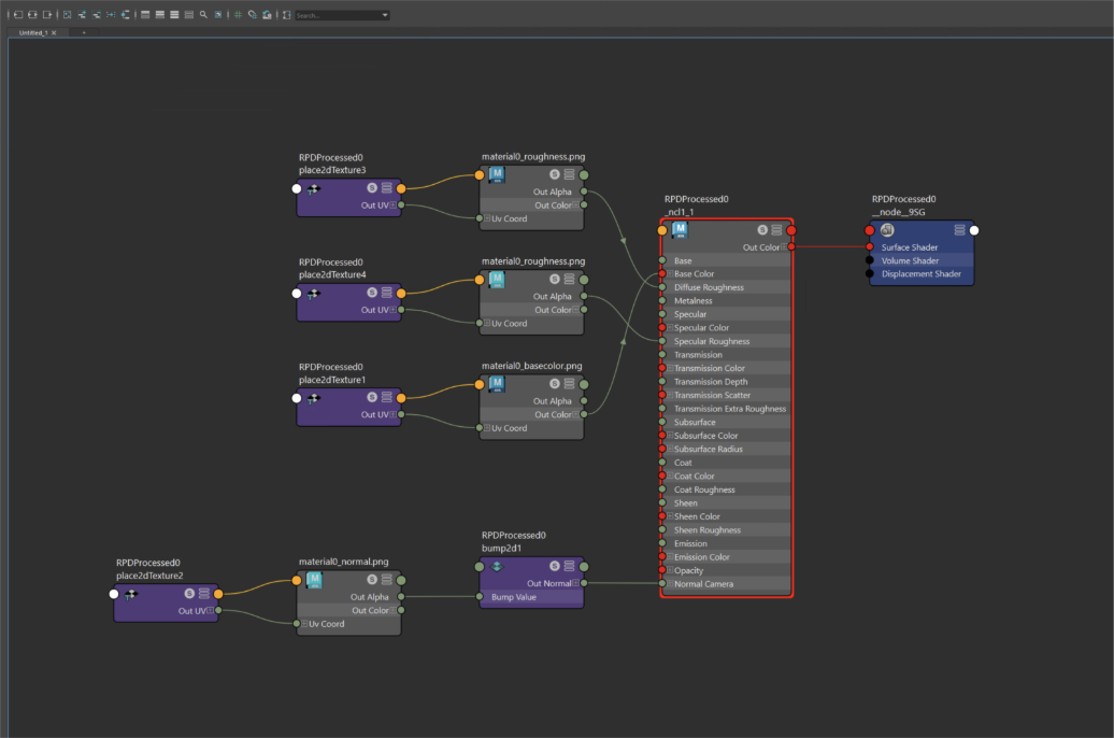
Bake Materials
| This tutorial contains these key points: |
|---|
| ✔️ Use the Maya plugin |
| ✔️ Select a part |
| ✔️ Run an action |
| ✔️ Examine the results |
This tutorial shows how use the RapidPipeline Processor plugin in Maya to simplify the shader graph complexity of a model´s materials by baking atlases. For more information see the Maya plugin Documentation. The Add-On runs on a powerful 3D data optimization and automation toolset, for more about this see the 3D Processor Reference.
The asset used in this tutorial (https://skfb.ly/6VnPP) by Belzar Sirus is licensed under Creative Commons Attribution (http://creativecommons.org/licenses/by/4.0/).
The input shoe model, with materials and textures

The shoe after baking, with new material and baked textures
The input shoe (top) has 3 materials with 12 textures; and the output (bottom) has 1 material and 4 textures.
Bake Materials Action
Select the model you want to optimize (if no selection is made, the whole scene will be processed).
Inside the plugin window, choose the action
Bake Materials.Adjust settings as desired. Each of the settings are explained in the Actions Documentation.
Press the
Runbutton.
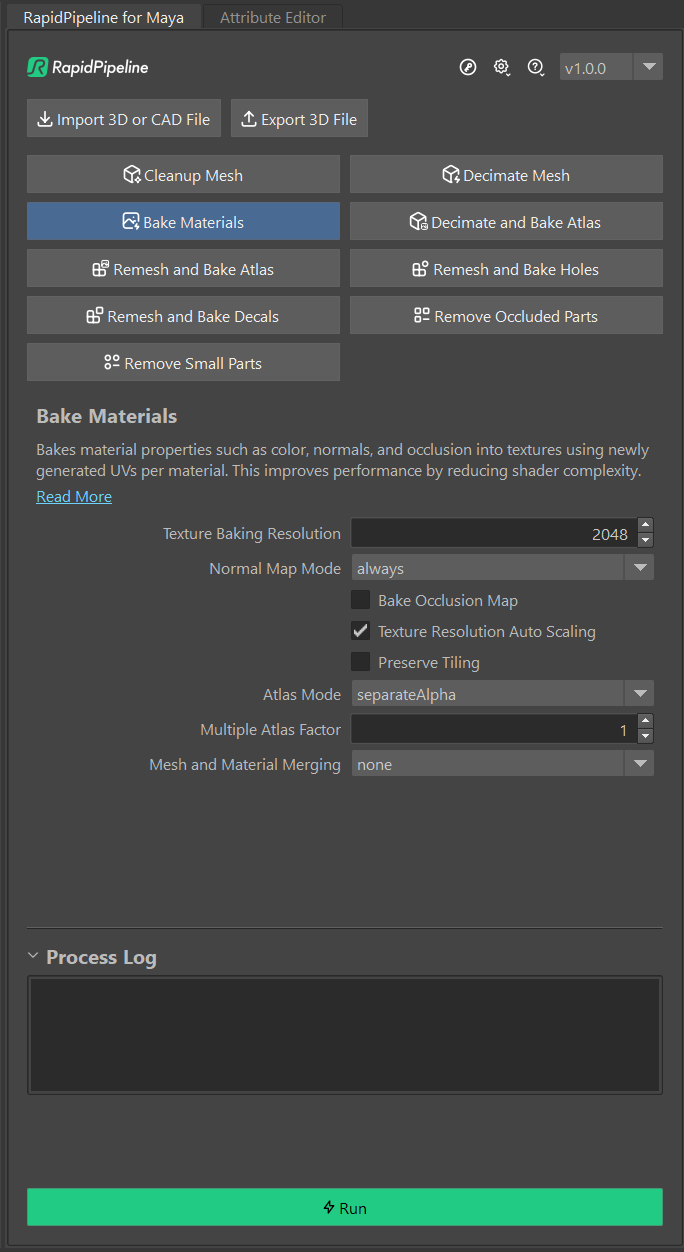
The Bake Materials action opened in the plugin
Examine the Results
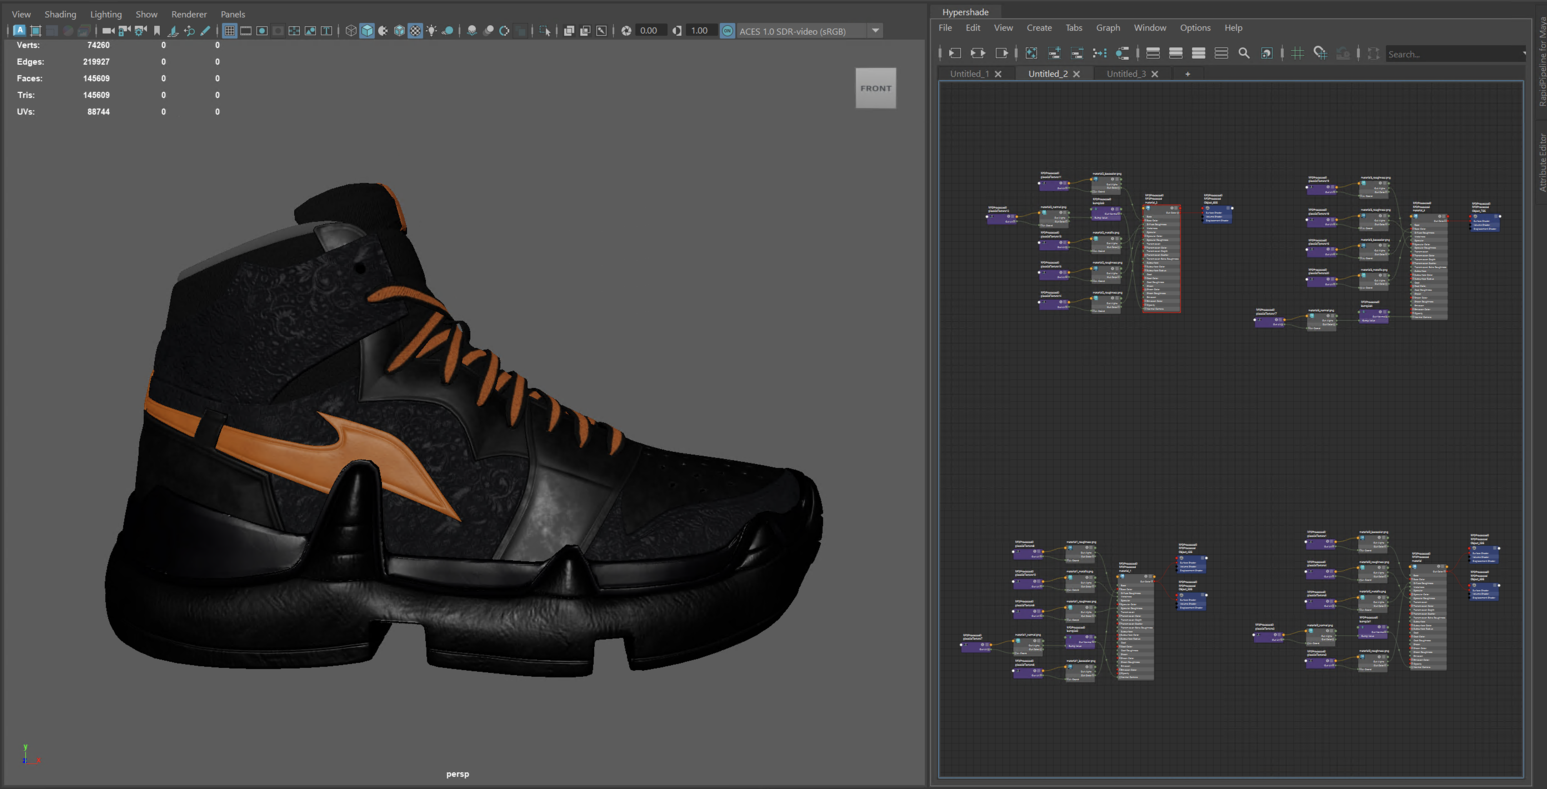
You can compare the materials and texture count of input and output by selecting each of them and opening Hypershade.
Display the Hypershade window to examine materials and textures
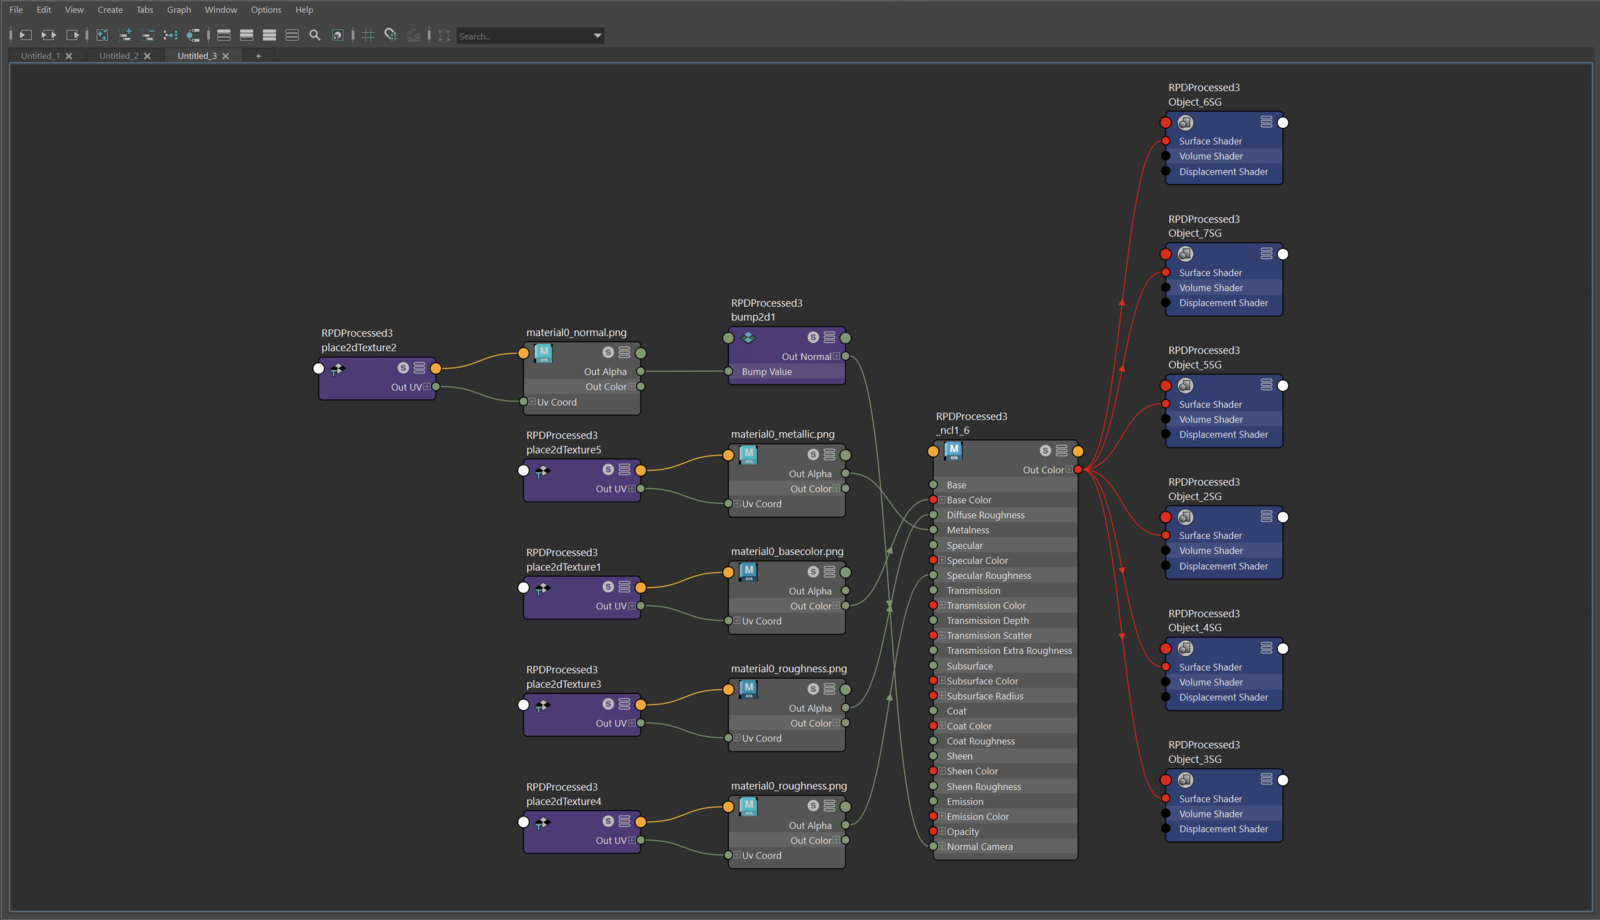
The output material and textures
Next Steps
Learn more about our Decimate and Bake Atlas action!