RapidPipeline for Maya
Overview
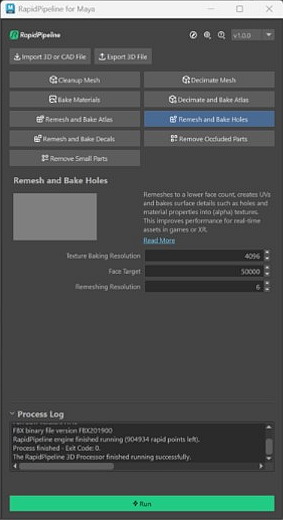
The RapidPipeline Maya Integration Plugin enables you to use RapidPipeline Actions directly within the Maya UI as a plugin.
Process, optimize & simplify selected 3D models interactively and 100% locally.
System Requirements
- Maya Version: 2025 or later
- Operating System: Windows 10/11 (64-bit), MacOS, or Linux
- Memory: 8GB RAM minimum, 16GB recommended
- Storage: 1GB free space for plugin installation
- Internet Connection: Required for plugin license authentication only
Installation
How to install the RapidPipeline Maya Integration Plugin.
- Uninstall earlier versions of the plugin before installing a new version.
1. Get a RapidPipeline Account with Integrations
Start your 14-day free trial or subscribe to a Desktop plan.
If a RapidPipeline subscription is already attached to the account, and if the plan includes API access, then RapidPipeline Integrations are available for use.
2. Download the package
Sign in the RapidPipeline Web Platform.
Scroll down to see the Integrations, and download the latest installer for your application.
If you need a different installer version, click on
More Downloads.
The Integrations Download page offers all current available RapidPipeline Integration packages for download.
Please note the specific naming of the packages for different operating systems (e.g. macOS) and the different tags of the installer packages depending on additional functionalities (e.g. CAD Edition). Some packages such as CAD Edition might require a specific subscription tier or addon package. Learn more on the RapidPipeline Pricing Overview Page.
If you are an end-user of the plugins and do not have your own account, or you are an account manager and want to distribute the plugin packages to users, please refer to our Public Integrations Downloads page. Note that a valid Token from a RapidPipeline account is still required to activate the given integration and generate a seat.
3. Extract the package
We provide download packages as a compressed ZIP file using the Autodesk Application Plug-in Package Format. The contents (a folder called RapidPipelineForMaya) should be extracted into a specific location, depending on the operating system:
 Extraction for Windows
Unzip the "RapidPipelineForMaya" folder.
Navigate to the Autodesk
ApplicationPluginsfolder. On Windows, this can typically be found by opening a File Explorer and entering this into the address bar:%PROGRAMDATA%\Autodesk\ApplicationPlugins
Move the extracted
RapidPipelineForMayafolder into the Autodesk ApplicationPlugins folder. You should then see this folder structure:%PROGRAMDATA%\Autodesk\ApplicationPlugins\RapidPipelineForMayaRestart Maya.
In Maya, open
Windows, go toSettings/Preferences, go toPlug-in Manager, then load the plugin and set it toAuto-Load.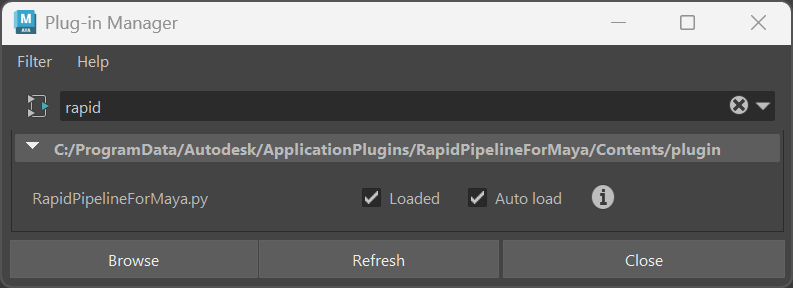
 Extraction for MacOS
Unzip and move the "RapidPipelineForMaya" folder to the following location:
/User/Shared/Autodesk/ApplicationAddins/RapidPipelineForMaya/If the "ApplicationAddins" folder does not exist in this location, a folder should be created with this exact name, and the "RapidPipelineForMaya" folder should be unzipped into it.
Open the MacOS
System Settings, go toPrivacy & Security, go toFull Disk Access, then add Maya. This will allow RapidPipeline to load your license properly.Restart Maya.
In Maya, open
Windows, go toSettings/Preferences, go toPlug-in Manager, then load the plugin and set it toAuto-Load.
 Extraction for Linux
Unzip and move the "RapidPipelineForMaya" folder to the following location:
Home/Autodesk/ApplicationPlugins/RapidPipelineForMayaRestart Maya.
In Maya, open
Windows, go toSettings/Preferences, go toPlug-in Manager, then load the plugin and set it toAuto-Load.
4. Enter the RapidPipeline Authentication Token
Watch the video above, or for step-by-step instructions see Integrations Seat Management to learn how to generate and install an Authentication Token.
5. Learn How to Use RapidPipeline
For step-by-step guides see the RapidPipeline for Maya Integration Plugin Tutorials.
For detailed reference documentation see the Actions Documentation.
Congratulations! The RapidPipeline Maya Integration Plugin is now ready to be used.
Upgrading the Plugin
To upgrade to a new version of the plugin, we recommend uninstalling the old plugin first.
Close all Maya installations currently running.
Delete the previous
RapidPipelineForMayafolder from the Autodesk ApplicationPlugins folder in:%PROGRAMDATA%\Autodesk\ApplicationPluginsInstall the new version by following the installation steps outlined above.
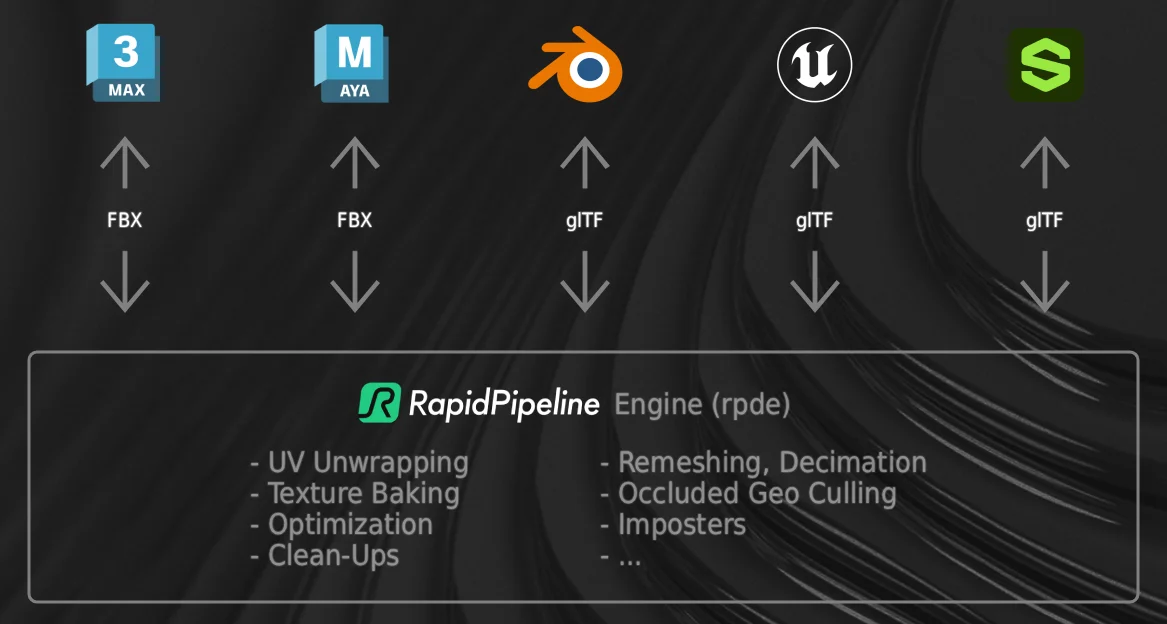
Internal Data Exchange
All our integrations leverage the RapidPipeline 3D Processor as an external engine to perform 3D data processing, behind the scenes.
The 3D data is sent to/from the application by leveraging each application's most compatible file format.
Known limitations
Currently, only Static Meshes are supported. Animated meshes are not supported.
Only Autodesk Standard Materials are supported, because the plugin uses FBX as an intermediary format.
Our initial focus is on supporting Autodesk Standard Material where we support these PBR properties: basecolor, opacity, diffuse roughness, specular roughness, metalness, and normal maps.
The plugin Importer will always use Autodesk Standard Material.
Procedural and geometry-dependent texture map nodes, such as Brownian and V-Ray Dirt, will not be exported correctly. For Maya we currently do not offer an automated solution, but we welcome you to contact us about potential support in the future via RapidPipeline DCC Importer.
Files created during the optimization process will be stored in the same folder your scene is stored in (under rpd_temp_files). These files are kept resident because textures may be referenced by your Maya scene. Should you choose to delete some of these results in your Maya scene, the files with optimization/import data (typically FBX files) will remain where they were. You are free to delete any such data that is not referenced anymore.
If you work in a scene that has not been saved yet these results will be stored and remain in your RapidPipeline for Maya plugin folder (as per your installation, see above.) If you then save the scene, these files will still remain and be referenced there, although any new new files created will now be stored in the scene folder.
Contact Us
Let us know how it's going, we would like to get your quick feedback here!