Processing your models
The RapidPipeline Web Platform provides you with multiple methods to perform alterations on your assets, from quick and simple, to deep and complex, depending on what you need.
Convert an Asset into Additional Formats
Uploaded assets are automatically converted into a couple formats, and the Convert button can be used to output additional formats. Note that these conversions apply no optimizations, this is a direct conversion only. To optimize an asset, it's best to use an Action or a Preset.
Click the Convert button on the right side of any imported asset, to perform a direct conversion into another format:

The Convert button opens a popup window with several choices:
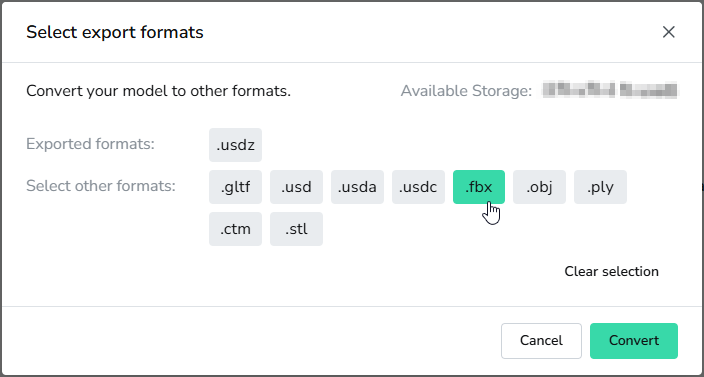
- Exported formats = These are already created, click any button to download the file immediately.
- Select other formats = These are available for conversion, select as many as you wish then press the Convert button.
Download single conversions by expanding an asset, then clicking any button in the Converted Files section:

Download all conversions by opening the three-dot menu, and choosing Download:

Use an Action or Preset on a Single Asset
Uploaded assets can be processed one at a time by an Action or a Preset.
On the right end of any asset, click Run 3D Processor, it looks like a lightning bolt:

Use the switch to choose between Actions or Presets, as desired:

Open any Action or Preset, and adjust settings as needed.
Click the Run 3D Processor button to initiate processing.

The popup window can be closed, and the current progress will show under each asset.
Use an Action or Preset on Multiple Assets
Uploaded assets can be batch-processed with an Action or a Preset.
Select as many assets as you wish.

Click the Run button.

Use the switch to choose between Actions or Presets, as desired:
Open any Action or Preset, and adjust settings as needed.
Click the Run 3D Processor button to initiate processing.
The popup window can be closed, and the current progress will show under each asset.
After processing an asset, you can verify the quality using our built-in quality assurance tools.