RapidPipeline Twin Studio
An introduction on how to use the RapidPipeline Twin Studio desktop application.
The plugin runs on a powerful 3D data optimization and automation toolset, more about it here: 3D Processor Reference.
Basic Usage
RapidPipeline Twin Studio is launched by running the executable located in the installation folder.

For setup instructions please refer to RapidPipeline Twin Studio Installation.
Interface Overview
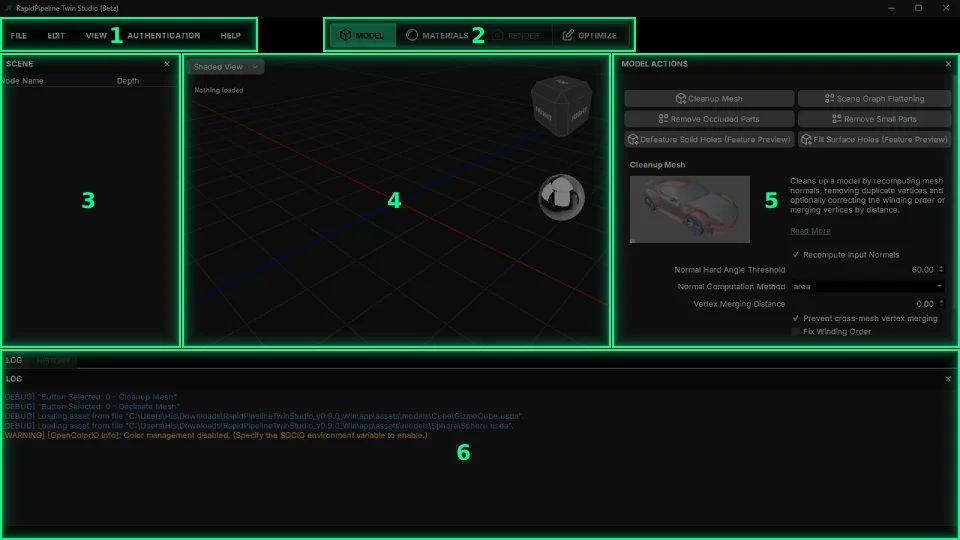
The RapidPipeline Twin Studio interface is divided into sections:
- Main Menu Bar
- Action Tabs
- Scene Tree
- 3D View
- Actions
- Logging Window / Command History
1 - Main Menu Bar
The File Menu is used to import and export 3D asset files. Saving/loading of Twin Studio project files is not yet supported. Import and export formats are currently limited in this early Beta Release.
The Edit Menu can be used for Undo (Ctrl+Z) and Redo (Ctrl+Y).
The View Menu controls the visibility of the main interface elements. Options change depending on the current Actions Tab.
The Authentication Menu opens a popup window for controlling the licensing of the application, please see Integrations Seat Management.
The Help Menu contains a Documentation link, a Feedback form link, a Support contact form, and an About window with information about the software.
2 - Action Tabs
Model Tab has tools for manipulating the geometry and hierarchy in the scene.
Materials Tab has tools for adding and adjusting materials.
Render Tab is currently inactive in this early Beta Release. To render your edited assets, export to a suitable format and import into a rendering software of your choosing.
Optimize Tab has tools for optimizing the asset.
3 - Scene Tree
Examine the node hierarchy in the asset.
Rename a node by double-clicking on it.
Hide/unhide a node by clicking the eye icon.
Select nodes to choose which are affected by operations.
- Select a range with left-mouse-drag.
- Select more than one by holding the Ctrl key.
- Select a range by holding the Shift key.
4 - 3D View
3D View Menus:
- View menu (upper left) contains view modes: Shaded, Wireframe, UV View.
- Statistics (upper left) shows info about the nodes in the scene.
- Directional Cube (upper right) can be clicked to snap to various viewing angles.
- Lighting Ball (upper right) can be clicked to adjust environment lighting.
Navigation Controls:
- Rotate the view with the left mouse button.
- Pan the view with the middle mouse button.
- Zoom the view with the middle mouse wheel.
Model Selection
- Left-click a mesh node to select it. The selected mesh is highlighted in transparent blue.
- Shift+Left-click to select multiple meshes.
- Ctrl+Shift+Left-drag to window-select meshes. Any meshes touched by the selection preview shape will be selected.
UV Unwrapping
- Right-click on a mesh node to open the Unwrapping menu.

- Choose a UV method, and it will be applied to the mesh under the cursor.
- Use View Menu > UV View (at upper left in the 3D View) to examine the new unwrap.
- Right-click on a mesh node to open the Unwrapping menu.
5 - Actions
Actions displayed here will change depending on the current Actions Tab.
Choose an Action by clicking on its title button, select meshes it should act upon, adjust the Action settings as desired, then press the Run button at the bottom.
Actions documentation explains the settings available within each Action.
6 - Logging Window & Command History
The Log window tracks each command performed in the application, currently used for debugging. 
The History window records repeatable commands, which will be used for automation processing. (Coming soon!) 
Import a 3D Model
All RapidPipeline operations are powered by Actions which offer a curated set of common functions for quick and easy processing.
Open the File menu, and choose
Import Scene.
Browse for the file to be imported. The supported import formats are currently limited.
Once the file is opened, a list of import functions are shown: Choose the appropriate import functions for your chosen file.
Adjust the settings as desired, then press
Import.The file is processed and imported into the scene. You can now assign materials and process the file!

Export a 3D Model
Open the File menu, and choose
Export Scene.

Browse for the location to export to, and enter a file name. Choose the export format, and press Save.

Export options are not yet implemented, so currently the default options are used.
In the future you can expect to have full control over all export settings.
For installation and current limitations please see RapidPipeline Twin Studio Installation.